Artekit PropBoard: Halo Reach M6G
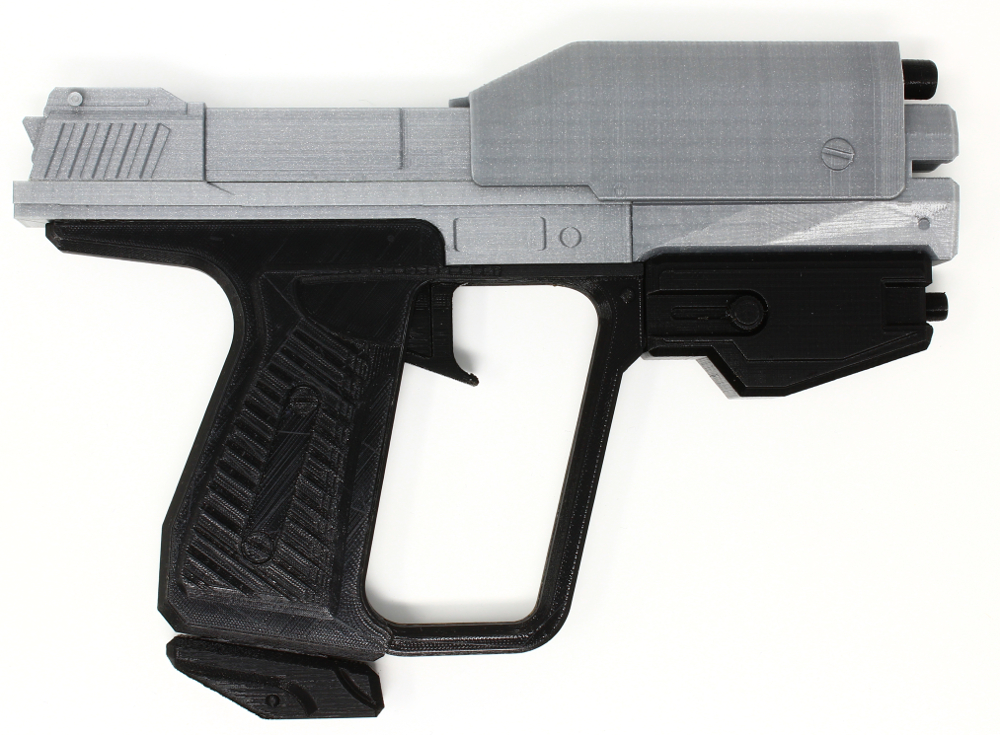
PropBoard-powered, 3D printed Halo: Reach M6G Magnum Prop.
Introduction
In this tutorial we are going to use the PropBoard to create a 3D-printed prop based on the M6G Magnum from the Halo Reach videogame.
The prop includes the mechanism for the trigger, that will signal the PropBoard to play a gunshot sound from the micro SD and to animate an LED mounted at the barrel. The software includes the logic for magazine depletion and can be reloaded by gently hitting the gun with the hand (with the help of the motion sensor).
Beyond the scope of reproducing the actual M6G, we added a little “combo” game and the possibility to switch from single fire mode to a full-auto mode and back.
3D printing
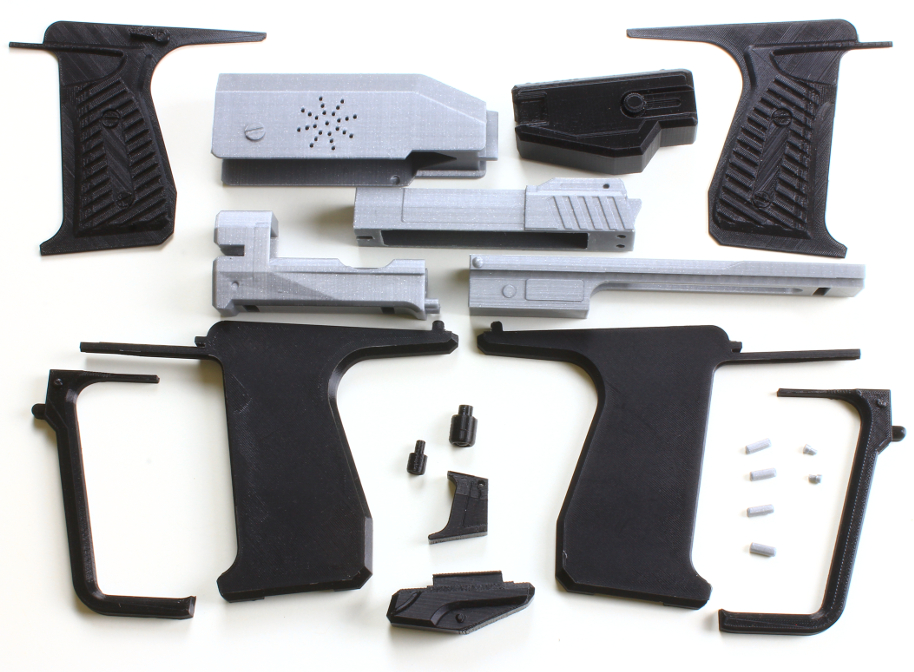
There is a total of 21 parts to print for this assembly. We printed some parts in black PLA and other in silver PLA. It took around of 12 hours of printing. No support material is required. Maybe for the “laser” part that has a bolt that may fall if printed without support material.
Most of the parts were printed with 20% infill and 0.2mm layer height. The only parts printed with 0.1mm height were the grip covers and the magazine, that we wanted with a more detailed look.
We didn’t any post processing after, so for a more refined look you can definitely sand the printed parts.
You can find the files on Thingiverse or download them by clicking this link.
Required materials
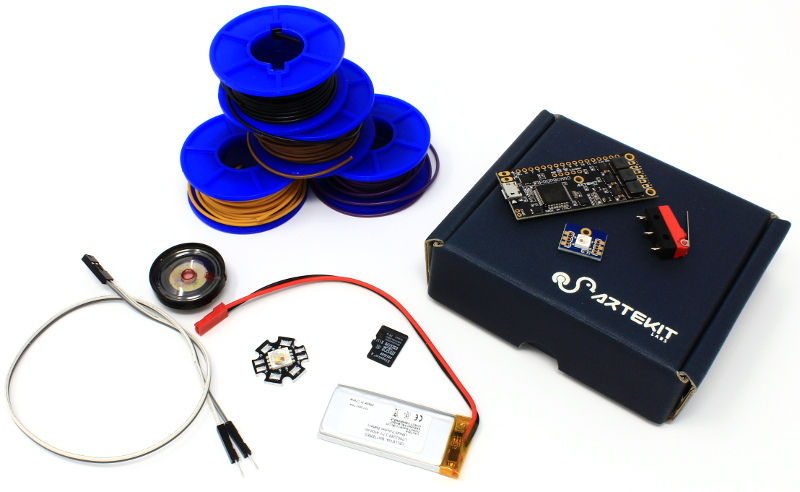
For assembling the electronics we are going to use:
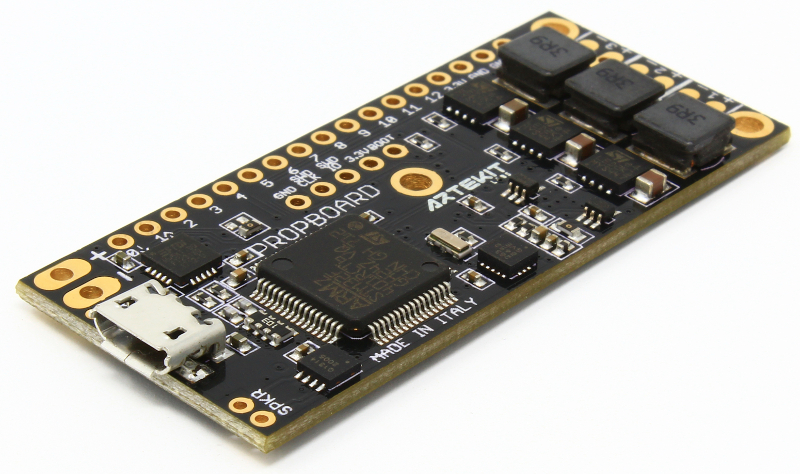
- A PropBoard
- A micro-switch for the trigger. We are using this one we have in stock. The printed parts perfectly fit the measure of this specific switch.
- A small 3.7V battery. We are using this one here.
- A high-brightness RGB LED. We use this one from ProLight Opto. In alternative, there is space available to fit a WS2812B RGB LED but we will not be covering this in this guide.
- A 28mm or smaller speaker.
- Some jumper wires. Can be male-female, or male-male. We are using the male connector to connect the battery. It may vary depending on the kind of battery you are going to use.
- Wires.
- A micro SD.
For this tutorial we are using a high-brightness LED. Looking directly at a high-brightness LED may damage the eye. Ah! don’t go around pointing the prop at people’s faces! If you do, please lower the maximum current applied to the LEDs by using the HBLED::begin() function.

The materials required for assembling the parts are:
- glue
- something to hold the speaker and LED in place. You can use kapton tape (or any adhesive tape) or hot glue. We used hot glue in this assembly and proved to be very reliable.
Assembling
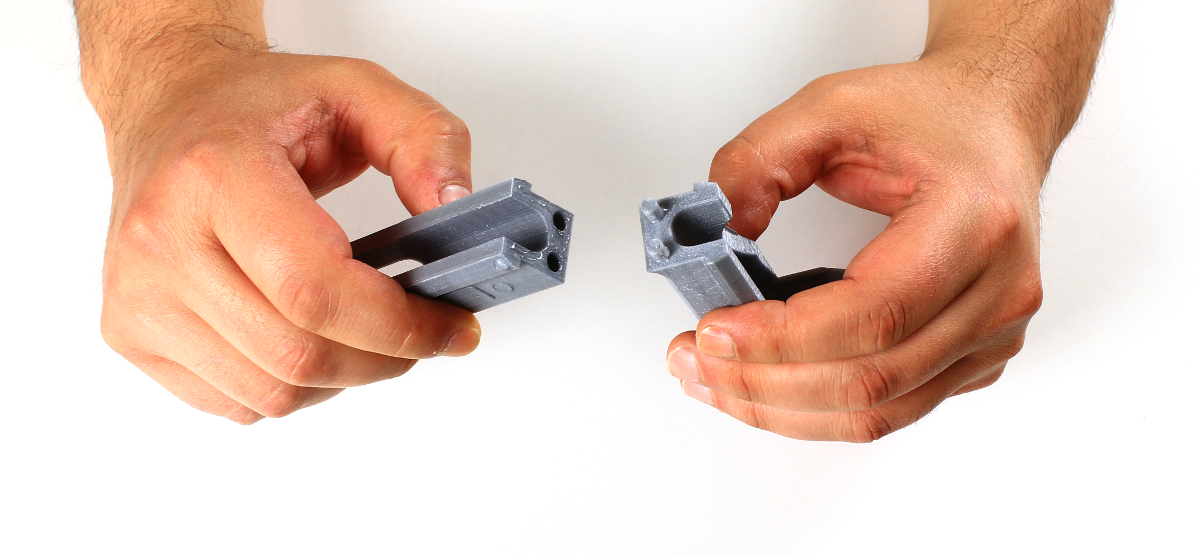
1) Start by applying glue on the front and back parts and fixing them together. This section of the assembly is essential and has to be well glued. Use the columns on the front part as a guide into the back part, and be sure it’s leveled.
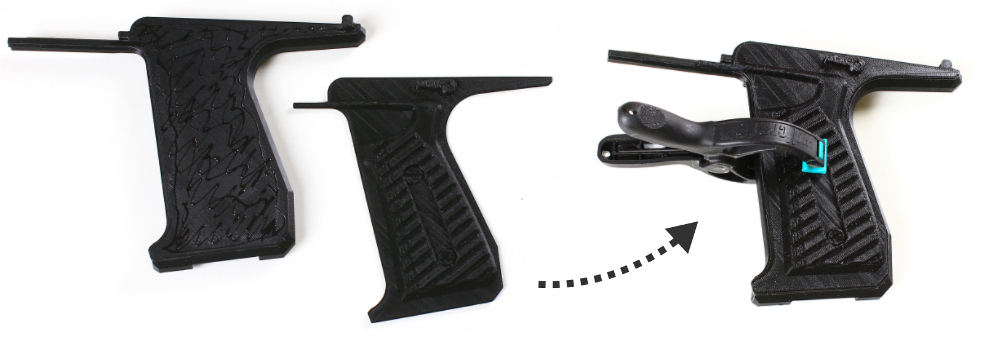
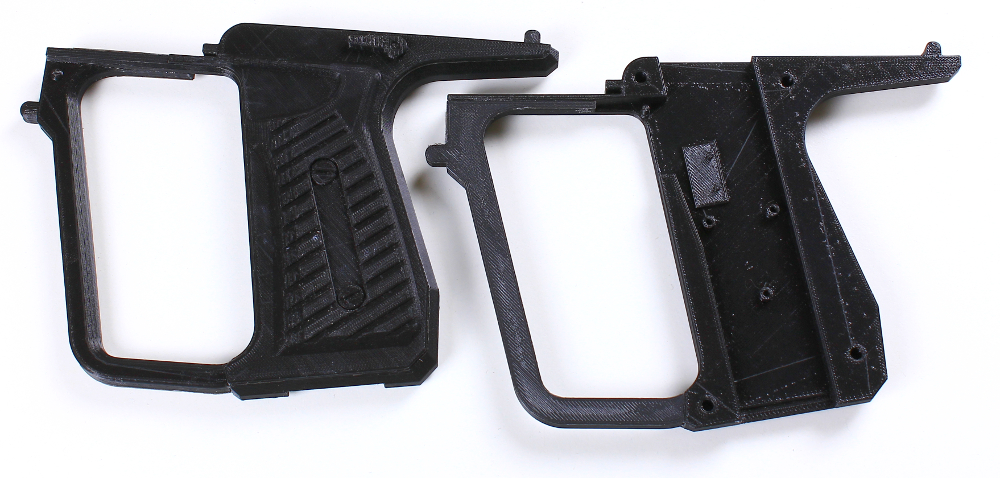
2) Then glue the grip covers to the both the left and right grips. Make sure the boarders are glued so there is no space between the grip and the cover.
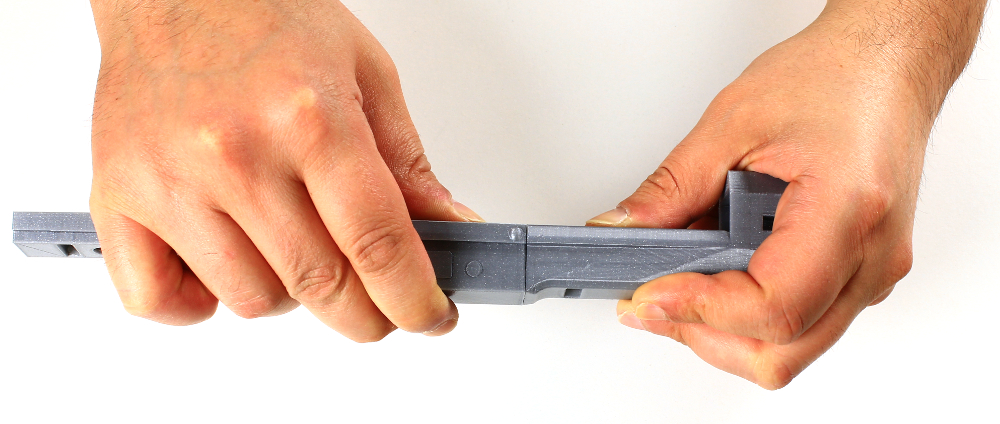
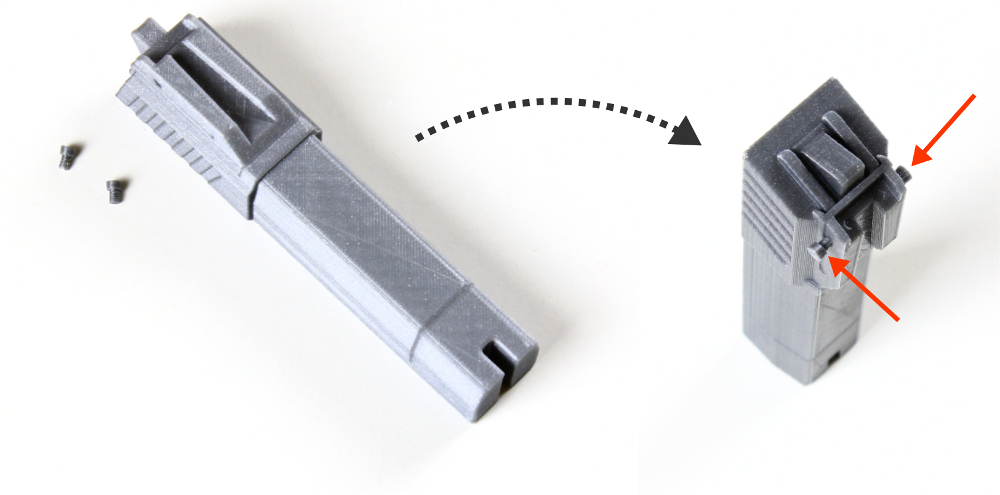
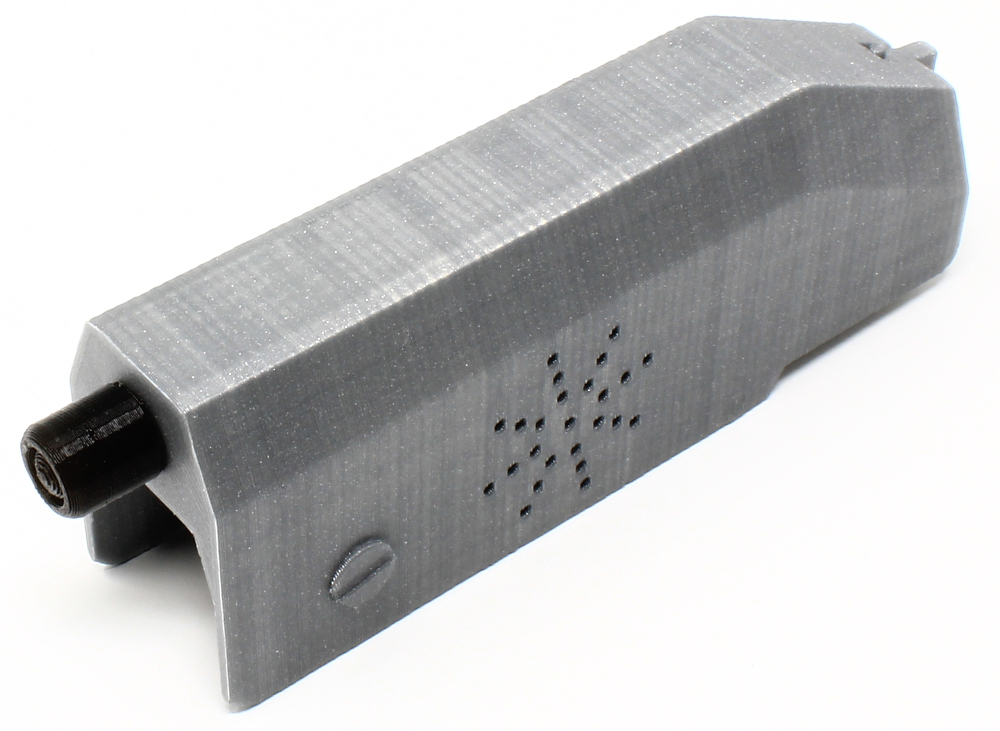
3) Assemble the slider part by glueing the two little screws at the back.
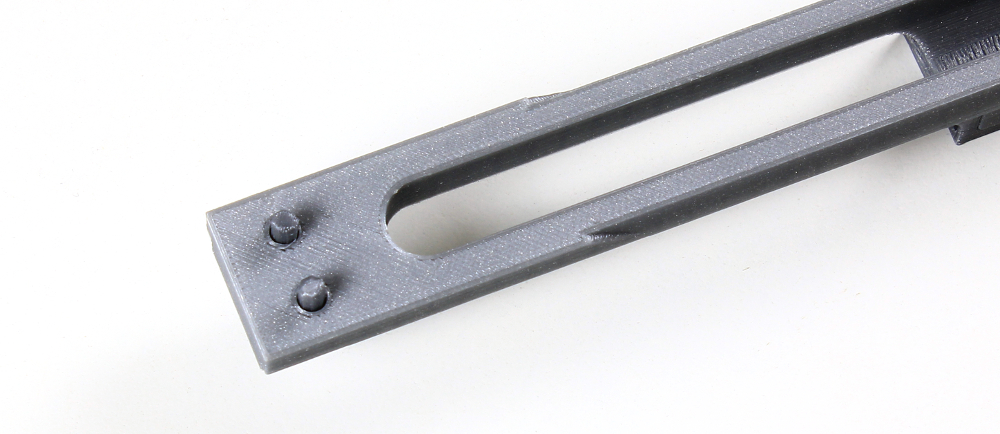
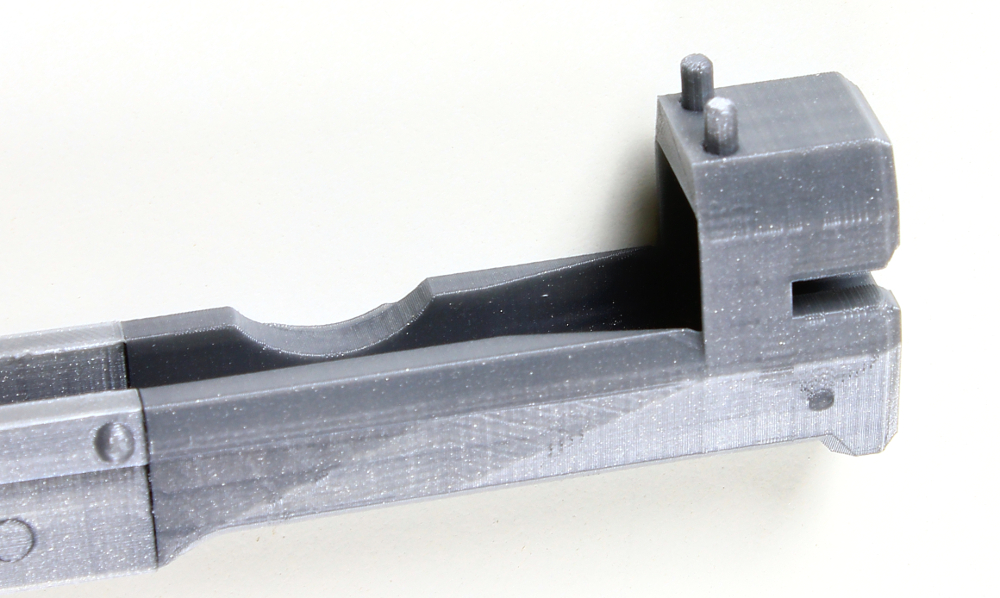
4) Use the four plastic dowels and glue them inside the holes of the front and back parts as shown in the pictures here below.
5) Glue the both the left and right handguards to the the left and right clips. Be sure that the handguards are well leveled against the grips.
6) Glue small lightbulb to the laser and then glue it to the bottom of the front part, as in the picture here below.
7) Glue the other lightbulb to the top part.
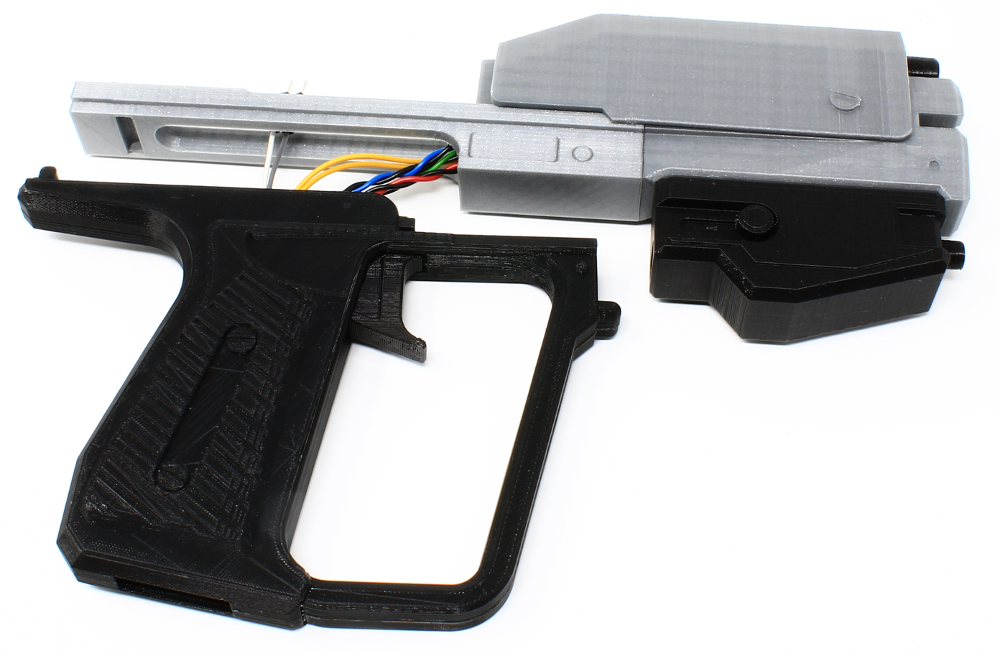
That’s all for the assembling part. The result is something like the picture here below.

Next, assembling the electronics.
Electronics
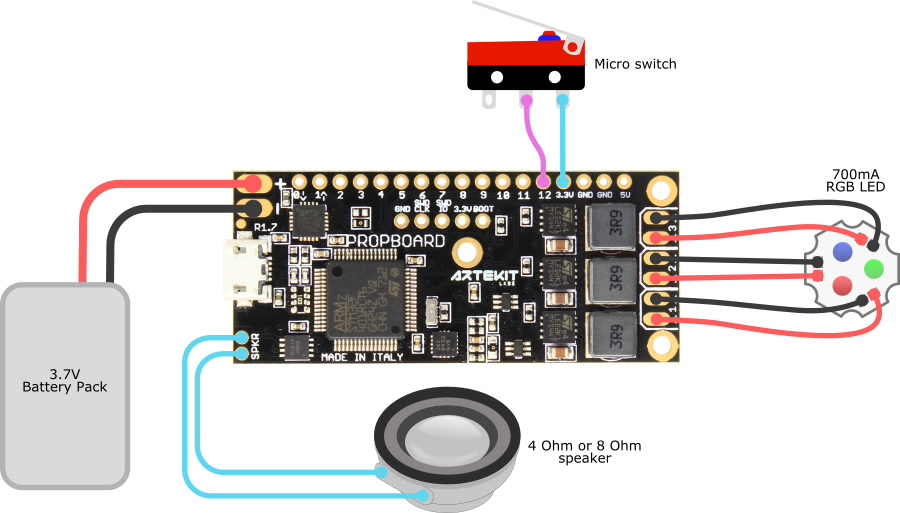
First of all, modify the PropBoard to accept the 3.7V to 5V power supply range. Follow the instructions found in the Changing the power supply range section of the PropBoard manual.
Here follows a picture with the needed connections:
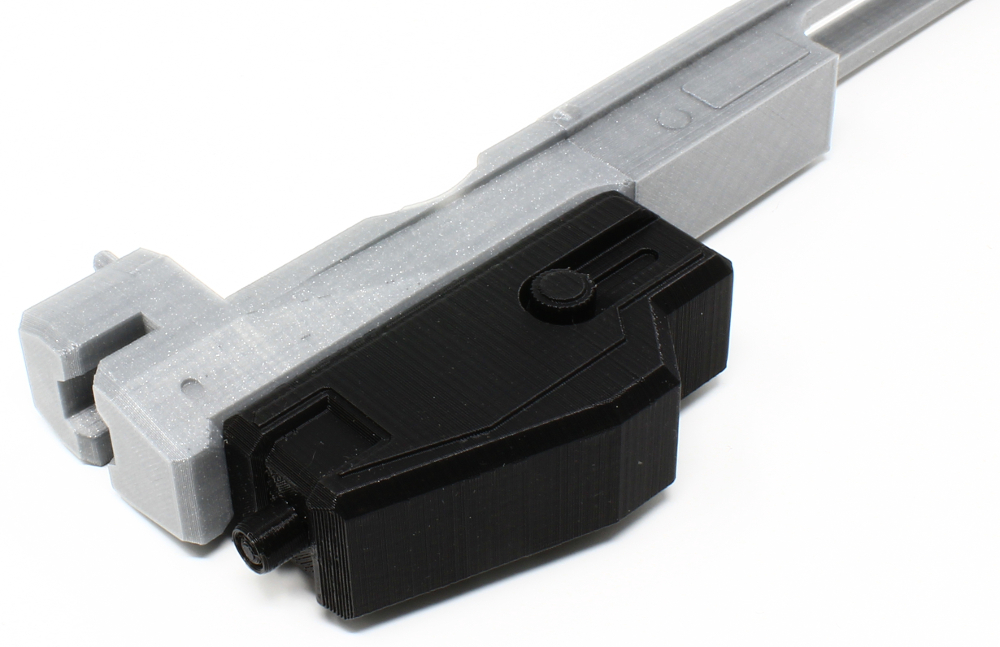
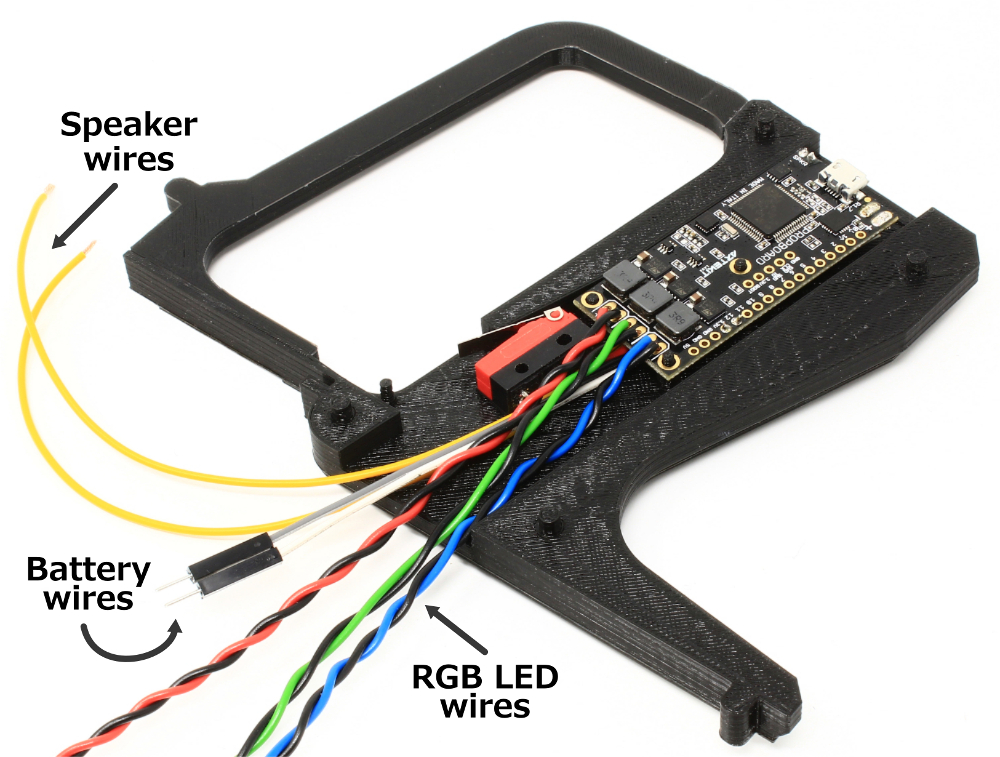
We start assembling the electronics by measuring wire length. Arrange the parts as shown in the following picture: use the left grip and fit the PropBoard in the mounting columns. Also mount the microswitch (note the orientation).

We are going to need:
2 wires for the speaker: solder these cables to the speaker pads of the PropBoard. The cable should go to up to the speaker mounted in the barrel (as in the picture here above). I soldered these cables on the bottom side of the board, so they will neatly pass under it.
2 wires for the battery: cut the the jumpers wires and leave the male connectors. Solder the wires to the power connector pads. The battery will be hidden inside the slider part, so these 2 wires should go from the power connector pads up to the slider part (use the picture here below as a reference). I soldered these cables on the bottom side of the board, so they will neatly pass under it.
Trigger/microswitch wires: the microswitch has 3 contacts. Solder a wire from the nearest contact from the PropBoard to the 3.3V pad. Solder another wire from the middle contact of the microswitch to pin 12 of the PropBoard. Use the Input/Output pins mapping section of the manual to locate the pins for the trigger. I soldered these cables on the bottom side of the board, so they will neatly pass under it.
6 wires for the RGB LED: solder these on the LED pads. The RED LED is soldered to the LED output 1. The GREEN LED is soldered to the LED output 2. And the BLUE LED is soldered to the LED output 3. I used the cable color (red, green and blue) to identify each LED color and twisted each pair of cables to get a cleaner setup.
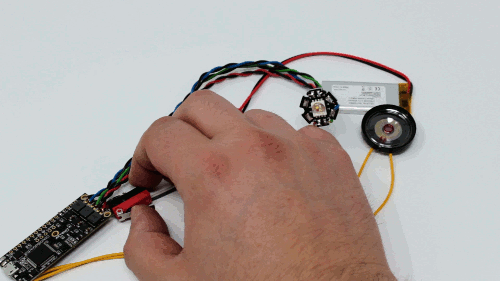
Finally solder the speaker wires to the speaker and the LED wires to the RGB LED.
Code and testing
1) Fire-up the Arduino IDE and copy/paste the following code. Then connect the PropBoard using a USB cable and download the sketch to the board.
#include <PropButton.h>

#define MODE_SINGLE_FIRE            1
#define MODE_FULL_AUTO              2
#define SINGLE_FIRE_CLIP_SIZE       8
#define FULL_AUTO_CLIP_SIZE         60
#define FULL_AUTO_FREQ              18
#define FULL_AUTO_BURST             6

PropButton trigger;
WavPlayer shot1, shot2;
WavPlayer* currentShot = &shot1;
WavPlayer miscFx;
HBLED redLed(1), greenLed(2), blueLed(3);

int fireMode = MODE_SINGLE_FIRE;
int clipSize = SINGLE_FIRE_CLIP_SIZE;
int bullets = clipSize;
bool infiniteClip = false;
volatile bool doReload = false;

int comboTime = 0;
int comboCount = 0;
int comboBulletsPerSecond = 3;

int fullAutoBurst = 0;
bool firingFullAuto = false;

void setup()
{
  pinMode(1, OUTPUT);
  digitalWrite(1, 1);

  Audio.begin();
  Motion.begin();
  Motion.configPulse(AxisAll, 3.78f, 500, 100, MotionInterrupt1);
  Motion.attachInterrupt(MotionInterrupt1, MotionPulse);
  redLed.begin(700);
  greenLed.begin(700);
  blueLed.begin(700);
  trigger.begin(12);
  trigger.setLongPressTime(3000);
  miscFx.play("beep.wav", PlayModeBlocking);
}

void loop()
{
  ButtonEvent triggerEvent = trigger.getEvent();

  // A long press switches fire modes
  if (triggerEvent == ButtonLongPressed)
    switchModes();

  switch (fireMode)
  {
    case MODE_SINGLE_FIRE:
      if (triggerEvent == ButtonPressed)
      {
        // Has bullets?
        if (bullets || infiniteClip)
        {
          // Play shot effect
          currentShot->play("gun1.wav");
          currentShot = (currentShot == &shot1) ? &shot2 : &shot1;

          // Do LED effect
          ledSingleShot();

          if (!infiniteClip)
          bullets--;

          // Combo?
          checkCombo();

        } else {
          miscFx.play("empty.wav");
        }
      }
      break;

    case MODE_FULL_AUTO:
      if (triggerEvent == ButtonPressed)
      {
        if (bullets > 1 || infiniteClip)
        {
          // Full-automatic shot
          currentShot->play("fullautoshot.wav");

          // Do LED effect
          ledFullAutoShot();

          fullAutoBurst = 0;
          firingFullAuto = true;
        } else {
          // Play empty
          miscFx.play("empty.wav");
          break;
        }
      } else break;

      while (trigger.pressed())
      {
        if (!currentShot->playing())
          break;

        if (bullets)
        {
          bullets--;
          fullAutoBurst++;

          if (!bullets || fullAutoBurst == FULL_AUTO_BURST)
            break;

          delay(1000/FULL_AUTO_FREQ);
        }
      }

      ledOff();
      if (fullAutoBurst != FULL_AUTO_BURST)
        currentShot->stop();

      firingFullAuto = false;
      break;
  }

  // Check motion for clip reload
  if (doReload)
  {
    doReload = false;

    // Check if we are firing a full-auto shot
    if (fireMode == MODE_FULL_AUTO && firingFullAuto)
        // do nothing
        return;

    miscFx.playRandom("reload", 1, 2, PlayModeBlocking);
    bullets = clipSize;

    // Reset trigger and reload events
    trigger.resetEvents();
  }
}

// Motion pulse interrupt (reload)
void MotionPulse()
{
  doReload = true;
}

void switchModes()
{
  // Switch modes
  if (fireMode == MODE_SINGLE_FIRE)
  {
    miscFx.play("beep.wav", PlayModeBlocking);
    miscFx.play("fullauto.wav", PlayModeBlocking);
    fireMode = MODE_FULL_AUTO;
    clipSize = FULL_AUTO_CLIP_SIZE;
    firingFullAuto = false;
  } else if (fireMode == MODE_FULL_AUTO)
  {
    miscFx.play("beep.wav", PlayModeBlocking);
    miscFx.play("singlefire.wav", PlayModeBlocking);
    fireMode = MODE_SINGLE_FIRE;
    clipSize = SINGLE_FIRE_CLIP_SIZE;
  }

  // Reset trigger and reload events
  trigger.resetEvents();
  doReload = false;
  bullets = clipSize;
}

void ledSingleShot()
{
  redLed.setValue(242);
  greenLed.setValue(81);
  blueLed.setValue(40);
  delay(50);
  ledOff();
}

void ledFullAutoShot()
{
  redLed.flash(225, 0, FULL_AUTO_FREQ, 0);
  greenLed.flash(34, 0, FULL_AUTO_FREQ, 0);
  blueLed.flash(34, 0, FULL_AUTO_FREQ, 0);
}

void ledOff()
{
  redLed.ramp(225, 0, 50);
  greenLed.ramp(34, 0, 50);
  blueLed.ramp(34, 0, 50);
}

void checkCombo()
{
  // Check combo game
  comboTime = GetTickCount() - comboTime;
  if (comboTime > 1000 / comboBulletsPerSecond)
  {
    comboCount = 1;
    comboTime = GetTickCount();
  } else {
    comboCount++;
    if (comboCount == SINGLE_FIRE_CLIP_SIZE)
    {
      // Combo!
      comboCount = 0;

      // Play combo sound
      miscFx.playRandom("combo", 1, 7, PlayModeBlocking);

      // Reset trigger and reload events
      trigger.resetEvents();
      doReload = false;

      // Reward with a full clip
      bullets = clipSize;
    } else {
      comboTime = GetTickCount();
    }
  }
}
2) Download the sound files by clicking in the link here below. Copy them to the root of the SD card and then insert the SD card into the PropBoard.
Click here to download the audio files.
3) Disconnect the USB cable (if you haven’t done it already) and connect the battery. You can test that your electronics assembly is working OK by pressing the trigger. You should hear the gunfire audio and the see the LED flashing.
Final assembling
1) Pass the RGB LEDs and along the hole of the back part and fix them to the barrel. I used some hot glue, as shown in the following picture. Make sure it is centered by looking through the hole of the barrel.
Note that the high-brightness LEDs are used only for a “flashing” effect, so there is no need for heat dissipation. If you intend to use it otherwise (like a flashlight), you will have to come up with some other method to cool the LEDs down or these may burn the plastic and degrade over time.
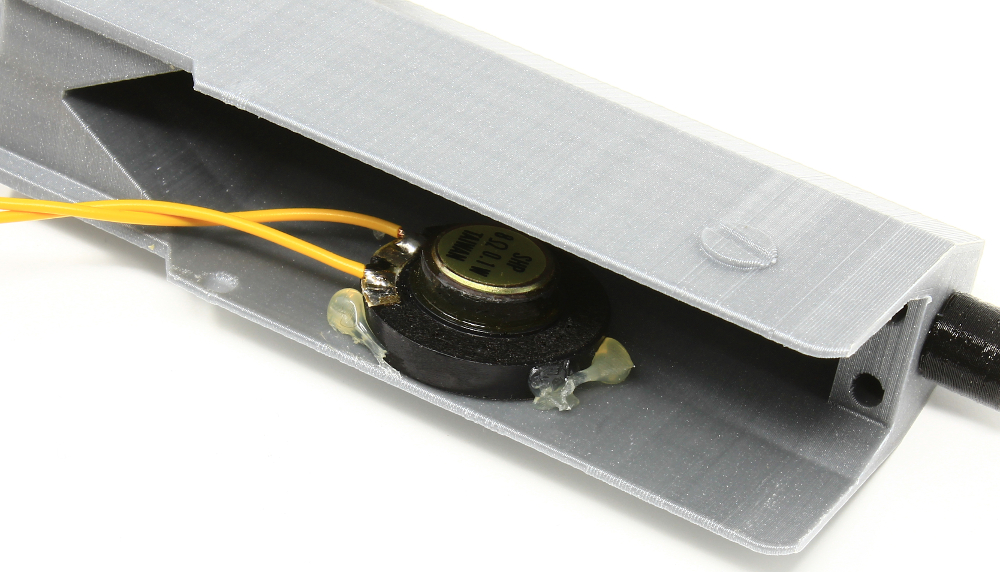
2) Do the same with the speaker and glue it to the top part. Note that the better it is centered with the speaker holes, the better it will sound.
3) Fit the top part with the barrel and arrange the parts as the following picture. Also mount the trigger.

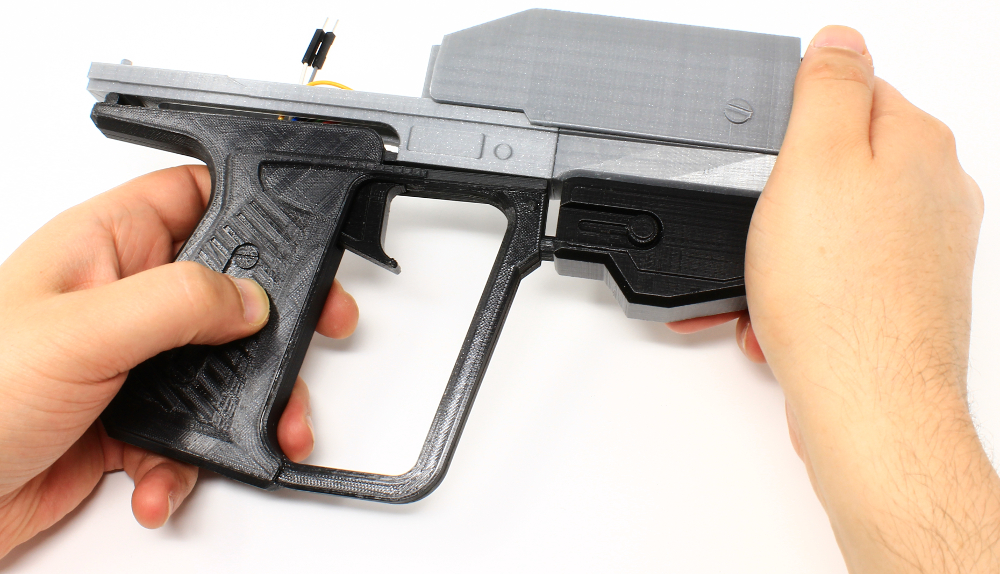
4) Get the remaining grip part and join it with the one containing the PropBoard. Press it against each other until they form a compact block. Note that the assembly should fit nicely and there is no need of excessive force. Make sure you are not squashing any wire.
5) Now align the grip parts with the holes in the back part and the laser part and gently push the grip forward, until all the pieces are together.
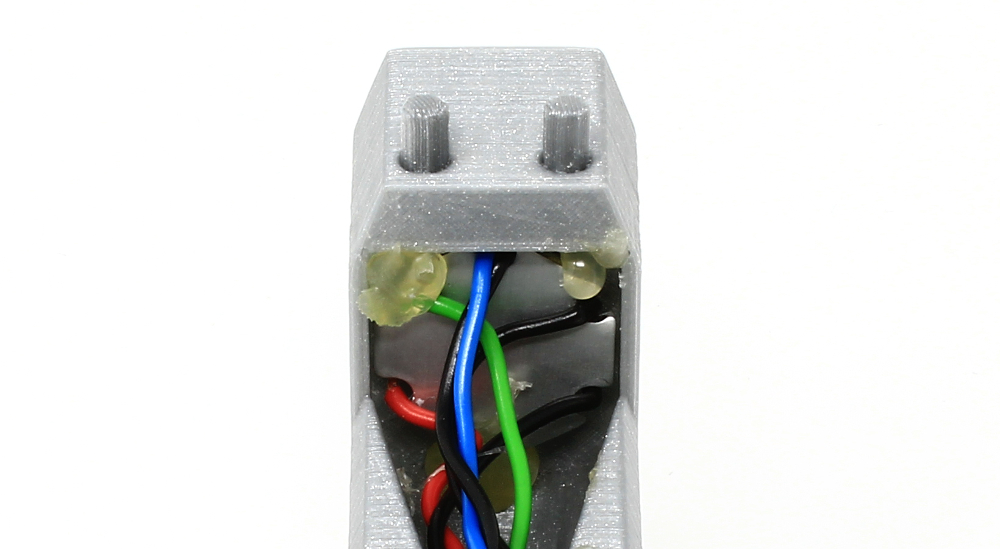
6) Connect the battery and hide it between the back part and the slider part. Then join the slider with the back. You’ll have easy access to the battery by removing the slider part, so you can disconnect it when your are not using the prop, or for a fast battery change.

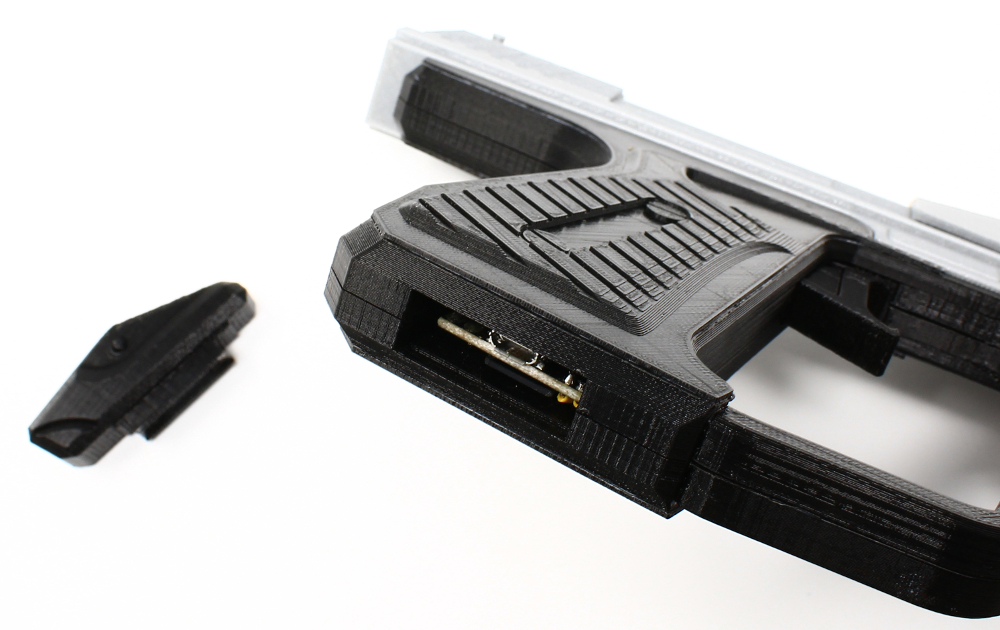
Use the clip part and insert it into the grip. You don’t need to glue it. You will still have access to the SD card and USB connector by removing the clip, in case you want to tinker with the software or change the contents of the SD.
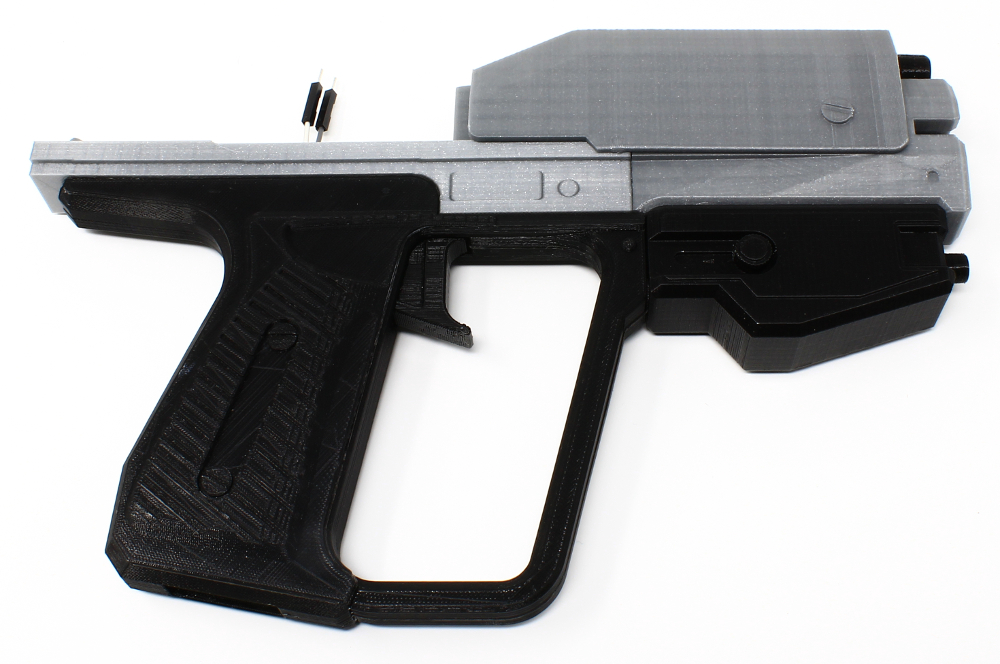
Now you should have your prop working and finished!