Artekit PropBoard: PBSaber
A full-featured Lightsaber firmware that runs on the PropBoard.
What is PBSaber?
PBSaber is the name of the firmware that turns your PropBoard into a full-featured lightsaber sound/light/motion board. It’s a project developed by Artekit Labs, completely free (as in freedom and as in beer) and open source.
PBSaber allows you to use the PropBoard as a lightsaber soundboard without writing a single line of code, giving you access to the full power of the PropBoard even if you don’t know how to program. It requires some minimum soldering skills and editing a configuration file. Also, if you are a maker, tinkerer and/or developer, PBSaber provides you with a solid codebase that you can modify to create incredible personalized lightsaber props.
Want to know more about the PropBoard? Check the product page and the PropBoard manual.
Features (v1.0.0)
- No coding skills required: you can create and customize your lightsaber even if you don’t know how to program the PropBoard.
- You can upgrade the software, anytime, with the latest version.
- Very easy to use and install.
- Fully configurable through a user-friendly, human-readable configuration file in the SD.
- Profile-based:
- the entire lightsaber behavior is controlled by user-defined profiles. Check the list down here to know every possible setting.
- in each profile you can customize the colors and modes for the shimmering, clash, blaster, stab and lock-up effects, ignition and retraction type and duration, and the sound font to use.
- you can select profiles through a button combination.
- it remembers the last used profile.
- there are no limits on how many profiles you can define.
- Audio:
- supports WAV files, both monophonic and polyphonic fonts.
- real-time mixing.
- latency from event detection to audio output: typical ~4.5ms (tested at 22050fs), on both mono and polyphonic fonts, with or without background music.
- supported sampling frequencies (@ 16 bits per sample): 22050, 32000, 44100, 48000, 96000.
- mono and stereo.
- gapless, clickless playback on both mono and poly fonts.
- it switches fonts on-the-go, from mono to poly and back based on the font the profile it’s using.
- unlimited font banks.
- unlimited font slots per sound type (for example unlimited swings slots).
- supports background music.
- Hardware support:
- supports 3 high-brightness LEDs up to 1A each.
- supports addressable LEDs (a.k.a Neopixels): APA102 or APA102C, WS2812 or WS2812B and SK6812RGBW RGBW LED.
- single or dual momentary button support.
- Low-power mode.
- Feedback-driven project: have a feature request? you want something modified? Start a discussion in our forum.
- 100% open source.
Roadmap
In no specific order.
- Hum-controlled shimmering.
- Groups of profiles.
- Motion-controlled hum pitch shifter.
- More blade effects.
- A serial protocol to change/save profile settings.
- Transition effects while switching profiles.
- Profile editor.
- Enable configuration for raw audio files.
- Crossguard blade.
- Battery management.
Firmware installation and updates
- Install the Arduino IDE and the PropBoard support by following these instructions.
- Grab the latest PBSaber release, by clicking on this link or from Github.
- Connect your PropBoard to your PC/MAC using an USB cable.
- Unzip the file anywhere in your computer and double-click on the PBSaber.ino file.
- Select the serial port for the PropBoard in the Arduino IDE and click the Upload button.
- For software updates, repeat from step 2.
Note: PBSaber needs version v1.0.3 (or higher) core files. You can update your PropBoard board support by using the Arduino IDE Boards manager and updating to the latest available version.
The PBSaber firmware and/or project comes with no warranties, of any kind. By using PBSaber or installing the PBSaber firmware in your PropBoard, you declare you’re OK with this.
SD installation
PBSaber requires a microSD containing:
- at least one configuration file. You can find some configuration files in the zip file you just have downloaded, inside the sd folder. Copy the config_template.ini file into the SD and rename it to config.ini. You’ll customize this configuration file later (or while reading this guide).
- at least one font, that you have to provide. If you don’t have any, inside the zip you’ve downloaded there is the basic ‘Barlow” font. The font is inside the ‘fonts\barlow’ folder. If you want to use this font, copy the ‘fonts’ folder into the SD.
- the ‘sndutil’ folder. Also in the zip file you’ve downloaded. Copy that to the SD as well.
Here is how the SD contents should look like:

Note 1: I often got asked by users if there is any special procedure to follow when copying and/or modifying the files into the SD (copy with copy-paste or drag-and-drop, copy fonts then copy other files, etc.). With the PropBoard, at the moment, there are no special requirements when copying or creating/modifying files in the SD. Do as you please, but a fresh, formated SD is always a good start (better if formatted with the official SD formatter).
Note 2: be sure that the SD is inside the PropBoard before powering the board. At the moment, if you remove and re-insert the SD with the PropBoard already powered on, the changes you make to the configuration file will only be effective on the next power on.
Hardware installation
The following section shows the most common connections for your LEDs, buttons, speaker and batteries. A basic lightsaber setup comprises:
- for the light effects of the blade you can use:
- a high-brightness LED (1A max, 700mA minimum recommended) like the Cree XPE2. Better if it’s an RGB LED.
- or an LEDs strip (Neopixels), models APA102 or APA102C, WS2812 or WS2812B or SK6812RGBW. We usually refer to this kind of blade as a pixel blade.
- a 4 or 8 Ohm speaker.
- one or two 3.7V batteries (recommended LiPo or 18650 Li-ion type batteries). You’ll probably use the single battery setup if you are going to use a pixel blade. For high-brightness LEDs like the Cree XPE2 you can use one or two 3.7V batteries. More info about batteries here.
- one or two momentary push-buttons.
- a microSD card.
For the next section, a quick reading of the PropBoard manual is recommended.
For the blade, you can choose to use either use a LED strip or a High-Brightness LED. The following pictures show how to connect the LED strip to the PropBoard:
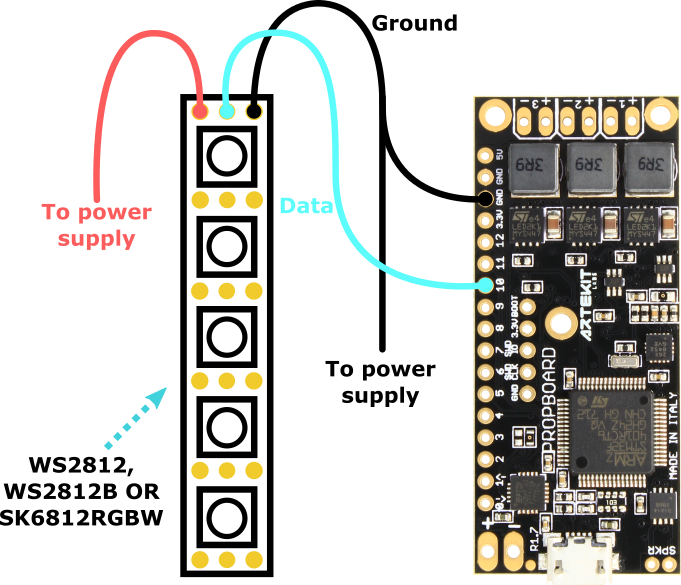
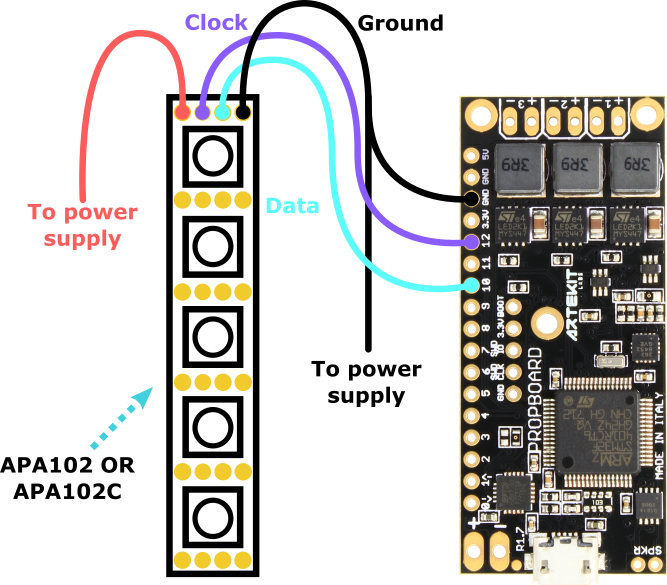
It is advised to put a 300 to 500 Ohms resistor between the data line and the PropBoard pad. This is to avoid damaging the microcontroller pin or the first LED in the LED strip in the case the data line is connected before VCC and ground.
The above images are for reference only (since there are a lot of LED strips models out there) and just illustrates the pins required and where to connect them in the PropBoard. To be sure where connect the wires in the LED strip, check your LED strip documentation.
If you have chosen to use a High-Brightness LED then connect it in the following way:
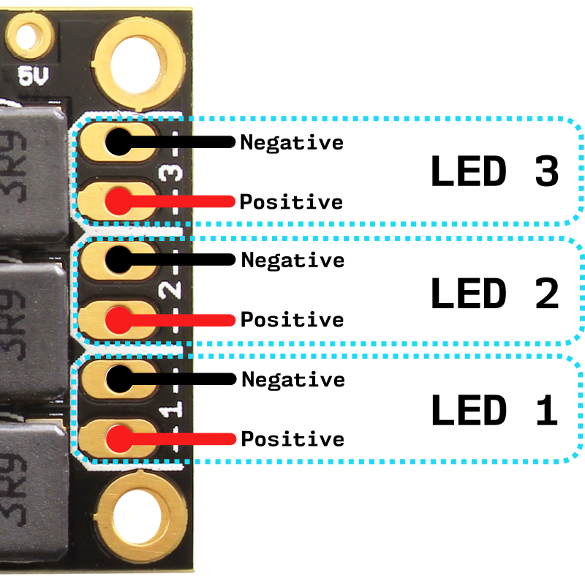
If the LED you are using is an RBG LED then you have to connect each LED color in the following way:
- Red LED to LED1 output.
- Green LED to LED2 output.
- Blue LED to LED3 output.
LED1, LED2 and LED3 are despicted in the picture here above.
If you are using a non RGB LED (that is, mixed color dies) the you can connect the LEDs in any output, but be sure to remember on which one since it will be important when chosing colors at the moment of configuring profiles (check the Note about colors in the Profiles section)
More info about connecting the LEDs can be found in the PropBoard manual.
Looking directly to High-brightness LED can permanently damage the eye. Use with caution.
Battery: if you are using a single 3.7V battery you have to make some modifications as detailed in the “Changing the power supply range” guide. For two batteries setup, you can use the board as is.
Connect the battery in these two pins:
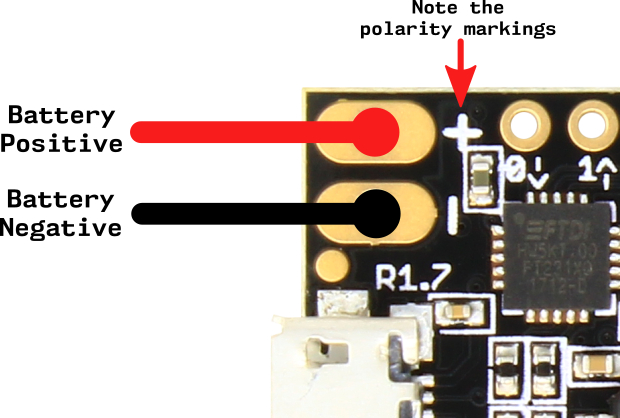
More details about connecting the batteries can be found in the PropBoard manual.
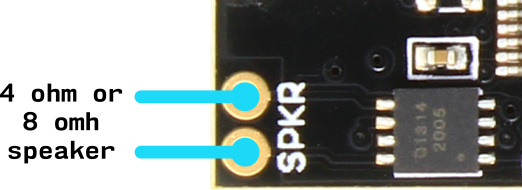
Connect the speaker is these two pins:
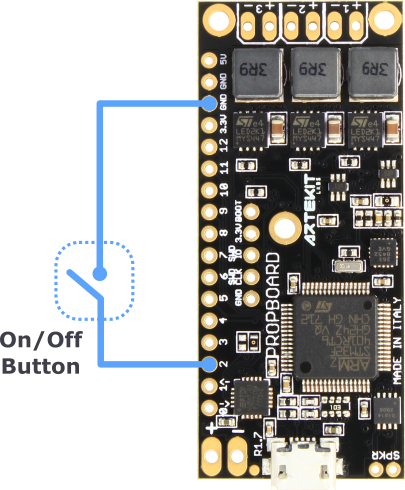
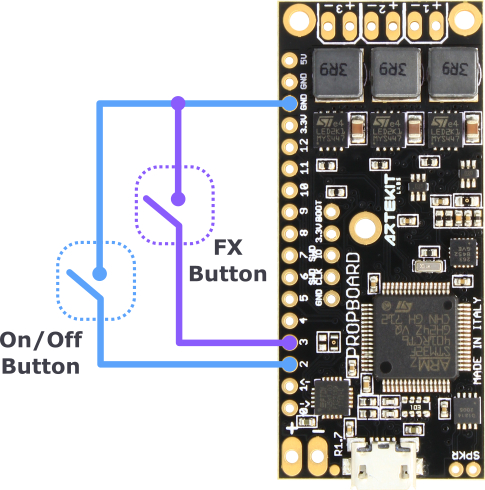
Buttons: we’ll use a couple of momentary buttons. One for On/Off and one for miscellaneous sound/light effects (FX button). You can use a single On/Off button and still do all the effects, but with a single button you won’t be able to switch from one profile to the other while the saber is ON (you can still do it while the saber is OFF).
Note: in all the sample configuration files we use two buttons, connected as shown here below. If you intend to use other pads for your buttons, remember to change your configuration file.
Single button configuration:
Or if you want to use two buttons here is how to connect them:
Of course, you can use any other pad to connect the buttons. Here is a list of all the available pads. It’s recommended to connect the On/Off Button to a pad that is able to wake up the board from low-power mode. If you are using a pixel blade, avoid using the pads with an X in the Pixel Blade column.
| PAD | Can Wake Up | Pixel Blade |
|---|---|---|
| 0 | NO | |
| 1 | YES | |
| 2 | YES | |
| 3 | YES | |
| 4 | YES | |
| 5 | YES | |
| 6 | YES | |
| 7 | YES | |
| 8 | YES | |
| 9 | NO | |
| 10 | NO | X |
| 11 | NO | |
| 12 | NO | X (if pixel blade is APA102 or APA102C) |
If you have any doubt about hardware connections, please ask in the forum.
The configuration file
The configuration file is a plain INI-like file that you will copy into the SD. It has to be named config.ini and must be placed in the root of the SD card. Alternatively, you can name it differently or choose which configuration file to load by doing some modifications to the code.
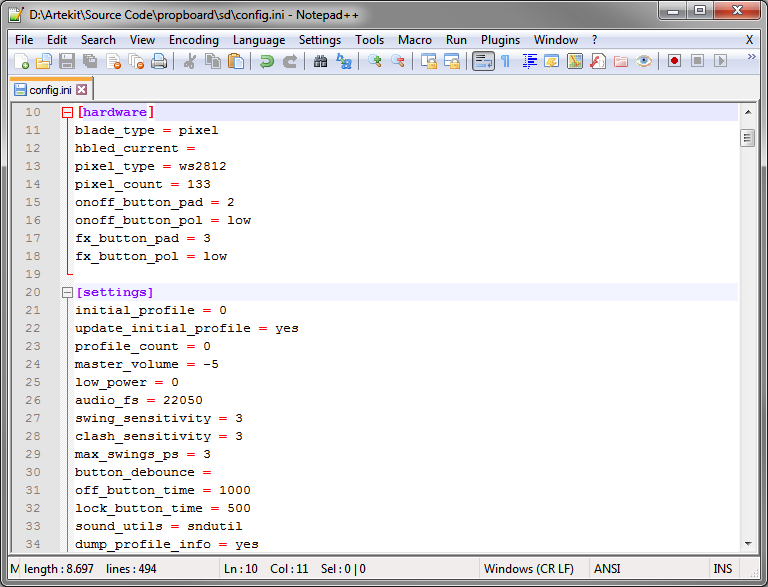
A typical configuration file
The PBSaber firmware will read from this config.ini file and act accordingly on what’s configured in there. From this configuration file you’ll control how the lightsaber behaves. You can find some sample configuration files in the zip file you have downloaded (in the sd folder).
Go ahead and open a configuration file! It will help you to better understand the next part of this guide.
For viewing and editing the configuration files I recommend using a program like Notepad++, with syntax-coloring and ‘folding’ capabilities.
Experienced users may skip the following sections and start editing a configuration file. The config_explained.ini file already contains comments with most of the information that follows here.
Ok, let’s get our hands dirty with the configuration file starting with a brief explanation.
Lines with preceding # or // are comments. You’ll see a lot of these in the configuration files. Don’t worry about them right now, since these are only helpful when editing the file for the first times. Once you’ve mastered all the settings you can delete the comments or add your own comments as you need.
The configuration file is divided into sections. Sections are those defined between [squared brackets], and every line of text following a [section] it is said to belong to that section.
At the moment, all the lightsaber settings are stored in a single configuration file.
Here is a quick overview of the sections you can find in a typical configuration file. Don’t worry, we’ll look into every detail later on.
[hardware]: in this section you will find the lightsaber hardware settings, that is, type of blade, button connections, etc. Think of it as the part of the lightsaber you configure once and never touch again.
[settings]: here you’ll find general settings, like motion sensitivity, low-power, audio volume. Anything that is not hardware-related but it’s valid across all the profiles.
[fontN]: represents an audio font. Here you’ll define where a font is located, how many files it has, file names, etc. The N in [fontN] is a number (resulting in, for example [font1]). When defining a profile you’ll reference this number to select which font to use for that profile.
[profileN]: defines a profile. Here you’ll configure blade colors, effects, etc. Each profile is defined in its own section, with the format [profileN], where N is a sequential number. There should be at least one defined profile, and it should be [profile1].
Are you a curious developer and want to know more about using INI files on the PropBoard? You can find the PropConfig library documentation here.
Now we’ll go through every section and learn about every possible setting, starting with the [hardware] section.
The Hardware section
blade_type: the type of LED your blade uses. It can be:
- hbled for for high-brightness LEDs (i.e. CREE XPE2)
- pixel for strips of addressable LEDs (a.k.a. neopixels).
For example:
blade_type = hbledhbled_current: the high-brightness LEDs maximum current in milliamperes. Fill this value only if blade_type is hbled, otherwise PBSaber will ignore it. It’s defined as follows:
hbled_current = output 1 current, output 2 current, output 3 currentFor example, a triple LED with 700mA on each LED
hbled_current = 700,700,700Or if you have a single 1A LED
hbled_current = 1000pixel_type: the type of LED strip you are using. It is valid only if blade_type is pixel, otherwise it’s ignored. It can be:
- apa102 for APA102 or APA102C
- ws2812 for WS2812 or WS2812B
- sk6812rgbw for SK6812RGBW
pixel_count: quantity of LEDs in the LED strip. Valid only when blade_type is pixel, otherwise it’s ignored.
onoff_button_pad: indicates the pad number you have connected the momentary On/Off button. Example:
onoff_button_pad = 1onoff_button_pol: polarity of the momentary On/Off button. NOTE: a momentary button usually has two contacts. You have to connect one of these contacts to the pad indicated with the onoff_button_pad value. The other contacts is usually connected to either ground or 3.3V. If you have connected the pin to ground, set this value to low, otherwise set it to high. For example:
## My On/Off button is connected to ground
onoff_button_pol = low
fx_button_pad: indicates on which pad you have connected the momentary FX button.
fx_button_pol: same as onoff_button_pol but for the FX button.
The Settings section
initial_profile: is the profile number the PBSaber will use after booting. It will be automatically updated if update_initial_profile is yes (read here below).
update_initial_profile: set this value to yes if you want the PBSaber to remember the last used profile. This value will be updated at every ‘retraction’ if the profile has changed since ‘ignition’.
profile_count: the quantity of profiles defined in this configuration file. Leave it empty or 0 and the PBSaber will autodetect how many profiles there are. So why define this value? you may ask. It’s useful if you have a set of profiles that are well tuned, tweaked and stable, but you want still to do some tests with additional profiles. After twitching around with those new profiles you want to go back and have your stable lightsaber, without losing those new profiles ‘under test’. It was useful to me (Ivan) while developing.
master_volume: master volume in dB, between -100 and 12. Set to 0 for the default volume.
low_power: this value determines after how many seconds without user activity (while the saber is OFF) the board will enter into low-power mode. Set to zero to avoid entering into low-power.
audio_fs: the audio sampling frequency. Must match the audio frequency of ALL your fonts. That is, you can’t use fonts with different sampling frequencies. The value can be 22050, 32000, 44100, 48000 or 96000. If this value is missing or it’s ommited then it’s defaulted to 22050.
swing_sensitivity: a 1 to 5 value for swing sensitivity, being 5 the most sensitive. By default it’s 3.
clash_sensitivity: a 1 to 5 value for clash sensitivity, being 5 the most sensitive. By default it’s 3.
swing_limiter: the minimum time in milliseconds between two swing effects. After a swing, the next following swings will be ignored during the time specified here. If left empty or set to zero it will take a default value of 300 milliseconds.
clash_limiter: the minimum time in milliseconds between two clash effects. After a clash, the next following clashes will be ignored during the time specified here. If left empty or set to zero it will take a default value of 300 milliseconds.
spin_limiter: the minimum time in milliseconds between two spin effects. After a spin, the next following spins will be ignored during the time specified here. If left empty or set to zero it will take a default value of 300 milliseconds.
button_debounce: typical button debounce time in milliseconds. Optional, and will be set to 25ms if it’s zero or not present.
off_button_time: hold time in milliseconds for the On/Off button. If the lightsaber is ‘on’, this is the time needed to start a ‘retraction’. If the lightsaber is ‘off’ and the PBSaber is configured in a single button configuration, pressing and holding the On/Off button for this hold time will put the PBSaber into the ‘profile selection’ cycle. More on this later.
lock_button_time: pressing and holding the FX button for this time (value in ms) will trigger a lock-up effect.
sound_utils: the full path of the folder containing some utility sounds. Set it to ‘sndutil’. You should have a sndutil folder in the zip file you have downloaded. Copy it to the SD card.
dump_profile_info and dump_font_info: if set to ‘yes’, the PBSaber will dump the current profile and font settings to the serial console (accessible through the USB cable). Useful to understand why something is not working as expected.
Fonts explained
For those who are new to ‘fonts’ I’ll describe a bit what these are. Basically, fonts are collections of sound files that are played by your lightsaber. These collections are usually focused on one theme or character from your favorite movie.
The files of a font, often kept together within a single folder, can be grouped into “types”. With “type” I refer to “swing”, “clash, “ignition”, the background hum, etc. To give more realism, usually fonts come with several files of the same type, for example a bunch of “swing” audio files so you don’t hear always the same sounds. Most of the time these files have their names ending with a number. For example swing sound files would have names like swing1.wav, swing2.wav, and so on. The PBSaber will randomly pick one of these numbers and play a random swing sound when you move the hilt.
In what folder arrangement and naming convention concerns, the fonts you can find around will come in different shapes and ways: some contained in a single folder, others in different folders, with different names, etc. What most differentiates the fonts you will find is the polyphony.
Monophonic fonts play a single sound file at a time. That is, there is the background ‘hum’ playing and when you do a ‘clash’ the clash sound will play, stopping the hum sound. When the clash sound ends, the hum is played again from the beginning. This also means that the clash sound contains an audible transition back into the hum sound.
In polyphonic fonts all the sounds are played on top of another background sound (usually on top of the ‘hum’), making the whole thing more realistic and allows you to reuse sounds from one font with another font.
The PropBoard, and so PBSaber, are polyphonic by design, able to play both mono and poly fonts.
Since fonts can come in a mix of flavors (regarding file names, formats and -phonia) we needed a flexible way to consolidate a usable configuration, keeping somewhat intact the original arrangement of the files/folders, while keeping open the possibility of adding support for other audio formats or adding specific settings for a font. So we have come with this solution:
Fonts are defined in their respective sections. These sections start with the word ‘font’ followed by a number. For example [font1] will describe the font number 1. This is just an identifier and doesn’t mean that font1 is the first font to use. It’s just a number that you will use later in the profile definition to say that a given profile uses a certain font (more on this later). The number cannot be preceded by zeroes (for example [font01] is incorrect), but other than that, you can use any number in any order.
But first, let’s take a look on the values one can set to define a font.
# This is font1
[font1]
# Title (optional)
title =
# Base folder
folder =
# Mono or poly?
poly =
# Ignition
ignition =
ignition_min_max =
# Retraction
retraction =
retraction_min_max =
# Going into low-power
low_power =
low_power_min_max =
# Hum
hum =
hum_min_max =
# Blaster
blaster =
blaster_min_max =
# Lock-up
lock =
lock_min_max =
# Swing
swing =
swing_min_max =
# Clash
clash =
clash_min_max =
# Spin
spin =
spin_min_max =
# Stab
stab =
stab_min_max =
# Background music
background =
background_min_max =
# Font name
name =
For every font, the values you can set are:
- title: this is optional. It’ll be shown in the serial console when the font is loaded. For example:
title = My Dark Font
- folder: the full path of where the font is located. For a font located inside the DarkFont folder that’s inside the fonts folder, it could be:
folder = fonts\DarkFont
- poly: set this to ‘yes’ if the font is polyphonic. Set it to ‘no’ if it’s monophonic.
For every ‘type’ of sound we must define its file name. If there are two or more files for this ‘type’ we need to specify the minimum and maximum number at the end of its name. For example, let’s take the case of a font with 5 ‘ignition’ files named poweron1.wav to poweron5.wav:
ignition = poweron
ignition_min_max = 1,5
What the settings up here do is to declare that the ignition WAV files start with the word ‘poweron’ and that there are 5 different files, from poweron1.wav to poweron5.wav.
When there is a single sound file for a “type” (typical case for a single ‘hum’ sound file) you don’t specify the maximum and minimum numbers:
hum = hum
hum_min_max =
That’s it. A single sound file for the hum, called hum.wav, without specifying hum_min_max.
Note that in every case you should not include the .wav extension to the name. For example: hum = hum.wav is incorrect.
Font examples
There is no better explanation than a real-world case, so for this guide I will define 3 fonts for my configuration file that I have purchased at saberfont.com (one poly and two mono). Then I will add a fourth font: the “Barlow” one we have already used in the past for some examples.
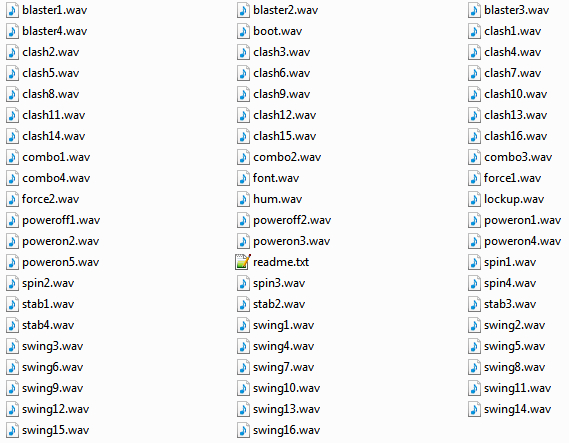
Let’s configure [font1] with the first mono font, starting with a good look at the files that compose the font.
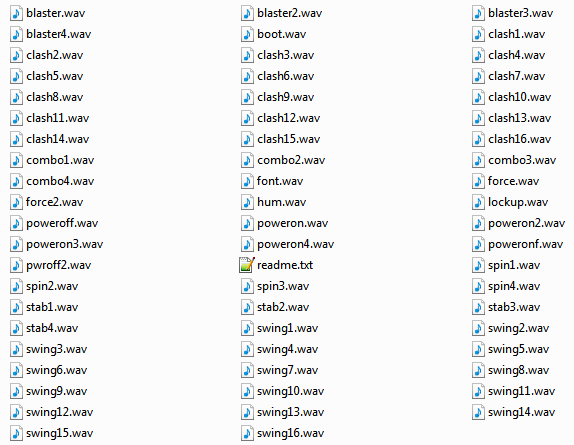
As you may see, we will have to rename some sound files. For example, there is “blaster.wav” and “blaster2.wav”. Let’s start by renaming those files and adding a sequential number at the end of the file name.
After that, I created [font1] as the following:
[font1]
title = Some font
folder = \fonts\SomeFont
poly = no
boot = boot
boot_min_max =
hum = hum
hum_min_max =
ignition = poweron
ignition_min_max = 1,5
retraction = poweroff
retraction_min_max = 1,2
power_down =
power_down_min_max =
blaster = blaster
blaster_min_max = 1,4
lock = lockup
lock_min_max =
swing = swing
swing_min_max = 1,16
clash = clash
clash_min_max = 1,16
spin = spin
spin_min_max = 1,4
stab = stab
stab_min_max = 1,4
force = force
force_min_max = 1,2
background =
background_min_max =
name = font
That’s it. [font1] is completed and ready to be used.
Now let’s define [font2] that has the following files:

After renaming some files you start to wonder if you should redefine all font parameters over and over again, for your entire collection of fonts.
For this purpose, there is the optional as_font value to indicate that a font is, for the most part, identical to another font. You still have to specify on which folder the font is, and if it’s mono or poly, and you can override some other values as you need.
For example, by writing ‘as_font = 1’ we say that [font2] is just like [font1], but located in another folder.
[font2]
title = My other font
folder = fonts\OtherFont
poly = no

# With the following we instruct to
# take the file names values from [font1]
as_font = 1

# But this font has 22 clash and 18 swing sounds!
# No problem, we fix it like this:
clash_min_max = 1,22
swing_min_max = 1,18
Now it’s the turn of a polyphonic sound font. Let’s take a look a its files.
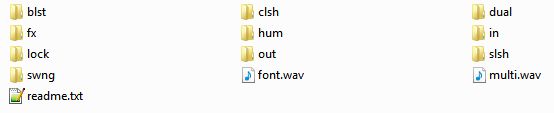
Yeah, completely different. This one has the files inside separate folders. So let’s create [font3] as the following:
[font3]
title = PolyFont
folder = \fonts\PolyFont
poly = yes
boot = multi
boot_min_max =
hum = hum\hum01
hum_min_max =
ignition = out\out
ignition_min_max = 1,15
retraction = in\in0
retraction_min_max = 1,2
power_down =
power_down_min_max =
blaster = blst\blst0
blaster_min_max = 1,4
lock = lock\lock01
lock_min_max =
swing = swng\swng
swing_min_max = 1,16
clash = clsh\clsh
clash_min_max = 1,16
spin =
spin_min_max =
stab = slsh\slsh0
stab_min_max = 1,4
force = fx\fx0
force_min_max = 1,2
background =
background_min_max =
name = font
Note that sound files names can’t have zeroes after the file name (for example ‘swing01.wav’), so I had to change the file name to some of them.
Now for the ‘Barlow’ font (original sound package here or in the ZIP fle you’ve downloaded) it could be:
[font4]
title = Barlow
folder = \fonts\Barlow
poly = yes
boot =
boot_min_max =
hum = idle
hum_min_max =
ignition = on
ignition_min_max =
retraction = off
retraction_min_max =
power_down =
power_down_min_max =
blaster = hit
blaster_min_max = 0,4
lock =
lock_min_max =
swing = swing
swing_min_max = 0,7
clash = strike
clash_min_max = 0,2
spin =
spin_min_max =
stab =
stab_min_max =
force =
force_min_max =
background =
background_min_max =
name =
The ‘Barlow’ font does not include some sounds, like the ‘lockup’ sound. That’s ok, you can still use the font, but the ‘lockup’ feature will be disabled.
If a file is missing or cannot be found, the corresponding feature will be disabled.
Profiles
Profiles are the heart of the configuration file. They define how your lightsaber behaves, what colors to use and how to react to the different external events.
Each [profile] sections defines a unique profile. There should be at least one profile in the configuration file, called [profile1]. Others profiles must be named sequentially ([profile2], [profile3], etc.) There cannot be [profile1], [profile2] and [profile5]. Currently there are no limits on how many profiles you can define.
Let’s take a quick look into the values you can configure, followed by a detailed explanation:
[profile1]
## Font
font =
## Ignition
ignition_mode =
ignition_duration =
ignition_on_stab =
## Retraction
retraction_mode =
retraction_duration =
## Shimmering
shimmer_color =
shimmer_mode =
shimmer_depth =
shimmer_freq =
## Clash
clash_mode =
clash_color =
clash_freq =
clash_depth =
clash_blend =
clash_random =
clash_duration =
## Blaster
blaster_mode =
blaster_color =
blaster_freq =
blaster_depth =
blaster_blend =
blaster_random =
blaster_duration =
## Stab
stab_mode =
stab_color =
stab_freq =
stab_depth =
stab_blend =
stab_random =
stab_duration =
## Lock-up
lockup_mode =
lockup_color =
lockup_freq =
lockup_depth =
lockup_blend =
lockup_random =
In the Usage instructions section you can learn how to select profiles using the lightsaber buttons.
Note about colors
When configuring colors (shimmer_color, blaster_color, etc.) use an RGB or RGBW value according to the following 3 rules:
1) If your blade is a high-brightness LED or an RGB pixels blade then color is an RGB value. For example:
# red = 255, green = 127, blue = 50
shimmer_color = 255,127,50
2) In the case your blade is composed of RGBW pixels then color is an RGBW value. For example:
# red = 255, green = 127, blue = 50, white = 200
shimmer_color = 255,127,50,200
3) In case your blade is composed of a mixed die high-brightness LEDs then every value matches an LED output. For example:
## Set LED1 output as 255, LED2 output as 30 and LED3 output as 10
shimmer_color = 255,30,10
Now let’s see every parameter that can be configured in a profile.
Font selection
font: the font number the profile will use. For example to use [font2] just write:
font = 2
Ignition
ignition_mode: the ignition mode. It can be one of the following:
- ramp: a ramp from zero brightness to full brightness (while shimmering).
- full: a fast ramp from zero brightness to full brightness (while shimmering).
- scroll: only for pixel blades. A progressive scrolling ignition, just like the movies. This includes also a brightness ramp.
Example:
ignition_mode = scrollignition_duration: duration in milliseconds of the ignition effect. When set to 0 or empty then the ignition effect will last as long as the duration of the ignition sound.
ignition_on_stab: if set to ‘yes’, you can do the ignition by holding the On/Off button and doing a ‘stab’. Normal ignition (by pressing and releasing the On/Off button) is always available. Leave it empty or set it to ‘no’ to disable ignition on stab.
Retraction
retraction_mode: same as ignition_mode but for retraction.
retraction_duration: same as ignition_duration but for retraction.
Shimmer
shimmer_color: color of the shimmering effect.
shimmer_mode: the shimmering mode. Can be one of the following values:
pulse: a ‘pulsating’ effect, incrementing and decreasing the brightness of the blade. The depth of the effect (how much the brightness increases/decreases) is defined with shimmer_depth and the frequency with shimmer_freq.
random: this results in a more flickering blade. It uses random brightness values between the maximum brightness and a depth defined with shimmer_depth and with frequency defined by shimmer_freq.
shimmer_depth: the depth of the shimmering effect. A value from 0 to 100, being 100 a full swing between the minimum brightness (0) and full brightness. A value of 10 will vary the shimmering between 90%-100% brightness.
shimmer_freq: the frequency of the shimmering effect in Hz. The maximum frequency is 25 Hz.
Clash
clash_mode is the mode for the clash effect. It can be one of the following values:
static: a static color flash.
shimmer: does a shimmer on top of the base shimmering.
flash: flashes between a static color and the background shimmering, with a given frequency.
flash_flicker: same as flash, but the static color will have a random brightness between 50% and 100%.
big_spark: only for pixel blades. It does a short flash (20ms) while drawing a big spark in the middle of the blade. The color of the flash is the same of the spark. You can define the length with clash_depth, otherwise the length will be the quantity of (LEDs in the strip / 3)
clash_color: the color of the clash effect.
clash_depth: if clash_mode is shimmer then it’s the depth of the shimmering (like shimmer_depth). If clash_mode is big_spark, then it’s the length of the spark in pixels.
clash_duration: duration of the clash effect in milliseconds. Leave it to 0 or empty to use the duration of the played sound file.
clash_freq: frequency in Hz of the clash effect. It will be ignored when clash_mode is big_spark or static.
clash_blend: how much the clash color will be blended into the background shimmering. It’s a value between 1 and 100. If 100 is used, then the clash color will completely override the background shimmering color. If the value is 0, then it will be defaulted to 100. It is ignored for big_spark.
clash_random: If clash_mode is big_spark, setting this value to ‘yes’ will choose a random color for the big_spark effect. If clash_mode is shimmer then it will choose the shimmering brightness randomly (flickering), otherwise it will do a pulsating effect.
Blaster
blaster_mode is the mode for the blaster effect. It can be one of the following values:
static: a static color flash.
shimmer: does a shimmer on top of the base shimmering.
flash: flashes between a static color and the background shimmering.
flash_flicker: same as flash, but the static color will have a random brightness between 50% and 100%.
spark: only for pixel blades. Small colored sparks will be drawn on the blade at a random location.
flash_spark: same as spark but it also does a quick (20ms) initial flash, of the same color of the spark.
blaster_color: the color of the blaster effect.
blaster_depth: if blaster_mode is shimmer then it’s the depth of the shimmering, much like shimmer_depth. If blaster_mode is spark or flash_spark then it’s the size in pixels of a ‘spark’. Set it to 0 to produce sparks with a random size between 8 and 20 pixels.
blaster_duration: duration of the blaster effect in milliseconds. Leave it to 0 or empty to use the duration of the played sound file.
blaster_freq: frequency in Hz of the blaster effect. It will be ignored if blaster_mode is spark, flash_spark or static.
blaster_blend: how much the blaster color will be blended into the background shimmering. It’s a value between 0 and 100. If 100 is used, then the blaster color will completely override the shimmering color. It is ignored for spark and flash_spark.
blaster_random: If ‘yes’ then it will choose a random color for the spark and flash_spark effects.
Stab
stab_mode: is the mode for the stab effect. It can be one of the following values:
static: a static color flash.
shimmer: does a shimmer on top of the base shimmering.
flash: flashes between a static color and the background shimmering.
flash_flicker: same as flash, but the static color will have a random brightness between 50% and 100%.
tip_spark: only for pixel blades. Does a colored spark at the tip of the blade. You can adjust the size with stab_depth.
stab_color: the color of the stab effect.
stab_depth: if stab_mode is shimmer then it’s the depth of the shimmering, much like shimmer_depth. If stab_mode is tip_spark then it’s the size in pixels of the ‘spark’. Set it to 0 to produce sparks with a random size between 10 and 20 pixels.
stab_duration: duration of the stab effect in milliseconds. Leave it to 0 or empty to use the duration of the played sound file.
stab_freq: frequency in Hz of the stab effect. It will be ignored if stab_mode is tip_spark or static.
stab_blend: how much the stab color will be blended into the background shimmering. It’s a value between 0 and 100. If 100 is used, then the stab color will completely override the shimmering color. It is ignored for tip_spark.
stab_random: If ‘yes’ then it will choose a random color for the tip_spark effect.
Lock-up
lockup_mode is the mode for the lock-up effect. Can be one of the following values:
shimmer: does a shimmer on top of the base shimmering.
flash: flashes between a static color and the background (shimmering) color.
flash_flicker: same as flash, but the static color will have a random brightness between 50% and 100%.
lockup_color: the color of the lock-up effect.
lockup_depth: if lockup_mode is shimmer then it’s the depth of the shimmering, much like shimmer_depth.
lockup_freq: frequency in Hz of the lock-up effect.
lockup_blend: how much the lock-up color will be blended into the background shimmering. It’s a value between 0 and 100. If 100 is used, then the lock-up color will completely override the shimmering color.
Profile examples
Now that you have seen all the values you can use, let’s add a profile to our config.ini file.
[profile1]
## Font
font = 3
## Ignition
ignition_mode = draw
ignition_duration = 0
## Retraction
retraction_mode = draw
retraction_duration = 0
## Shimmer
shimmer_color = 237,28,36
shimmer_mode = pulse
shimmer_depth = 15
shimmer_freq = 15
## Clash
clash_mode = big_spark
clash_color = 255,255,255
## Blaster
blaster_mode = flash
blaster_color = 255,255,255
blaster_freq = 10
blaster_depth = 0
blaster_duration = 40
## Lock-up
lockup_mode = shimmer
lockup_color = 255,255,255
lockup_freq = 25
lockup_depth = 80
lockup_random = true
And that’s it. The configuration is now complete and your lightsaber is ready to roll!
So you’ve connected all the wires, turned-on the lightsaber and marvelled at the red blade, but then you realized that it would be cool to have also a green blade (same settings, just changing the blade color).
To do this we need to create a new profile BUT instead of redefining every value again, we can use the as_profile value and inherit all the settings from another profile, and then redefine/override the ones we are interested in.
So, we create [profile2] and tell it that it’s just like [profile1] but with a green shimmering.
# Here follows profile2
[profile2]

# That is just like profile1
as_profile = 1

# But with a green shimmering color
shimmer_color = 0,255,0
Now you can switch profiles while wielding your lightsaber, going back and forth between profile1 and profile2.
And since we are getting good at it, we start to add more and more profiles. The following profile is just like profile1 but changes some other things, like the font.
# This is profile3
[profile3]

# That is like profile1
as_profile = 1

# But with a bunch of different settings
font = 2
shimmer_color = 255,0,255
shimmer_mode = random
clash_color = 255,255,0
Now it’s up to you to decide if your profiles completely redefine all the settings, or making subtle changes to other profiles. You can keep adding profiles by redefining all the settings or by inheriting them from other profiles with as_profile.
It doesn’t matter in which line you place the as_profile value. The values from the profile pointed by as_profile will be loaded first, to be then overriden with the new values.
Usage instructions
Much of what follows here depends on how many buttons your lightsaber has. So we split this section into two lightsabers categories:
With single On/Off button
Ignition: press and release the On/Off button. You’ll see and hear the ignition.
Ignition on stab: press and hold the On/Off button and do a stab. Note that if you fail to do the stab and keep the button pressed, then the PBSaber will enter the profile selection mode.
Background music: while the lightsaber is off, press and release the On/Off button. This will start the background music. The next press and release of the On/Off button will do an ignition. You can also trigger Ignition on stab after the music has started. To cancel the ignition while the music is playing, keep the On/Off button pressed and the music will stop.
Blaster hits: are done by pressing and releasing the On/Off button.
Clashes: done by hitting the blade or hilt.
Swings: produced by swinging the hilt.
Stabs: are done by moving the hilt/blade like a swing, but only in the forward direction.
Force effect: is done by doing a swing while pressing and holding the On/Off button. You may need a little practice doing this since pressing the On/Off button long enough without a swing will produce a retraction (off_button_time value).
Lock-up: achieved by doing a clash while pressing and holding the On/Off button. Pressing the On/Off button long enough without a swing will produce a retraction. This is simpler than force effect but requires a little practice too.
Retraction: with the lightsaber on, press and hold the On\Off button.
Switching profiles: while the lightsaber is OFF, press and hold the On\Off button. You’ll hear a confirmation ‘click’. In this mode you can browse the profiles you have configured by pressing and releasing the On\Off button. You’ll hear a ‘click’ and the name of the font (if configured). Press and hold the On\Off button again to confirm the profile selection. The initial profile number will be updated (initial_profile value) at the next ‘retraction’.
With both On/Off and FX buttons
Ignition: press and release the On/Off button. You’ll see and hear the ignition.
Ignition on stab: press and hold the On/Off button and do a stab.
Background music: while the lightsaber is off, press and release the On/Off button. This will start the background music. The next press and release of the On/Off button will do an ignition. You can also trigger Ignition on stab after the music has started. To cancel the ignition while the music is playing, keep the On/Off button pressed and the music will stop.
Blaster hits: are done by pressing and releasing the FX button.
Clashes: are done by hitting the blade or hilt.
Swings: produced by swinging the hilt/blade.
Force effect: is done by doing a swing while pressing and holding the FX button. You may not get it right away since pressing the FX button long enough can produce a lock-up effect (lock_button_time value), and a little practice is needed.
Lock-up: achieved by pressing and holding the FX button.
Switching profiles: while the lightsaber is ON, select the next profile in the list by pressing and holding the FX button and the pressing the On/Off button. To select the previous profile in the list, press and hold the On/Off button and then press the FX button. While the lightsaber is OFF, you can select the next profile in the list by pressing the FX button, or select the previous profile by pressing and holding the FX button. You’ll hear the name of the font (if configured). You can browse the entire profile list in a circular fashion.
Retraction: press and hold the On\Off button.
Troubleshooting
If something is not working as expected, you can connect the PropBoard to your PC/MAC with an USB cable and use the Arduino serial console (at 115200bps) or any other terminal program (like TeraTerm, putty, etc.) to see all kinds of diagnostic messages. Even more if dump_profile_info and dump_font_info are set to ‘yes’. This message log will help you (and me in case you ask for support) to diagnose problems.
Hacking
The following section requires a little bit of knowledge on programming. Here we’ll see some advanced stuff for those who want to give a personal touch to their lightsabers.
Don’t worry, we won’t go deep into the guts of the PBSaber; we’ll just modify the PBSaber.ino file. To better understand, let’s take a look at it before we start.
#include "PBSaber.h"

PBSaber saber;

void setup()
{
    // Initialization
    saber.begin();
}

void loop()
{
    // Loop
    saber.poll();
}
Loading a different configuration file
There are several reasons for wanting to load different configuration files and to decide which one to load while the PBSaber boots-up. For example to load a configuration depending on some external condition like a blade type, or loading different “themes”, or you just want to try different settings and keep them all inside the same SD.
This can be achieved by calling saber.begin() and passing a string pointing to the configuration file you want to load, for example:
void setup()
{
    saber.begin("my_other_config.ini");
}
Let’s take for example the case in that you want to have a “dark” and “light” themes configuration files. Each configuration file contains profiles dedicated to each theme, using a different set of fonts/colors/effects/etc. This keep the “dark” and “light” profiles separated and won’t mix while changing profiles on-the-fly.
Let’s also say that you want to do this differentiation by holding the On/Off button while pulling the “kill-switch” out.
void setup()
{
    // After boot, the program gets here.

    // I have my On/Off button connected to pin 1, and is active-low, so it's read
    // as zero when it's pressed.

    // We want to load the "light" configuration by default, and to load the
    // "dark" configuration if the power button is pressed while removing the
    // kill-switch

    // Pin 1 as input pull-up
    pinMode(1, INPUT);
    digitalWrite(1, HIGH);

    // If there is a high signal on pin 1 it means our button is released
    if (digitalRead(1))
    {
        // Load the "light" configuration
        saber.begin("config_light.ini");
    } else {
        // Load the "dark" configuration
        saber.begin("config_dark.ini");
    }
}
Intercepting the lightsaber state
You can further add your own features by simply creating a function to receive information when the lightsaber changes states. Like this:
void setup()
{
    // Initialization
    saber.begin();

    // Instruct PBSaber to call the myFunction() function when the
    // lightsaber state changes.
    saber.setNewStateCallback(myFunction);
}

void myFunction(saberStateId state)
{
    // This function will be called when the lightsaber changes states.
    // The 'state' variable will contain the current lightsaber state.
}
You have to follow a simple rule: do not call delay() :)
Why? You’ll interrupt the lightsaber processing (becoming irresponsive) and blade effects will be affected. But other than that, there is still a lot you can do.
These are the states the lightsaber can transit. You’ll get the idea:
typedef enum
{
    stateOff,
    stateIdleOff,
    stateMusic,
    stateCycleProfiles,
    stateIgnition,
    stateIdleOn,
    stateRetraction,
    stateBlaster,
    stateLockUp,
    stateClash,
    stateSwing,
    stateSpin,
    stateStab,
    stateForce,
    stateNextProfile,
    statePrevProfile,
    stateMAX,
} saberStateId;
The following example code will play a “Toasty!” sound effect at the third quickly blocked blaster in a row, like if it were a Star Wars - Mortal Kombat Edition lightsaber (?).
#include "PBSaber.h"

PBSaber saber;
WavPlayer myPlayer;     // Create a WAV player

void setup()
{
    // Initialization
    saber.begin();

    // Instruct PBSaber to call the myFunction() function when the
    // lightsaber state changes.
    saber.setNewStateCallback(myFunction);
}

void loop()
{
    // Loop
    saber.poll();
}

// This function will be called when the lightsaber changes states.
// The 'state' variable contains the current lightsaber state.
void myFunction(saberStateId state)
{
    static int blaster_count = 0;

    // If it is a blaster
    if (state == stateBlaster)
    {
        // Count up to three
        blaster_count++;
        if (blaster_count == 3)
        {
            // And play a sound
            myPlayer.play("toasty.wav");

            // Start again
            blaster_count = 0;
        }
    } else {

        // Not a blaster, restart.
        blaster_count = 0;
    }
}
The above was just a quick example, but you’ll get the idea. Feel free to implement any functionality, like managing crystal chamber illumination or other indication LEDs or playing alternative audio files.
Overriding blade effects
Right before the PBSaber executes a blade effect, it will call a user-defined function. In this function you can override the effect parameters. You can set your function by calling the setOnEffectCallback() function. The do not call delay() rule applies also here.
#include "PBSaber.h"

PBSaber saber;

void setup()
{
    // Initialization
    saber.begin();

    // Tell PBSaber to call the effectOverride() function when it's about
    // to perform a blade effect
    saber.setOnEffectCallback(effectOverride);
}

void loop()
{
    // Loop
    saber.poll();
}

void effectOverride(uint32_t profile, saberStateId state, bladeEffect& effect)
{
    // This function is called before executing a blade effect.
    // The 'profile' parameter is the current profile ID.
    // The 'state' parameter is the current lightsaber state.
    // The 'effect' parameter is a structure containing the effect information.

    // Let's say we want to override the clash effect color for profile 5
    if (profile == 5 && state == stateClash)
    {
        effect.base_color = COLOR(255,255,255);
    }
}
These are the parameters you can override:
typedef struct
{
    effectType type;
    COLOR base_color;
    COLOR other_color;
    uint32_t freq;
    uint8_t depth;
    uint8_t blend;
    uint32_t duration;
    bool randomize;
} bladeEffect;
The following are the effectType values of the bladeEffect structure.
// Base flash effect modes
typedef enum
{
    effectTypeInvalid = 0,
    effectTypeStatic,
    effectTypeShimmer,
    effectTypeFlash,
    effectTypeFlashFlicker,
    effectTypeSpark,
    effectTypeFlashSpark,
    effectTypeBigSpark,
    effectTypeTipSpark,
} effectType;
Conclusion
I hope you guys/girls liked this mega-sketch and keep supporting the development of new features by purchasing a PropBoard.
For any feature request and bug report you can find the developer of this sketch (that’s me, Ivan) in the forum and Github.
Have fun!