Artekit AK-TMP116N Digital Temperature Sensor Breakout
Get started with the Artekit AK-TMP116N, a small and practical board to easily measure temperature.
Introduction
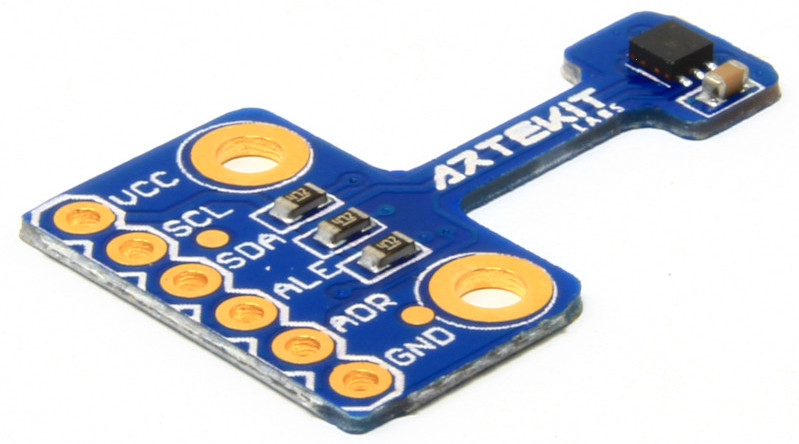
The Artekit AK-TMP116N is a breakout board for the Texas Instruments TMP116N Digital Temperature Sensor. It’s a very easy to use board that quickly enables you to sense ambient temperature using the I2C bus of your favorite development board.
In this guide will take a quick look at the board and library, including a practical example for temperature readings using the Arduino UNO.
Hardware description
Let’s start by taking a general look at the board:
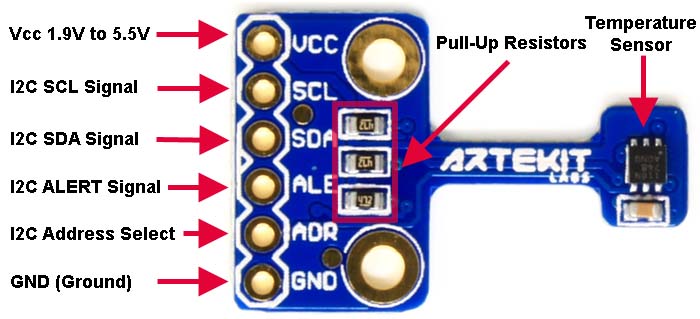
Pinout
- VCC: connect here the power supply. Can be 3.3V up to 5V.
- GND: connect the ground.
- SDA: I2C data.
- SCL: I2C clock.
- ALERT: connect to an input of your board. Used to signal a temperature ALERT condition.
- ADDRESS: you can modify the I2C address of the sensor by setting this pin to VCC.
Pull-up resistors
On the back of the board there are three solder jumpers you can use to enable 4K7 Ohm resistors for the I2C signals (SDA and SCL) and the ALERT pin.
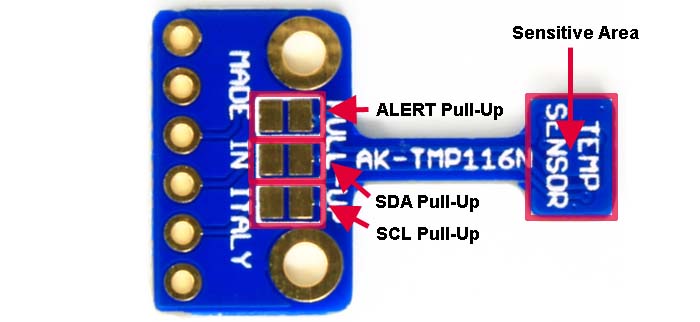
To enable these pull-up resistors, join the pads with some solder.
ADDRESS pin
By default, the I2C address of the sensor is 0x78. The address pin can be used to modify this address (and set it to 0x79) and thus allowing you to connect two sensors on the same I2C bus.
Example with Arduino UNO
For this example we are going to need:
- an Artekit AK-TMP116N board
- an Arduino UNO
- solder and soldering iron
- a breadboard
- jumper wires
- male headers (straight or right angle)
Start by soldering the headers to the board, then using the breadboard, connect the board like in the following picture:
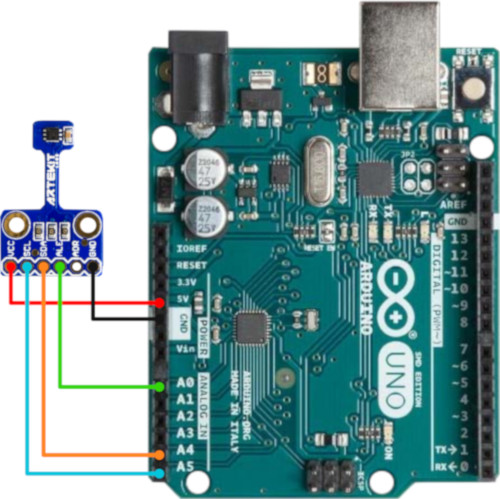
| Arduino UNO pin | AK-TMP116N pin |
|---|---|
| 5V | VCC |
| GND | GND |
| A0 | ALE |
| A4 | SDA |
| A5 | SCL |
Download and install the Artekit AK-TMP116N Arduino Library. You can download the library by clicking the button here below.
To start measuring right now, copy the following code and paste it into the Arduino IDE:
// Example for the AK-TMP116N temperature sensor breakout board.
// This example configures the sensor for temperature reading and
// ALARM sensing.

#include <Artekit_TMP116.h>

// The pin on which we connect the ALERT pin
#define TEMP_ALERT_PIN    A0
// Low limit for temperature alert
#define TEMP_LOW_LIMIT    20
// High limit for temperature alert
#define TEMP_HIGH_LIMIT   30

// Instantiate the Artekit_TMP116 class
Artekit_TMP116 temp_sensor;

bool initialized = false;

void setup()
{
  // Initialize serial port
  Serial.begin(9600);

  // Initialize the input pin for the ALERT indication
  pinMode(TEMP_ALERT_PIN, INPUT);

  // Initialize temperature sensor
  initialized = temp_sensor.begin();

  if (initialized)
  {
    Serial.println("AK-TMP116N sensor initialized");
  } else {
    Serial.println("Error initializing AK-TMP116N sensor");
  }

  // Configure the alert on a 20 degrees low limit
  // and a high limit on 30 degrees
  temp_sensor.setLowHighLimit(TEMP_LOW_LIMIT, TEMP_HIGH_LIMIT);
}

void loop()
{
  if (!initialized)
    return;

  // Read and print the temperature
  delay(500);
  float temperature = temp_sensor.readTemperature();
  Serial.print(temperature);
  Serial.println("ºC");

  // As an alternative you can do:
  //if (temp_sensor.readTemperature(&temperature))
  //{
  //  Serial.print(temperature);
  //  Serial.println("ºC");
  //}

  // Check for an alert (pin is active-low)
  if (!digitalRead(TEMP_ALERT_PIN))
  {
    // Get the alert type
    TMP116_Alert alert = temp_sensor.getAlertType();

    switch(alert)
    {
      default:
      case TMP116_NoAlert:
        break;

      case TMP116_AlertLow:
        Serial.println("ALERT L");
        break;

      case TMP116_AlertHigh:
        Serial.println("ALERT H");
        break;

      case TMP116_AlertLowHigh:
        Serial.println("ALERT HL");
        break;
    }
  }
}
Download the code to your Arduino and fire-up the Serial Console (at 9600). You’ll see temperature readings each 500ms. If the temperature becomes higher than X or lower than X, you’ll see the “ALERT L” or “ALERT H” text coming out in the Serial Console.
Library for Arduino explained
The functions to access the temperature sensor are enclosed in the Artekit_TMP116 class. To access the functions, instantiate the class this way:
Artekit_TMP116 temp_sensor;
Now every function can be accessed like this:
temp_sensor.begin();
If you have modified the address of the TMP116N (with the ADDRESS pin), you have to instantiate the class specifying the new address, like this:
Artekit_TMP116 temp_sensor(0x79);
Here is a list and detailed explanation of the library functions you can use in your sketches:
bool begin();
void end();

float readTemperature();
bool readTemperature(float* temperature);

bool setLowLimit(float low);
bool setHighLimit(float high);
TMP116_Alert getAlertType();
bool setLowHighLimit(float low, float high);
void clearAlert();

uint16_t readRegister(uint8_t address);
bool readRegister(uint8_t address, uint8_t* valueL, uint8_t* valueH);
bool readRegister(uint8_t address, uint16_t* value);
bool writeRegister(uint8_t address, uint16_t value);
bool writeRegister(uint8_t address, uint8_t valueL, uint8_t valueH);
Artekit_TMP116::begin()– call this function to initialize the library.Artekit_TMP116::end()– call this function to de-initialize the library.Artekit_TMP116::readTemperature()- returns the current temperature in Celsius degrees.Artekit_TMP116::readTemperature(float* temperature)– does the same as the above function but it checks if there is new conversion data available. The function returns immediately with false if the temperature data wasn’t ready yet, or true if there was a successful temperature reading. The temperature will be stored in a variable pointed by the temperature pointer. For example:float temp; if (temp_sensor.readTemperature(&temp)) { // Temperature successfully read Serial.print("Temperature read! It is = "); Serial.println(temp); }
Artekit_TMP116::setLowLimit(float low)- this function sets a low temperature limit (in Celsius degrees). If the temperature goes below this limit, the ALERT pin will be asserted.Artekit_TMP116::setHighLimit(float high)- this function sets a low temperature limit (in Celsius degrees). If the temperature goes above this limit, the ALERT pin will be asserted.Artekit_TMP116::setLowHighLimit(float low, float high)- this function does the same as the above two functions, but in a single function call.Artekit_TMP116::getAlertType()- returns the type of alert. The return value can be:TMP116_NoAlert- No alert happened.TMP116_AlertLow- Temperature crossed the low-limit (configured with thesetLowLimitfunction).TMP116_AlertHigh- Temperature crossed the high-limit (configured with thesetHighLimitfunction).
Artekit_TMP116::clearAlert()- call this function after detecting an alert to clear the alert state. The ALERT pin will go back to the rest (low) level and will be asserted by the next ALERT condition.
You can eventually set your own sensor configuration by directly accessing the sensor registers using the following functions. Note that in normal use cases you won’t need to use them.
Artekit_TMP116::readRegister(uint8_t address, uint8_t* valueL, uint8_t* valueH)Artekit_TMP116::readRegister(uint8_t address, uint16_t* value)Artekit_TMP116::writeRegister(uint8_t address, uint16_t value)Artekit_TMP116::writeRegister(uint8_t address, uint8_t valueL, uint8_t valueH)