Artekit PropBoard: LedStrip Library
The LedStrip library allows you to use LED strips with the Artekit PropBoard.
Introduction
The LedStrip library allows you to use a Addressable LEDs (a.k.a. Neopixels) with the PropBoard. You can add the library to your sketch by selecting it the Sketch menu -> Include Library sub-menu, then selecting LedStrip in the Contributed libraries section. Or you can write #include <LedStrip.h> at the top of your sketch.
The library is automatically installed when you install the PropBoard Board Support Package.
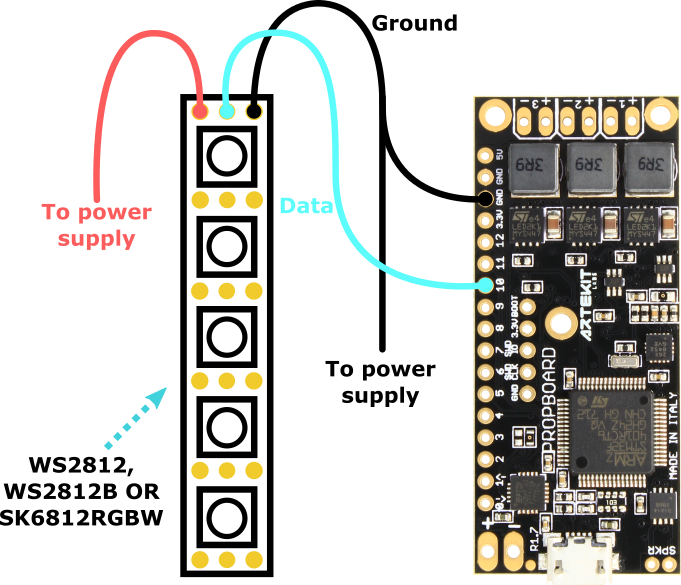
Currently, the LedStrip library supports the following LED strips:
- WS2812 or WS2812B
- APA102 or APA102C
- SK6812RGBW
Connections
The LedStrip library uses the SPI MOSI (Pin 10) to send data to the WS2812B or SK6812RGBW strip.
To use an APA102C strip, connect the pin 10 to the DATA pin and pin 12 to the CLOCK pin.
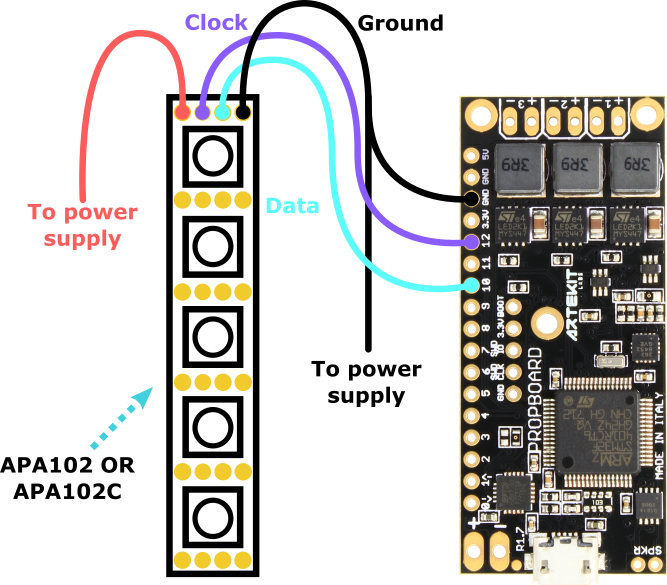
It is advised to put a 300 to 500 Ohms resistor between the data line and the PropBoard pad. This is to avoid damaging the microcontroller pin or the first LED in the LED strip in the case the data line is connected before VCC and ground.
The pictures up here show the typical connections. Check with your LED strip datasheet to find which and where are the pins you need to connect (usually DATA, GROUND and VCC).
See also
Usage
You can drive your LED strips through the LedStrip class. Start by creating a LedStrip object, then call LedStrip::begin indicating the quantity of LEDs in the LED strip and the type of LED strip. For example:
#include <LedStrip.h>

LedStrip myLedStrip;

void setup()
{
    // A WS2812B strip with 4 LEDs
    myLedStrip.begin(4, WS2812B);
}
Then call the LedStrip::set function to set the color of one LED (or all LEDs) on the strip. The LedStrip::set function only updates the color of the LED in an internal RAM buffer. To actually transfer the contents of the buffer to your LEDs you need to call the LedStrip::update function.
Example
void loop()
{
    // Set the 1st LED with white color
    myLedStrip.set(1, 255, 255, 255);

    // Set the 2nd LED with red color
    myLedStrip.set(2, 255, 0, 0);

    // Set the 3rd LED with green color
    myLedStrip.set(3, 0, 255, 0);

    // Set the 4th LED with blue color
    myLedStrip.set(4, 0, 0, 255);

    // Update all the LEDs
    myLedStrip.update();

    // Delay a second
    delay(1000);

    // Sets all the LEDs with some color
    // Note the first parameter: when zero
    // all the LEDs are set with the same color
    myLedStrip.set(0, 111, 55, 255);

    // Update all the LEDs
    myLedStrip.update();

    // Delay half a second
    delay(500);
}
The LedStrip library takes over the SPI channel. It is not recommended to use the SPI library together with the LedStrip library.
LedStrip::begin
The LedStrip::begin function initializes the LedStrip object by setting the quantity of LEDs of the LED strip.
Syntax
bool begin(uint32_t count, LedStripeType type = WS2812B);
Parameters
The count parameter indicates the quantity of LEDs that you LED strip has.
The type parameter indicates the type of LED and can be one of the following values:
- WS2812B: for WS2812B LED strips.
- APA102: for APA102 LED strips.
- SK6812RGBW: for SK6812RGBW LED strips.
If the type parameter is omitted, then it takes the default WS2812B value.
Returns
Returns true on success, false otherwise.
LedStrip::set
The LedStrip::set function sets the color of one LED or all LEDs in the strip. The function only modifies values in a buffer in RAM. To actually transfer the contents of the buffer to your LEDs you need to call the LedStrip::update function.
Syntax
void set(uint32_t index, uint8_t r, uint8_t g, uint8_t b, uint8_t w = 0);
void set(uint32_t index, const COLOR& color);
Parameters
The index parameter is the LED number you want to set. It’s 1-based, so a value of 1 refers to the first LED in the strip, a value of 2 refers to the second LED in the strip, and so on. If index is zero, then all the LEDs in the strip are set with the same color.
The r, g, b and w parameters are the values for red, green, blue and white respectively. The white value has only meaning if the LED strip is a SK6812RGBW, otherwise is ignore and can be omitted. The value is a number from 0 to 255, where 0 means ‘off’ and 255 means ‘maximum brightness’. The passed value will be brightness-corrected by the function, much like HBLED::setValue does for high-brightness LEDs.
The color parameter is a COLOR object. Can be used if the following ways:
COLOR red(255,0,0);     // Red

// Set the color to red
myStrip.set(0, red);

// Or the COLOR object can be used like this
myStrip.set(0, COLOR(255,0,0));
Returns
None.
Notes
You can call this function even if an effect (like shimmering) is in progress. It will not modify the effect behaviour.
LedStrip::setRange
This function sets a range of LEDs in the strip with a given color.
Syntax
void setRange(uint32_t start, uint32_t end, const COLOR& color);
void setRange(uint32_t start, uint32_t end, uint8_t r, uint8_t g, uint8_t b, uint8_t w = 0);
Parameters
The start parameter is the index of the LED where the range starts. Has to be equal or higher than 1. The end parameter is the index of the last LED of the range. The color and r,g,b and w parameters define the color to set.
LedStrip::update
The LedStrip::update function sends the contents of the RAM buffer to the LED strip.
Syntax
bool update(uint32_t index = 0, bool async = false);
Parameters
The index parameter is optional, and indicates up to which LED in the strip you want to update. If omitted or left to 0, then the entire LED strip is updated.
The async parameter is optional. When false, the function will block until all the LEDs specified by the index parameters are updated. If true then the function is asynchronous, and will return immediately. Call the LedStrip::endUpdate function when finished. To know if all the LEDs were updated, call the LedStrip::updating function. If using WS2812B LEDs, the 50uS delay for reset is not done by the function itself and has to be done by the caller.
Returns
The function returns true on success, false otherwise. If the function was called with the async parameter set to true, the function may return false if there is already an update procedure in progress.
Notes
If an effect is in progress (for example, shimmering) a call to this function will stop it.
LedStrip::updating
Call this function to know whether an asynchronous update procedure (LedStrip::update function called with the async parameter set to true) is in progress.
Syntax
bool updating();
Parameters
None.
Returns
The function returns true if there is an update procedure in progress. Otherwise it returns false.
LedStrip::endUpdate
Call this function to correctly end an asynchronous update procedure (LedStrip::update function called with the async parameter set to true).
Syntax
void endUpdate();
Parameters
None.
Returns
None.
Notes
If this function is called when an update is in progress, it will block until it finishes.
LedStrip::shimmer
This function starts an asynchronous shimmering effect on the LED strip. It uses a fixed color, an amplitude value and frequency to create a series of consecutive, linear brightness ramp-up and ramp-down effects between the passed color and the given amplitude.
Syntax
void shimmer(COLOR color, uint8_t amplitude, uint32_t hz, bool random);
Parameters
The color parameters is a the color for the shimmering effect. It will be applied to all the LEDs declared when calling the LedStrip::begin function. This color value should be the maximum value the shimmering effect will use. Use the RGB macro to set this value.
The amplitude value is a 0 to 100 (percent) value indicating the brightness amplitude of the shimmering effect. For example, a value of 100 will produce a shimmering effect ranging from the maximum brightness value (the color parameter) down to minimum brightness (zero). A value of 20 will produce a shimmering effect ranging from the maximum brightness value down to a 20% less of the maximum brightness.
The hz parameter is the frequency in Hertz (maximum 30Hz).
If the random parameter is ‘true’, a random amplitude value will be selected at the given frequency. Otherwise a ramp-up/ramp-down effect is produced.
Returns
None.
Notes
To stop the shimmering effect, call the LedStrip::stopEffect or the LedStrip::update functions.
The following illustration shows the parameters involved in the shimmering effect.
![]()
Example
LedStrip myLedStrip;

void setup()
{
    // A LED strip with 10 LEDs
    myLedStrip.begin(10);

    // Start a red shimmering effect with a 25 amplitude and 15 Hz
    myLedStrip.shimmer(RGB(255, 0, 0), 25, 15, false);

    // Delay
    delay(5000);

    // Set the LED strip all to blue
    myLedStrip.set(0, 0, 0, 255);

    // Update
    myLedStrip.update();
}
LedStrip::withEffect
Call this function to know if the LedStrip object is executing an effect.
Syntax
bool withEffect();
Parameters
None.
Returns
Returns true if the LedStrip object is executing an effect, otherwise it returns false.
LedStrip::stopEffect
Call this function to stop an ongoing asynchronous effect.
Syntax
void stopEffect();
Parameters
None.
Returns
None.
Notes
When the effect stops, the LedStrip will keep the latest value set by the effect.
Brightness
You can control the brightness of the LED strip using the following functions:
void setBrightness(float value);
void incrementBrightness(float value);
void decrementBrightness(float value);
float getBrightness();
The value parameters is a floating point number from 0 to 1.
The brightness of a color is calculated every time you call LedStrip::set or LedStrip::setRange. This means that calling any of the above functions will only take effect only over new colors you set with the LedStrip::set or LedStrip::setRange functions. The brightness of the current colors shown in the LED strip will not be updated to reflect the new brightness.