Artekit WaveTooEasy
User manual for the Artekit WaveTooEasy polyphonic WAV player.
Introduction
The Artekit WaveTooEasy is a WAV audio player specifically designed to be easily integrated into projects that require audio playback. It’s so easy to use and integrate that you can couple a WaveTooEasy board to an already existing project in no time, even if the project is powered by a legacy or low-end microcontroller, or no microcontroller at all. And the most important thing: no coding required! WaveTooEasy comes already programmed and works out of the box!
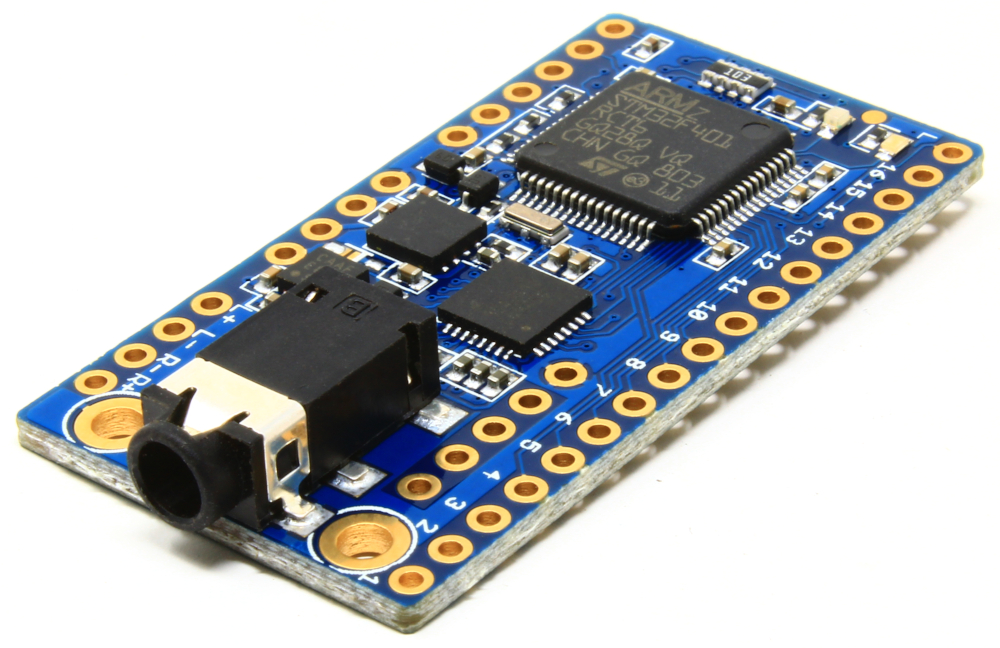
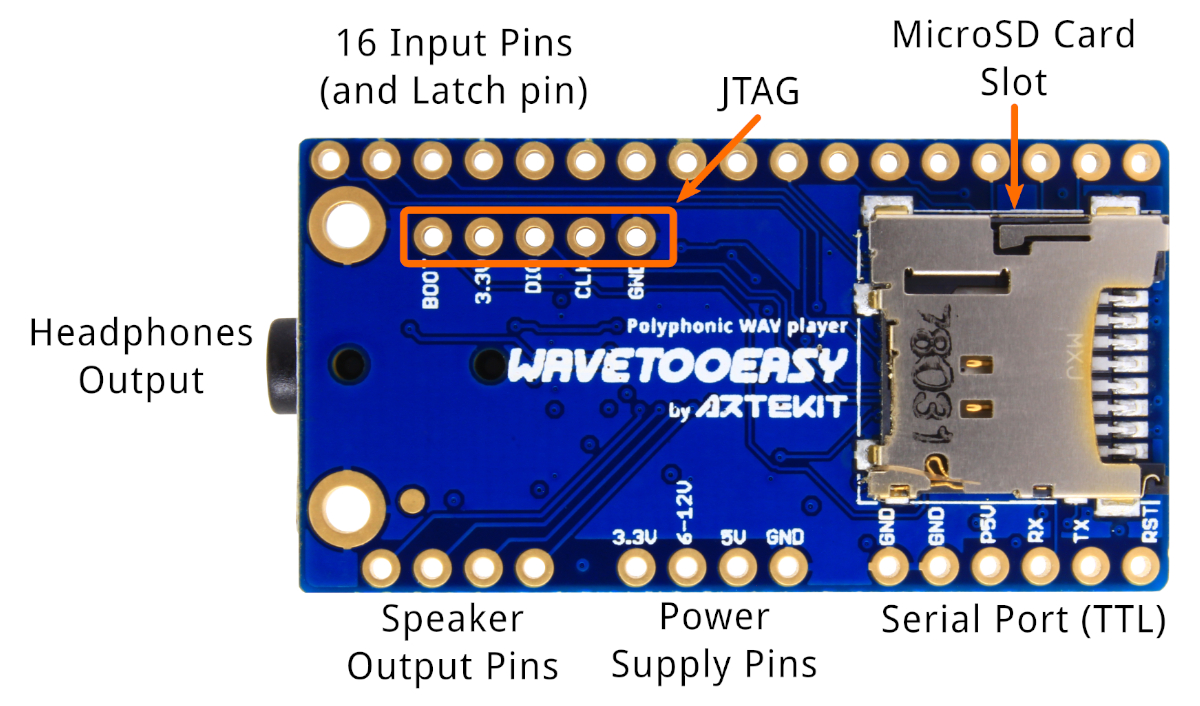
Artekit Labs WaveTooEasy board.
By sensing 16 input pins, or by interpreting commands through the serial port, WaveTooEasy can select and play up to 10 WAV files simultaneously, achieving polyphony with very low latency. In a few words, toggle a signal on a pin (like with a button) and the corresponding WAV file is played; toggle another pin and a second WAV file is played, mixing and playing up to ten WAV files in real-time.
The WAV files are stored in a microSD card (the board has a microSD slot) and a simple text configuration file tells the WaveTooEasy how to behave.
The board is powered by a Cortex M4 microcontroller running a modified version of the audio engine used by the Artekit PropBoard. Audio output is achieved by a 2.5W Class-D stereo amplifier with outputs for speakers and headphones.
WaveTooEasy comes with three modes of operation: serial, bare IO pins and latched mode, with distinct uses for every mode and fully configurable.
Features
- Highly configurable polyphonic WAV audio player.
- Plays up to 10 simultaneous WAV files.
- No coding or programming required.
- Works out of the box.
- Easy to integrate with existing projects.
- Supports 16-bit, mono or stereo, uncompressed WAV files.
- Supports sampling frequencies from 22050Hz up to 41000Hz.
- Typical latency: ~4.5ms.
- 16 input pins, latch pin and TTL serial port (all 5V tolerant).
- Input pins with internal pull-up, pull-down resistors.
- Three operation modes:
- IO mode (playback triggered through digital inputs).
- Latched mode (playback triggered through a latch input).
- Serial mode (playback is controlled through serial communication).
- Integrated microSD card slot.
- 2.5W Class D stereo amplifier, for headphones and speakers.
- 3.5mm jack for stereo headphones.
- Supports 3.3V, 5V and 6V-12V power supplies.
- Supports SDSC, SDHC and SDXC microSD cards.
- Open-source firmware.
- Easy firmware updates using the microSD card.
- 2 indication LEDs.
- Low-power mode.
- Arduino IDE compatible: optionally, you can develop your own firmware for the WaveTooEasy using the Arduino IDE.
Hardware overview
In this section we are going to learn about the different components of the board.
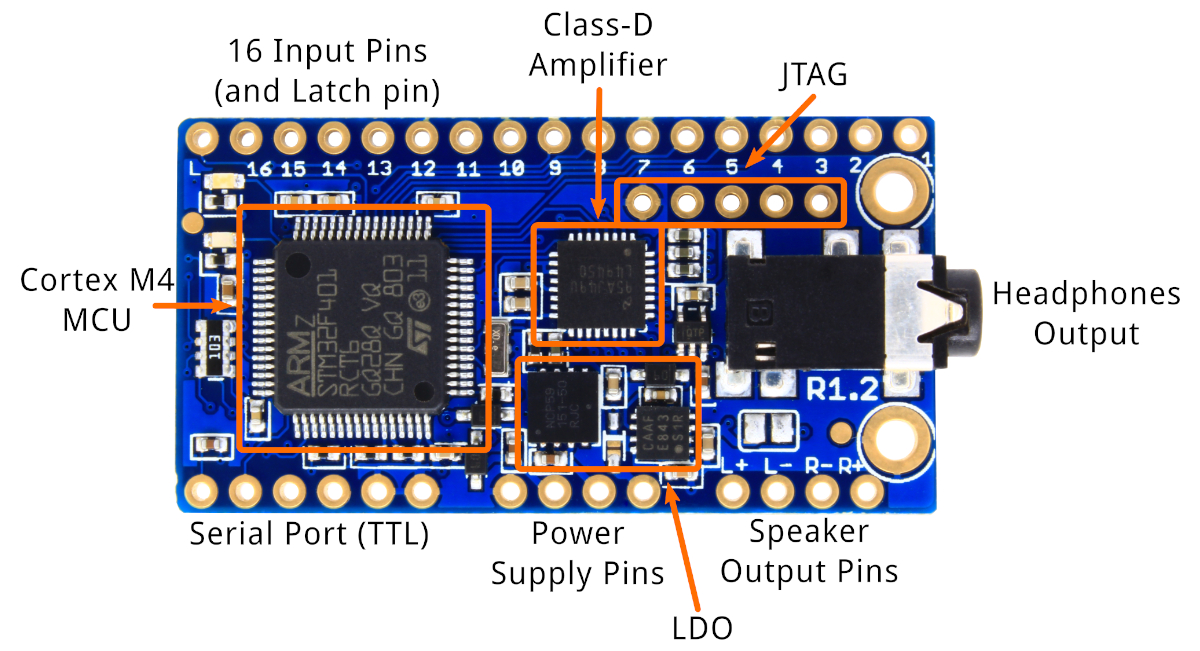
WaveTooEasy hardware. Top view.
The WaveTooEasy is powered by an STmicroelectronics STM32F401 Cortex M4 MCU. The MCU is in charge of processing serial port commands, sensing the 16 inputs pins and playing the WAV files from the SD card (slot located on the back of the board).
Audio output is achieved through a 2.5W Class-D amplifier, the Texas Instruments LM49450, with outputs for speakers (differential) and for headphones.
The board accepts a wide range of power supplies (details in the next section) using a couple of on-board LDO regulators.
Optionally, you can use the JTAG SWDIO pins for programming/debugging.
WaveTooEasy hardware. Bottom view.
On the back of the board there is the microSD slot and you can also find some pin labels that, for space reasons, could not be placed on the top side of the board.
Power supply
The WaveTooEasy board accepts a wide range of power supplies. There are 3 pins for the different power supply ranges and a pin for the common ground.
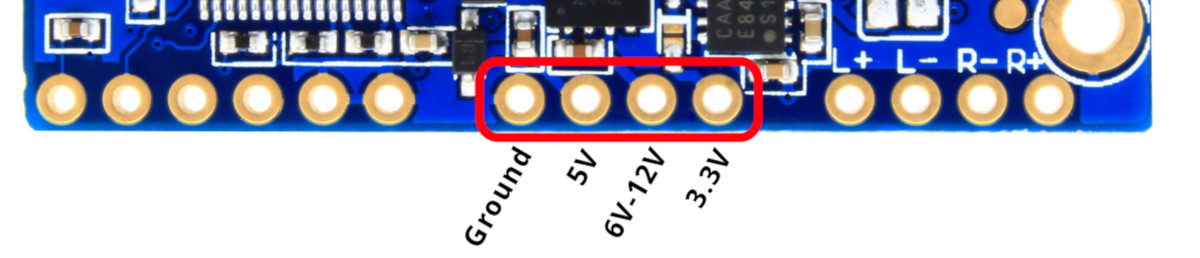
WaveTooEasy power supply pins.
Pinout
- Ground: power supply common ground (this is not the audio ground).
- 5V: you can connect here a 5V power supply.
- 6V-12V: you can connect here a power supply between 6V and 12V.
- 3.3V: you can connect here a 3.3V power supply.
NOTES
Do not supply the board with different power supplies at the same time. For example, do not supply 5V while the board is already powered with 3.3V.
The first stage regulator may overheat when the following conditions are met: sustained high-volume playback is on, with volume above 20dB selected for speakers and a voltage above 9V is used on the 6V-12V pin. In case you need to play constant high-volume audio files on speakers please apply a lower voltage above 6V or use the 5V pin with a 5V power supply. The audio section of the board is always powered at 5V and thus there is no performance loss.
Optionally, you can power-up the board using the pins available at the serial port pins (only supporting 5V).
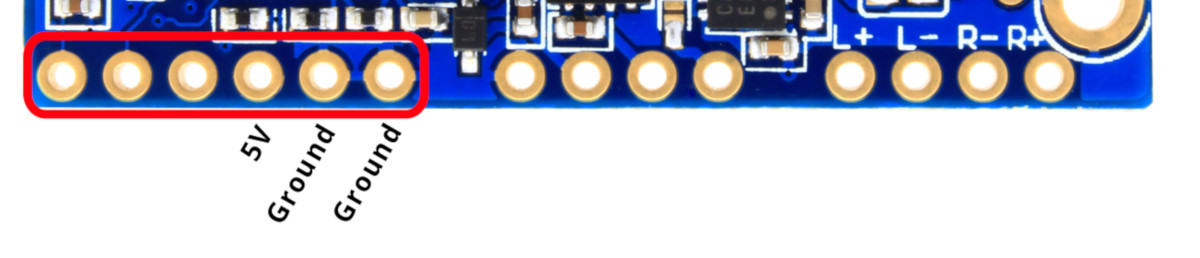
WaveTooEasy power supply at the serial port pins.
This 5V power supply pins are here because you can also power the board by directly plugging an USB-to-Serial converter like our Artekit AK-FT232RL.
Audio output
WaveTooEasy has two audio outputs connectors: pins for speakers and a 3.5mm jack for connecting headphones.

WaveTooEasy audio outputs (speaker and headphones).
Speaker pins
Here you will connect your 8Ω or 4Ω speakers. The output is a digital signal (from the Class-D amplifier). If your system only has one speaker (mono), use only L+ and L- signals, or R+ and R- signals. That is, do not connect R and L signals together into a single speaker.
Headphones jack
The headphones jack is a standard 3.5mm audio jack (stereo). The output signal is analog, slightly amplified (942 mV RMS) to drive headphones.
When the headphones are connected into the headphones jack, the speakers pins are automatically disabled.
Usage modes
Now that we have learned about audio configurations and power supply modes, let’s get into the operation modes of the WaveTooEasy board.
WaveTooEasy has 10 independent audio channels, and each channel can play an audio WAV file. These audio channels are virtual: that means that they have no relation with the Input Pins you can see in the board. These audio channels represent the quantity of audio files the WaveTooEasy can play at the same time.
So, how can we play audio on these channels? Playing audio on these channels depends on external events, like a signal coming into an input pin or a command received on the serial port. The mode WaveTooEasy reacts to external events is called an “operation mode”, and you can select which operation mode to use through a configuration file that you will copy into the SD card (more on this later).
In total, WaveTooEasy has 3 operation modes:
IO mode
Latch mode
Serial mode
In the following sections of this documentation we will explain every mode.
IO mode
Each one of the input pins of the board (1 to 16, as seen in the picture here below) can be toggled to play an audio file.

WaveTooEasy input pins.
Each time an input pin is toggled, WaveTooEasy will play the corresponding WAV file that is mapped to the pin (we do this in the configuration file). If there is no WAV file mapped, WaveTooEasy will try to play a file called pin_number.wav (from 1.wav to 16.wav).
Each pin can be configured to be triggered by edge (the WAV file is played when there is a voltage transition from high to low or viceversa), or by level (the WAV file is played as long as the pin is kept in a certain voltage level, high or low).
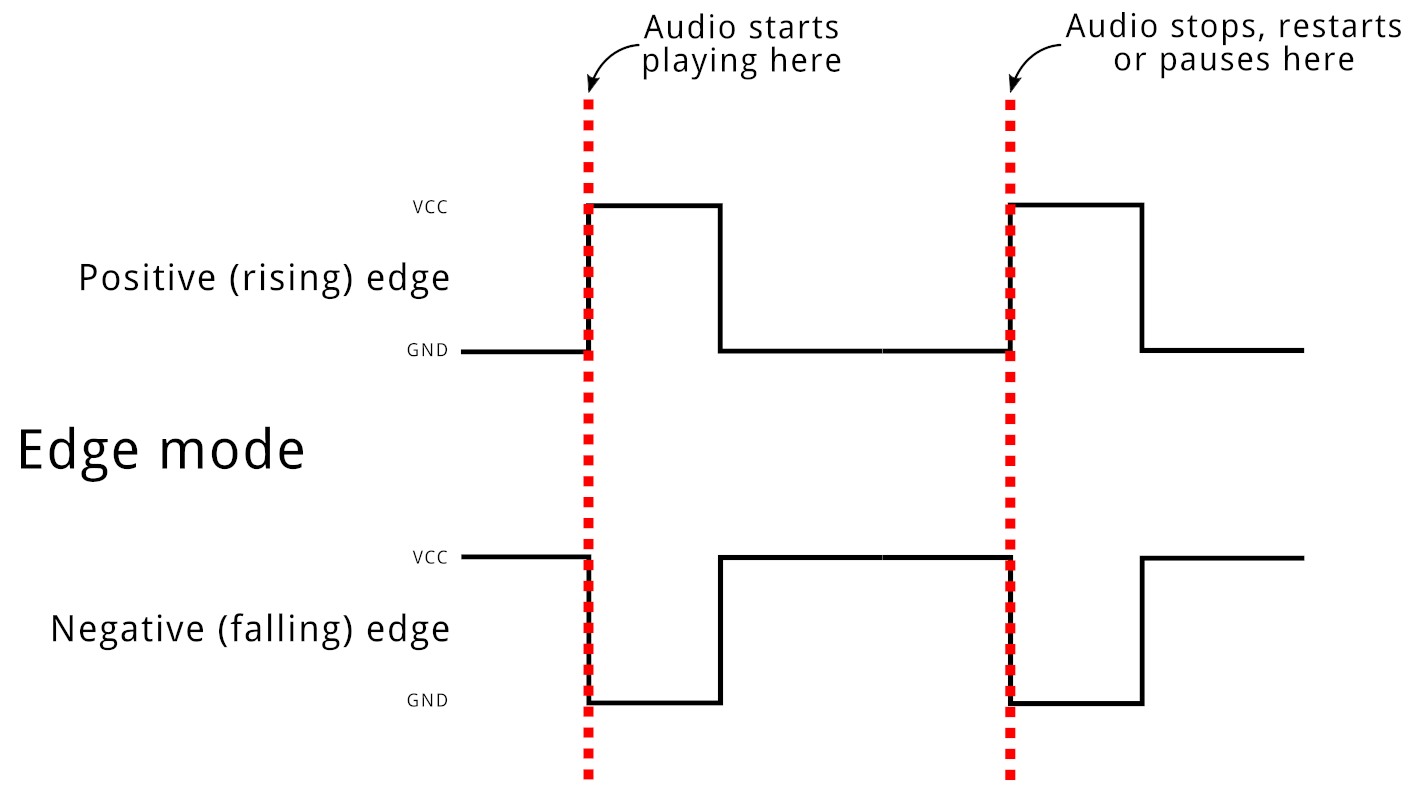
Edge trigger mode.
Level trigger mode.
The IO mode is highly configurable: you can choose which file to play, the kind of trigger (edge or level) polarity of the signal (high or low), playback mode (normal or looped), volume, and if the sound should be restarted or paused/resumed when triggered. All these options are available independently for every pin.
IO mode PROs:
Intuitive and easy to use.
Ideal to be used together with physical switches connected to the inputs (for example, to create a basic musical instrument).
It doesn’t require an external controller (like a microcontroller, Arduino, etc.).
IO mode CONs:
- Access to only 16 different WAV audio files.
Latched mode
This mode uses the latch pin together with the other 16 pins. Each one of the 16 pins becomes the bit of a binary number that represents a file in the SD, making it possible to play up to 65536 different WAV files by using just the pins (from 0.wav to 65535.wav).
You don’t need to necessarily drive all the 16 pins: you can play 2^N WAV files by just using N pins (where N <= 16 and N > 0), plus one pin for the latch.
To select a file to play, put a signal into the pins representing the (binary) number of the file you want to play. For example, to play the file 29.wav (which in binary is 11101) assert the input pins 1, 3, 4 and 5. Then do a pulse on the latch pin, and the WAV file will start playing. If there was a WAV file already playing, it is stopped and the new selected file will be played.
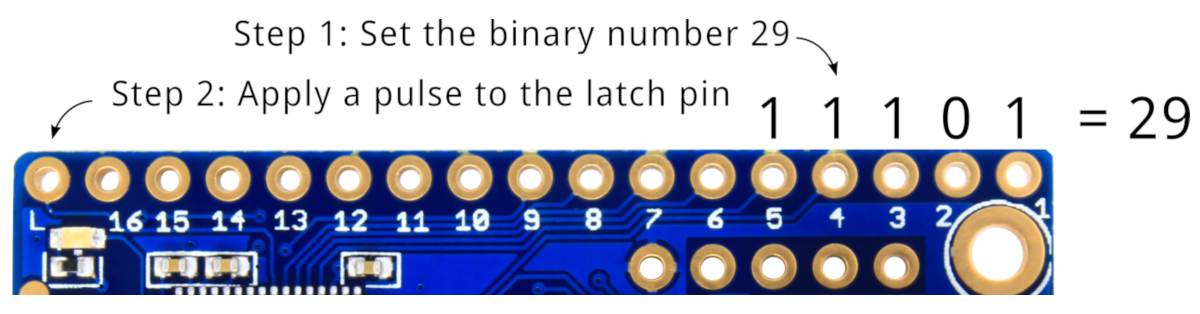
Latched mode example (playing file 29.wav).
You can configure the polarity of the pins (all active-high or all active-low) and the polarity of the latch pin.
Latch mode PROs:
Access up to 65536 files by just using pins.
It doesn’t require an external controller (like a microcontroller, Arduino, etc.).
Latch mode CONs:
No control over playback operations other than “play” (you cannot stop or pause the playback).
No loop mode playback.
Plays one file at the time.
Serial mode
This operating mode is the most flexible as it allows you to fully control each of the 10 available channels. By using a simple protocol (available as a portable C library and also as a library for Arduino), you can start/stop/pause the playback on any channel, configure the volume, playback mode, etc.
In this operating mode, all other input pins are disabled.
Serial mode PROs:
Full control of the player and its 10 audio channels.
Start/stop/pause/volume controls.
Status for every channel (free/busy status).
Serial mode CONs:
- Requires an external controller with an UART.
Configuration file
WaveTooEasy board requires a very simple configuration file that defines the operation mode, serial port baudrate, sample rate, master volume and other settings we’ll see in this section.
This configuration file is a standard INI file that should be placed on the root of the microSD card and named config.ini.
The syntax of the config.ini file is very simple, and is like any other INI file you have probably seen before:
It has [sections], enclosed in square brackets.
Inside every sections there is a series of key-value pairs, usually related to the section they are enclosed within.
As a general example, let’s take a look at the following configuration file, that uses IO mode and plays files from 1.wav to 16.wav
[settings]
mode = io
sample_rate = 44100
speakers_volume = 19
headphone_volume = 7

[io]
ch1_mode = normal edge high
ch2_mode = normal edge high
ch3_mode = normal edge high
ch4_mode = normal edge high
ch5_mode = normal edge high
ch6_mode = normal edge high
ch7_mode = normal edge high
ch8_mode = normal edge high
ch9_mode = normal edge high
ch10_mode = normal edge high
ch11_mode = normal edge high
ch12_mode = normal edge high
ch13_mode = normal edge high
ch14_mode = normal edge high
ch15_mode = normal edge high
ch16_mode = normal edge high
In this chapter we will explaing every possible section and key-value pairs, starting with the [settings] section.
[settings] section
This section defines the general behavior of the board, and most importantly, the mode the board will operate (IO mode, latch mode or serial mode).
The possible keys you can configure in the [settings] section are:
mode: defines the operation mode. It can have the following values:
io
latch
serial
For example:
[settings]
mode = serial
sample_rate: the sample rate of all the WAV files WaveTooEasy will play. Note that all the files have to have the same sample rate, and it has to be the one you will define here. The available sample rates are: 22050, 32000 and 44100. For example:
sample_rate = 44100speakers_volume: a floating point value representing the speakers volume in dB. A value between -53 up to 24. The default and “normal” value is 0.
speakers_volume = -5NOTE: the amplifier has fixed values that can be set as speaker_volume (-53, -42, -34.5, -28.5, -24, -21, -18, -15, -12, -9, -7.5, -6, -4.5, -3, -1.5, 0, 1.5, 3, 4.5, 6, 7.5, 9, 10.5, 12, 13.5, 15, 16.5, 18, 19.5f, 21, 22.5 and 24 dB). You can use any value, and the software will try to match the nearest lower fixed value. For example, if you choose -5 dB the software will pick -6 dB.
headphones_volume: a floating point value representing the headphones volume in dB. A value between -59 up to 18 dB. The default and “normal” value is 0.
headphones_volume = -5NOTE: the amplifier has fixed values that can be set as headphone_volume (-59, -48, -40.5, -34.5, -30, -27, -24, -21, -18, -15, -13.5, -12, -10.5, -9, -7.5, -6, -4.5, -3, -1.5, 0, 1.5, 3, 4.5, 6, 7.5, 9, 10.5, 12, 13.5, 15, 16.5, 18). You can use any value, and the software will try to match the nearest lower fixed value. For example, if you choose -5 dB the software will pick -6 dB.
NOTE about headphones volume: please keep in mind that the default 0dB setting for headphones volume is very loud. Try to set it to -12dB or lower. Test the headphones volume first by playing an audio file without putting them in your ears.
baudrate: the baudrate of the serial port when
mode = serial. Can be a standard baudrate value between 9600 and 921600. The default baudrate is 115200.baudrate = 115200low_power_timeout: this optional value specifies a timeout (in seconds) in which, in the absence of activity (on IO pins when
mode = io,mode = latchor serial activity ifmode = serial), the board will enter into low-power mode. If this setting not present, the board will not enter into low-power mode. After entering into low-power mode, to wake-up the board apply a 100ms high pulse to the Channel 1 pin.# Set the low power timeout to 5 seconds low_power_timeout = 5
disable_leds: the WaveTooEasy board has 2 indication LEDs. You can disable these LEDs using this setting. If this setting is missing, the LEDs will be used as described here).
# Disable LEDs
disable_leds = yes
[io_mode] section
This section has to be defined when mode = io. It serves to configure each pin characteristics, like input polarity, play mode and the file to play.
Every pin is configured with a key named pinN_mode, where N is the number of the pin (from 1 to 16). For example, to configure pin 1, 2 and 3 you have to define:
[io mode]
pin1_mode =
pin2_mode =
pin3_mode =
# etc.
Now, every pin is configured with a string that has the following format:
pinN_mode = play_mode polarity trigger_mode trigger_action
play_mode: this is the playback mode. It can be normal or loop.
polarity: the polarity of the digital signal for this pin. It can be low for a pin that is triggered with a low (falling) signal, or high for a pin that is triggered with a high (rising) signal. The WaveTooEasy firmware will activate an internal (weak, 47K typical) pull-down or pull-up according to the selected polarity.
trigger_mode can be:
edge: for a pin that is triggered when a signal goes from low to high (or viceversa, depending on the polarity setting). For example, if you are playing piano audio files, this is the trigger mode you’ll want to use.
level: to trigger and keep the audio playing while a signal stays either low or high (depending on the polarity setting). For example, if you are playing flute audio files, this is the trigger mode you’ll want to use.
trigger_action: can have one of the following values:
restart: is the default value. At every edge or level trigger, the WAV file is played back from the begining.
pause: allows you to pause/resume the playback at every edge trigger, or pause/resume the playback when the level trigger is inactive/active respectively.
stop: if an audio file is playing, it allows you to stop the playback at the next edge trigger. This option is only available if
trigger_mode = edge. The audio will start playing again at the next edge trigger.
Here are some examples:
## Configure pin 1 to trigger on a low level signal, playing in loop mode
pin1_mode = loop low level

## Configure pin 2 to trigger on a rising edge, playing in normal mode
## and able to pause/resume playback
pin2_mode = normal high edge pause
If the pinN_mode value is not present, it will be defaulted to normal high level.
Now, how we tell WaveTooEasy which file to play when a given input pin is triggered?
For this there is the pinN_file key (where N is the pin number). This value configures the full path of the file to play when a given input pin is triggered (note that the maximum path length is 255 bytes). If this value is not present, it will default to “pin_number”.wav (for example 1.wav for channel 1).
Example for pin 1:
## Configure pin 1 to trigger on a low level signal, playing in loop mode the
## drums.wav file located in the music\beats folder.
pin1_mode = loop low level
pin1_file = \music\beats\drums.wav
Optionally, you can specify the output volume of the playback. This is done with the pinN_volume (where N is the pin number). It’s a floating point value between 0 to 2, where 1 is the default value.
## Configure pin 1 to trigger on a low level signal, playing in loop mode the
## drums.wav file located in the music\beats folder.
pin1_mode = loop low level
pin1_file = \music\beats\drums.wav
pin1_volume = 1.2
You can also enable a debouncer on every pin. This is the case in which you have very noisy switches or ripple in the signal that can trigger a pin multiple times. It is configured with the pinN_debouce key (where N is the pin number). If the value is not present then the default debounce value is 5ms.
## Configure pin 1 to trigger on a low level signal, playing in loop mode the
## drums.wav file located in the music\beats folder.
pin1_mode = loop low level
pin1_file = \music\beats\drums.wav
pin1_volume = 1.2
pin1_debounce = 25
[latch_mode] section
This section has to be configured if mode = latch. If defines the polarity of the input and latch pins.
latch_polarity: configures the polarity of the latch pin as active-high or active-low. It can be low or high respectively.
input_polarity: configures the polarity of all the input pins as active-high or active-low. It can be low or high respectively.
Example:
## Latch mode: configure both the latch pin and the input pins
## as active-high.
[latch mode]
latch_polarity = high
input_polarity = high
[serial_mode] section
This section is optional and defines the name of the files that can be played for every channel when operating in serial mode (mode = serial).
Instead of operating on pins (like the io mode), the serial mode operates on channels (remember that WaveTooEasy has 10 available audio channels). The file for every channel is defined through the chN_file key, where N is the channel number. The maximum path length is 255 bytes.
[serial_mode]
## Configure channel 1 to play the drums.wav file located
## in the music\beats folder.
ch1_file = \music\beats\drums.wav
This is completely optional since you can specify the path of the file to play through the serial protocol (but your application has to know beforehand where the audio files are located inside the SD and their names). The reason this configuration exists is that you can use the serial protocol to say the board, for example, “play whatever audio file is configured for channel 1”, even if you don’t know where the files are in the SD or their names.
If there is no file name configured, the name is defaulted to “channel_number”.wav.
LED indicators
The WaveTooEasy board has two LEDs that are used to quickly evaluate the board status:
Both LEDs flashing quickly (500ms ON, 250ms OFF): there was an error reading the
config.inifile. This means there was an error accessing the microSD, theconfig.inifile was not found or there was a misconfiguration.Green LED on, red LED blinking slowly (1000ms ON, 500ms OFF): the board is ready to play audio files.
Green LED on, red LED blinking quickly (250ms ON, 125ms OFF): there is at least one audio file playing (including paused files).
Firmware updates
In the case a new firmware is released you can update your WaveTooEasy firmware directly from the microSD card. Place the wte.bin file (containing the new firmware) in the root of the microSD card, insert the SD into the SD slot and then power-cycle the WaveTooEasy board. You will see the LEDs flashing quickly.
After this procedure is completed you will see the LEDs flashing with the normal sequence as described in the section here above.
The wte.bin file is deleted automatically once the board is succesfully programmed.
Library for Arduino
If you want to drive the WaveTooEasy with an Arduino board using the Serial port, we have prepared a library that handles all the communication for you.
In the following Github repository you will find instructions on how to install and use the library: https://github.com/Artekit/Artekit_WaveTooEasy
Generic C library
If you need to use the WaveTooEasy in an enviroment that is not Arduino, we also have a generic C library you can include in your programs. Use this library to communicate with the board using a serial port.
The library is available here: https://github.com/Artekit/wavetooeasy-c-lib
In the same repository there is a complete Visual Studio 2019 example project demonstrating this library.
Firmware customization
Do you know that WaveTooEasy is fully open-source and that the firmware can be modified through the Arduino IDE?
Both the WaveTooEasy main program and the Core files (together makes the board’s firmware) are available for download and ready to be modified to suit your needs.
The WaveTooEasy main program is available at Github: https://github.com/Artekit/WaveTooEasy
The Core files and instructions on how to install them can be found here: https://github.com/Artekit/artekit_stm32f401-core
Now open the WaveTooEasy.ino file in the Arduino IDE and select Artekit WaveTooEasy from the Boards menu and you are ready to go.
To download the program to board you will need an USB-to-Serial converter like the Artekit AK-FT232RL board and connect it in the following way:
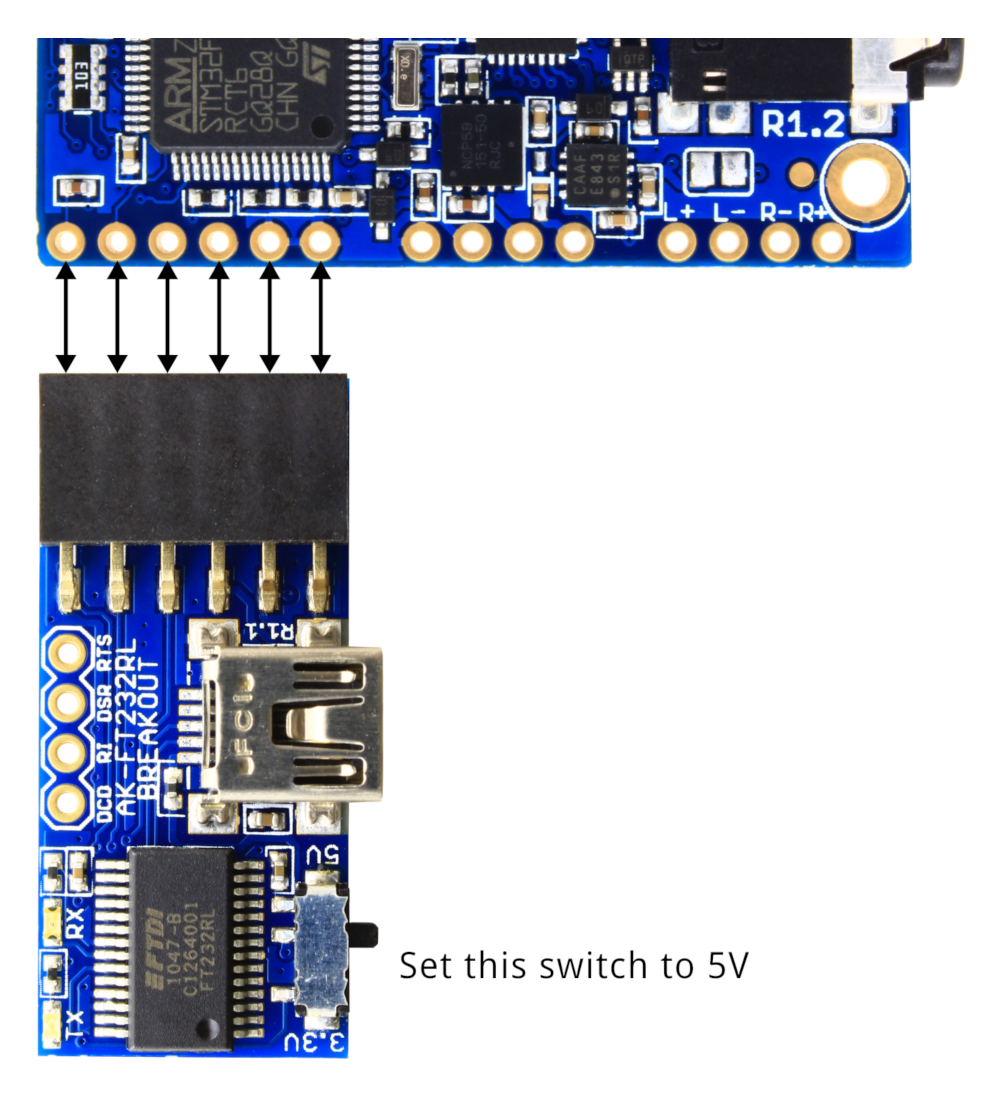
WaveTooEasy to AK-FT232RL connections.
Then select the COM port from the Board menu and click on Download.
Board dimensions
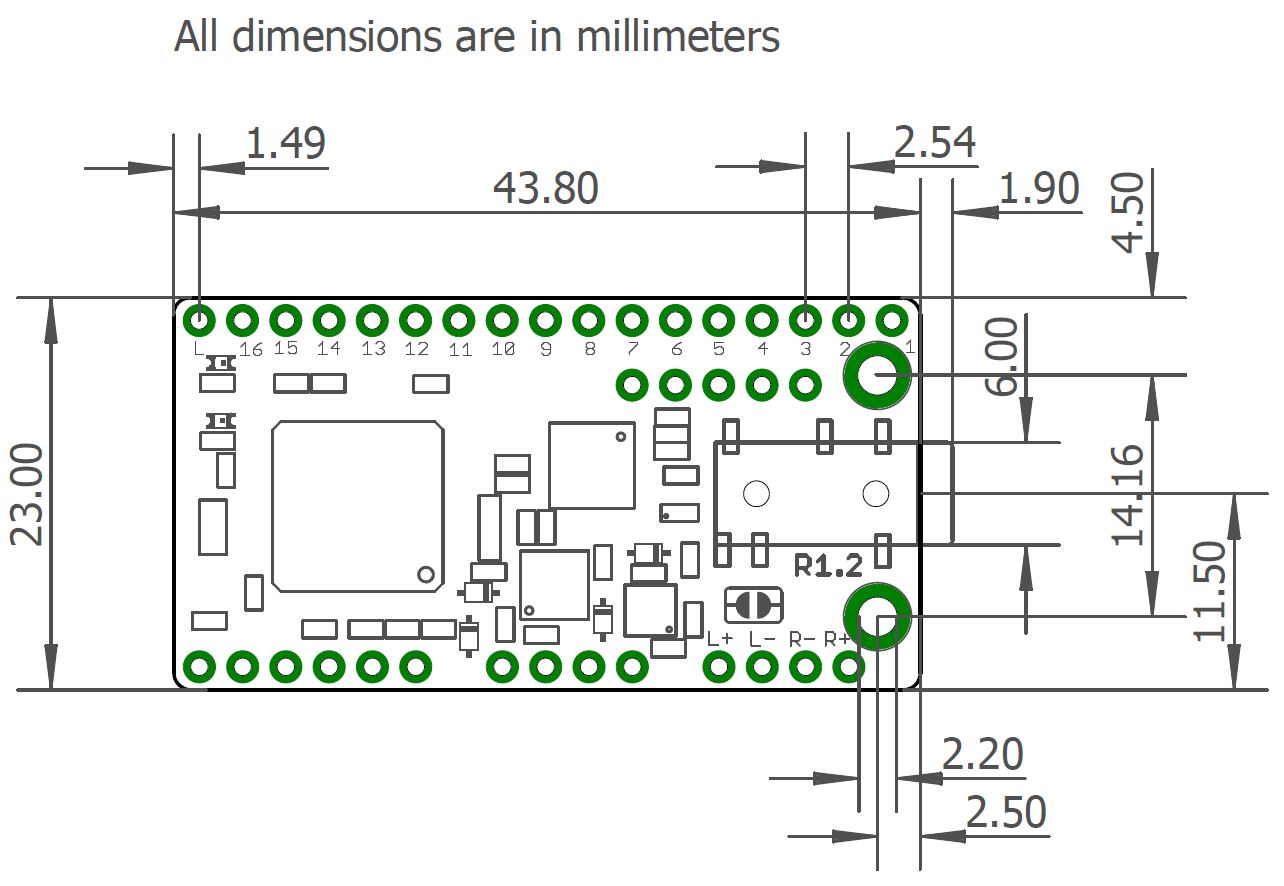
WaveTooEasy board dimensions.
Appendix: serial protocol
This chapter is fully optional, but it’s here if you want to implement your own library or just want to know how the communication protocol works.
The WaveTooEasy serial communication is about exchanging data packets between a host and the WaveTooEasy board.
Communication is always initiated by the host and WaveTooEasy will only answer to requests from the host, that is, the board will never send a packet spontaneously.
The protocol can be described in the following way:
[2 bytes header]
[1 byte command ID]
[2 bytes data lenght]
[data]
[2 bytes CRC16]
The header is composed of the following two bytes:
0x7F 0xAA
The command ID is a single-byte value that represents the command to execute by the WaveTooEasy board. The list of commands can be found here below.
The data lenght is a 16-bit value that indicates the quantity of bytes that will follow in the data body. It has to be sent even if there is no data payload (data lenght = 0), and it’s sent and received as a little-endian value.
All the 16-bits and 32-bits values must be transmitted and received using little-endian byte ordering.
Data is the payload of the packet with length data length and can be maximum 512 bytes long.
CRC16 is a 16-bits checksum that is calculated including header, command, data body lenght and data using the following function:
uint16_t wteCRC16(void* data, uint32_t len, uint16_t partial)
{
    uint16_t crc = partial;
    uint32_t i;
    uint8_t j, c;
    uint8_t* ptr = (uint8_t*) data;

    for(i = 0; i < len; i++)
    {
        c = ((crc>>8) & 0x00FF);
        c ^= *ptr++;
        crc = ((uint16_t) c << 8) | (crc & 0x00FF);
        for (j = 0; j < 8; j++) {
            if (crc & 0x8000) {
                crc <<= 1;
                crc ^= 0x1021;
            } else {
                crc <<= 1;
            }
        }
    }

    return crc;
}
For example, the CRC for CMD_HELLO is 0x92 0xCD, and the packet would be:
0x7F 0xAA 0x01 0x00 0x00 0x92 0xCD
Commands
Note: in the examples for the commands in the list here below, “[CRC16]” represents the two bytes for the CRC16.
The Command ID value is enclosed within parenthesys.
CMD_HELLO (0x01): Use this command to check for the presence of WaveTooEasy. The board will answer back with the same command. It’s recommended to send this command first to check if the WaveTooEasy is ready to receive further commands. Example:
Send to WaveTooEasy:
0x7F 0xAA 0x01 0x00 0x00 0x92 0xCD

Receive from WaveTooEasy:
0x7F 0xAA 0x01 0x00 0x00 [CRC16]
CMD_VERSION (0x02): This command is used to ask the version. WaveTooEasy will answer with 3 bytes containing the version numbers (fix, minor and major). For example, if the version is 1.0.1, the conversation goes like:
Send to WaveTooEasy:
0x7F 0xAA 0x02 0x00 0x00 [CRC16]

Receive from WaveTooEasy:
0x7F 0xAA 0x02 0x03 0x00 0x01 0x00 0x01 [CRC16]
CMD_PLAY_FILE (0x03): Use this command to play a WAV file from the microSD on a given channel. The command has a data body like the following:
[1 byte channel number] [1 byte play mode] [WAV file full path]Channel number: the channel number the WAV file will be played. It’s a number between 1 and 10.
Play mode: selects if the WAV file will be played in normal or looped mode. Set this field to 1 for looped, or 0 for normal.
WAV file full path: an ASCII string with the full path of the file to play. This string can be maximum 255 bytes long and has to be NULL-terminated.
On success, WaveTooEasy will answer with 1 byte data body with the channel number used to play the WAV file. On error, WaveTooEasy will answer with a CMD_ERROR message.
Example for playing a WAV file called test.wav, played in loop mode on channel 5:
Send to WaveTooEasy:
0x7F 0xAA 0x03 0x0B 0x00 0x05 0x01 0x74 0x65 0x73 0x74 0x2E 0x77 0x61 0x76 0x00 [CRC16]

Receive from WaveTooEasy:
0x7F 0xAA 0x03 0x01 0x00 0x05 [CRC16]
CMD_PLAY_CHANNEL (0x04): Use this command to play the WAV file that is associated to a given channel. This command is useful if you don’t know about the SD contents, but you know that a channels is already configured to play a certain WAV file when requested (refer to the *[serial mode]* section in Configuration).
This command has a 2 bytes data body.
[1 byte channel number] [1 byte play mode]Channel number: the channel number the WAV file will be played. It’s a number between 1 and 10.
Play mode: selects if the WAV file will be played in normal or looped mode. Set this field to 1 for looped, or 0 for normal.
On success, WaveTooEasy will answer with 1 byte data body with the channel number used to play the WAV file. On error, WaveTooEasy will answer with a CMD_ERROR message.
Example for playing the file mapped to channel 8, in loop mode:
Send to WaveTooEasy:
0x7F 0xAA 0x04 0x02 0x00 0x08 0x01 [CRC16]

Receive from WaveTooEasy:
0x7F 0xAA 0x04 0x01 0x00 0x05 [CRC16]
CMD_STOP_ALL (0x05): Stops playback on all channels. WaveTooEasy will answer back with the same command, indicating success. Example:
Send to WaveTooEasy:
0x7F 0xAA 0x05 0x00 0x00 [CRC16]

Receive from WaveTooEasy:
0x7F 0xAA 0x05 0x00 0x00 [CRC16]
CMD_STOP (0x06): Stops the playback on a specified channel. WaveTooEasy will answer back with the same command, indicating success.
It requires a 1 byte data body, that specifies the channel number. WaveTooEasy will answer back with the same command, indicating success.
Example to stop playback on channel 3:
Send to WaveTooEasy:
0x7F 0xAA 0x06 0x01 0x00 0x03 [CRC16]

Receive from WaveTooEasy:
0x7F 0xAA 0x06 0x01 0x00 0x03 [CRC16]
CMD_PAUSE (0x07): Pauses the playback on a given channel. It requires a 1 byte data body that indicates the channel to pause. WaveTooEasy will answer back with a byte indicating with a 1 that the channels is paused, otherwise it will send a 0, indicating that the channel was already stopped.
Example to pause playback on channel 7:
Send to WaveTooEasy:
0x7F 0xAA 0x07 0x01 0x00 0x07 [CRC16]

Receive from WaveTooEasy:
0x7F 0xAA 0x07 0x01 0x00 0x01 [CRC16]
CMD_PAUSE_ALL (0x08): Pauses the playback on all channels. WaveTooEasy will answer back with the same command, indicating success. To know which channel is paused/stopped, use the CMD_CHANNELS_STATUS command.
Example:
Send to WaveTooEasy:
0x7F 0xAA 0x08 0x00 0x00 [CRC16]

Receive from WaveTooEasy:
0x7F 0xAA 0x08 0x00 0x00 [CRC16]
CMD_RESUME (0x09): Resumes the playback on a given channel. It requires a 1 byte data body that indicates the channel to resume. WaveTooEasy will answer back with a byte indicating with a 1 that the channels was effectively resumed, otherwise it will send a 0, indicating that the channel was stopped or already playing.
Example to resume playback on channel 2:
Send to WaveTooEasy:
0x7F 0xAA 0x09 0x01 0x00 0x02 [CRC16]

Receive from WaveTooEasy:
0x7F 0xAA 0x09 0x01 0x00 0x01 [CRC16]
CMD_RESUME_ALL (0x0A): Resumes the playback on all the channels. WaveTooEasy will answer back with the same command, indicating success. To know which channel is playing/stopped, use the CMD_CHANNELS_STATUS command.
Example:
Send to WaveTooEasy:
0x7F 0xAA 0x0A 0x00 0x00 [CRC16]

Receive from WaveTooEasy:
0x7F 0xAA 0x0A 0x00 0x00 [CRC16]
CMD_CHANNELS_STATUS (0x0B): Returns the status (playing/paused/stopped) of all channels. WaveTooEasy will answer with a 10-byte array (one byte for each channel) with a status code. The status can be:
- 0x00: channel stopped
- 0x01: channel playing
- 0x02: channle paused
For example:
Send to WaveTooEasy:
0x7F 0xAA 0x0B 0x00 0x00 [CRC16]

Receive from WaveTooEasy:
0x7F 0xAA 0x0B 0x0A 0x00 0x00 0x00 0x00 0x00 0x01 0x02 0x01 0x02 0x01 0x02 [CRC16]
CMD_CHANNEL_STATUS (0x0C): Returns the status (playing/paused/stopped) of a specific channel. The command requires a 1 byte data body specifying the channel to query.
WaveTooEasy will answer with one byte representing a status code. The status can be:
- 0x00: channel stopped
- 0x01: channel playing
- 0x02: channle paused
For example, to know the status of channel 2:
Send to WaveTooEasy:
0x7F 0xAA 0x0C 0x01 0x00 0x02 [CRC16]

Receive from WaveTooEasy:
0x7F 0xAA 0x0C 0x01 0x00 0x01 [CRC16]
CMD_GET_CHANNEL_VOL (0x0D): Returns the current volume of a specific channel. The command requires a 1 byte data body specifying the channel number.
WaveTooEasy will answer with one byte representing the volume in percent (up to 200%).
For example, to know the volume of channel 5, that is at 100%:
Send to WaveTooEasy:
0x7F 0xAA 0x0D 0x01 0x00 0x05

Receive from WaveTooEasy:
0x7F 0xAA 0x0C 0x01 0x00 0x64
CMD_SET_CHANNEL_VOL (0x0E): Sets the volume on a specific channel. The command requires a 2 bytes data body as the following:
[1 byte channel number] [1 byte volume percent (up to 200%)]WaveTooEasy will answer back with the same command, indicating success. For example, to set the volume of channel 2 at 50%:
Send to WaveTooEasy:
0x7F 0xAA 0x0E 0x02 0x00 0x02 0x32 [CRC16]

Receive from WaveTooEasy:
0x7F 0xAA 0x0E 0x02 0x00 0x02 0x32 [CRC16]
CMD_SET_SPEAKERS_VOL (0x0F): Sets the speakers volume. The command requires a signed 16-bits value specifying the volume in dB, multiplied by 10. For example to se the volume to 2.1 dB, send 21.
wavetoeasy will return 1 byte indicating the set volume.
For example, to set the speakers volume to 2dB:
Send to WaveTooEasy
0x7F 0xAA 0x0F 0x02 0x00 0x14 0x00 [CRC16]

Receive from WaveTooEasy:
0x7F 0xAA 0x0F 0x02 0x00 0x14 0x00 [CRC16]
CMD_SET_HEADPHONE_VOL (0x10): Sets the headphones volume. The command requires a signed 16-bits value specifying the volume in dB, multiplied by 10. For example to se the volume to 2.1 dB, send 21.
wavetoeasy will return 1 byte indicating the set volume.
For example, to set the headphones volume to 2dB:
Send to WaveTooEasy
0x7F 0xAA 0x10 0x02 0x00 0x14 0x00 [CRC16]

Receive from WaveTooEasy:
0x7F 0xAA 0x10 0x01 0x00 0x14 0x00 [CRC16]
CMD_ERROR (0xFF): In case of error, WaveTooEasy will send back this command as an answer. The command contains a 1 byte data body with an error code. Error codes are specified and explained in the following list:
- ERROR_INVALID_LENGTH (0x01): the length specified in the packet is invalid.
- ERROR_INVALID_FILE_LENGTH (0x02): the length of the file path is invalid.
- ERROR_INVALID_CHANNEL (0x03): the channel number specified is invalid.
- ERROR_INVALID_MODE (0x04): the playback mode code (normal, loop, etc.) is invalid.
- ERROR_INTERNAL (0x05): an internal error happened (for example, unable to communicate with the DAC, or an SD problem).
- ERROR_PLAYING (0x06): error while trying to start playback, probably because the file doesn’t exist or cannot be found.
Communication timeout
While receiving a packet, WaveTooEasy will set a 50ms timeout at every character reception. If the communication gets interrupted while receiving a packet for more than 50ms, WaveTooEasy will reset the reception state and buffers. This is to avoid deadlocks in communication where one of the two parties get desynchronized.