Artekit AK-CMSIS-DAP JTAG/SWD
This is the user manual and guide for the AK-CMSIS-DAP JTAG/SWD board.
Introduction
In this guide we are going to learn about the Artekit AK-CMSIS-DAP JTAG and how to use it with the most known IDEs and debugging software.
The AK-CMSIS-DAP is a JTAG/SWD probe based on the CMSIS-DAP standard (also known as DAPLink). The CMSIS-DAP standard not only eases the access to the Coresight Debug Access Port (DAP) of ARM Cortex microcontrollers, but also unifies all the JTAG protocols in a way that users and developers won’t need to support every JTAG/SWD probe protocol in their hardware/software tools.
The AK-CMSIS-DAP JTAG/SWD board is the Artekit implementation of that standard, running on quartzless SiLabs Happy Gecko EFM32 Cortex M0+ (the EFM32HG308F64G-B-QFN24), with 64KB Flash and 8KB RAM running at 25 MHz, completely open source and open hardware.
We also added buffered inputs/outputs allowing to connect targets powered from 1.8V up to 5V, isolating the lines from the internal 3.3V voltage and protecting the internal MPU pins from external short-circuits and over voltages.
The hardware
The AK-CMSIS-DAP board has one 20-pin standard JTAG connector on one side and a strip of 7 utility pins on the other. The following picture and table show the signals you can find in the standard 20-pin JTAG connector.
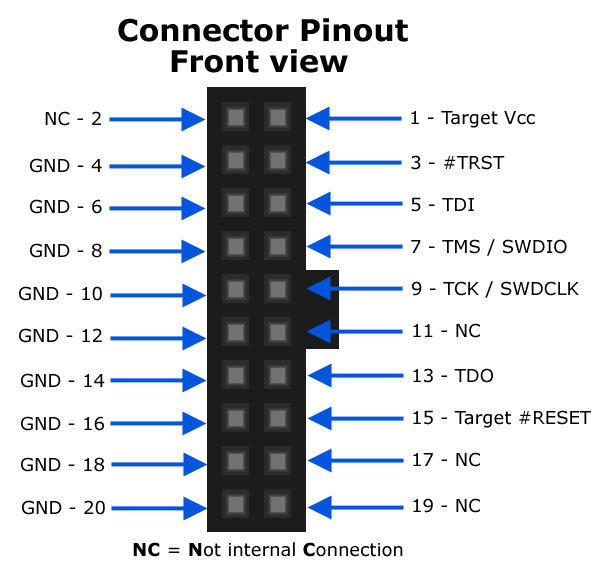
| PIN | Type | USAGE |
|---|---|---|
| 1 | IN | Target VCC. Must be connected to the Target VCC |
| 2 | No internal connection | |
| 3 | OUT | #TRST output (open collector) |
| 4 | PWR | Ground |
| 5 | OUT | TDI JTAG signal |
| 6 | PWR | Ground |
| 7 | I/O | TMS Output in JTAG mode, SWDIO I/O in SWD mode |
| 8 | PWR | Ground |
| 9 | OUT | TCK output in JTAG mode, SWDCLK output in SWD mode |
| 10 | PWR | Ground |
| 11 | No internal connection | |
| 12 | PWR | Ground |
| 13 | INP | TDO input in JTAG mode |
| 14 | PWR | Ground |
| 15 | OUT | Target #RESET output (open collector) |
| 16 | PWR | Ground |
| 17 | No internal connection | |
| 18 | PWR | Ground |
| 19 | No internal connection | |
| 20 | PWR | Ground |
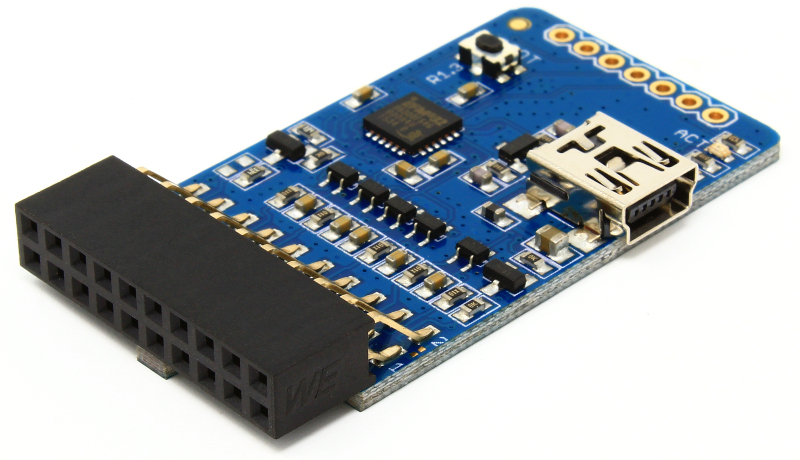
In the top of the board you can see a 7-pin connector and a BOOT push button as shown in the following picture:
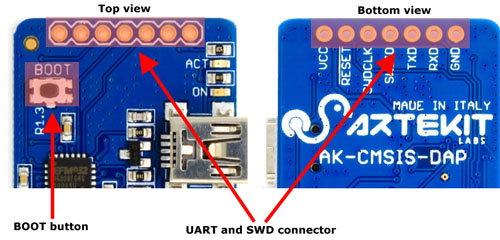
The AK-CMSIS-DAP comes programmed with an internal bootloader to upgrade the firmware using a simple RS232 line and a PC terminal program as TeraTerm. To upgrade the firmware please read the Upgrading the firmware section.
The connector pinout signals:
| PIN | Type | USAGE |
|---|---|---|
| VCC | PWR | 3.3V output from the MCU internal regulator. Can source maximum 10mA. |
| RESET | INP | Active low. Resets the internal MCU. |
| SWDCLK | OUT | SWD clock output. EFM32 debug port. |
| SWDIO | I/O | SWD data input/output. EFM32 debug port. |
| TXD | OUT | Internal UART TXD signal. For firmware upgrade or debug purposes. |
| RXD | INP | Internal UART RXD signal. For firmware upgrade or debug purposes. |
| GND | PWR | Board ground signal. |
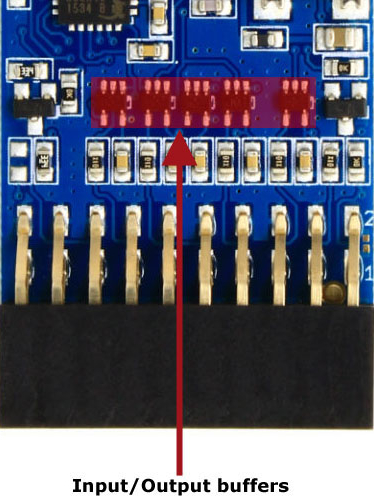
In the AK-CMSIS-DAP, all inputs and outputs signals, to and from the JTAG/SWD connector, are buffered. It is very important to connect the pin 1 (Vcc) of the JTAG/SWD connector to the target board Vcc to adapt the internal AK-CMSIS-DAP buffers to the target signal levels.
Drivers
The CMSIS-DAP standard uses the USB HID protocol as the transport protocol, so you don’t need any drivers, no matter the operating system, to use the AK-CMSIS-DAP board. All you need is a standard USB mini cable.
Usage with KEIL uVision
Connect the AK-CMSIS-DAP to the target and to the PC, using the USB cable. In KEIL uVision, click on the “Options for Target…” button.
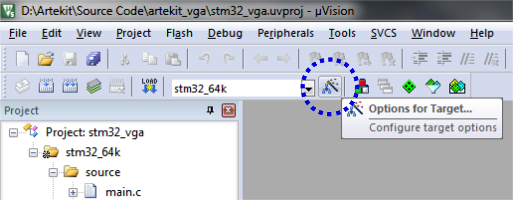
A new window should open. Go to the Debug tab and select CMSIS-DAP Debugger from the drop-down menu, as in the following picture. Then click on the Settings button.
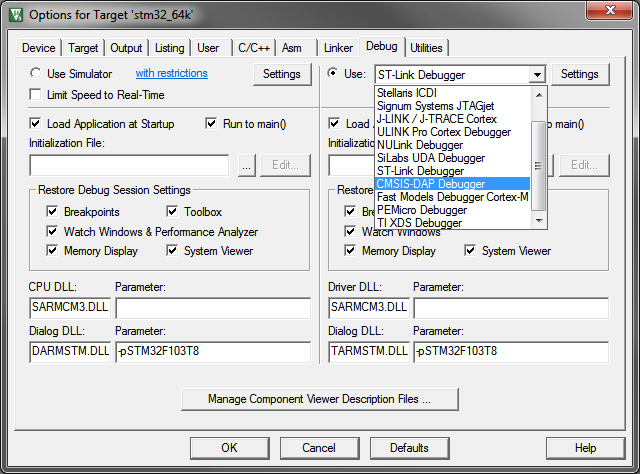
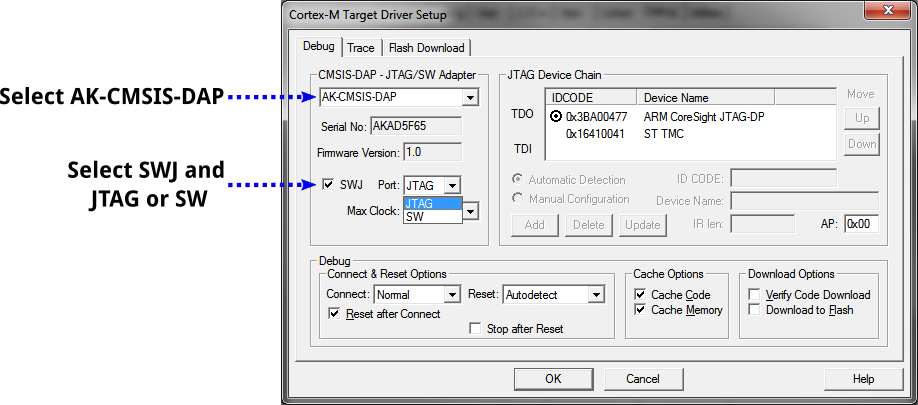
In the next windows select the AK-CMSIS-DAP device. Set the JTAG or SW modes according to your target’s characteristics. In the JTAG Device Chain you can view the target device code (an STM32F103 in this case).
Usage with with IAR
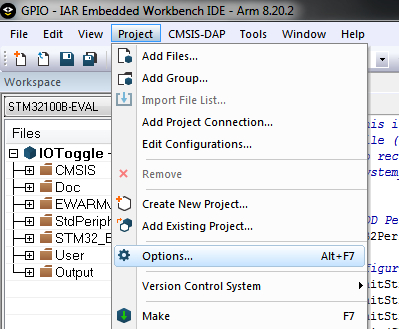
Connect the AK-CMSIS-DAP to the target and to the PC, using the USB cable. Launch the IAR Embedded Workbench IDE and select Options from the Project menu.
In the next windows select Debugger/CMSIS-DAP from the menu on the left.
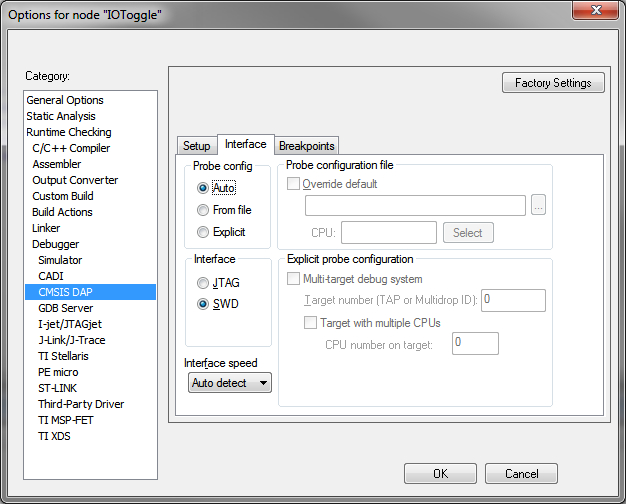
From this window you can configure how IAR will connect to your target through the AK-CMSIS-DAP. Select the Interface tab an configure the JTAG or SWD protocol according to your target’s characteristics.
Usage with OpenOCD
The AK-CMSIS-DAP can be used with OpenOCD as a debugging or flashing probe. You can download a precompiled version of OpenOCD for Windows from the OpenOCD’s official GitHub repository. Linux users should build OpenOCD from source or download it through, for example, apt-get on Ubuntu distros.
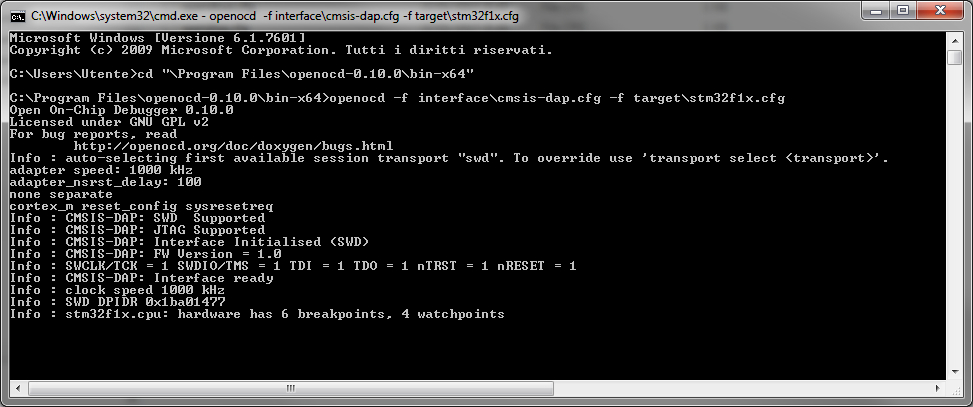
To use OpenOCD with SWD protocol, type from the command line:
openocd -f interface/cmsis-dap.cfg -f target/xxxxxx.cfg
To use OpenOCD with JTAG protocol, type from the command line:
openocd -f interface/cmsis-dap.cfg -c "transport select jtag" -f target/xxxxxx.cfg
In the examples here above, the xxxxxx.cfg file is your target MCU, for example, stm32f1x.cfg for a STM32F1xx.
The following picture shows how it should look like when OpenOCD successfully connects to the target.
Upgrading the firmware
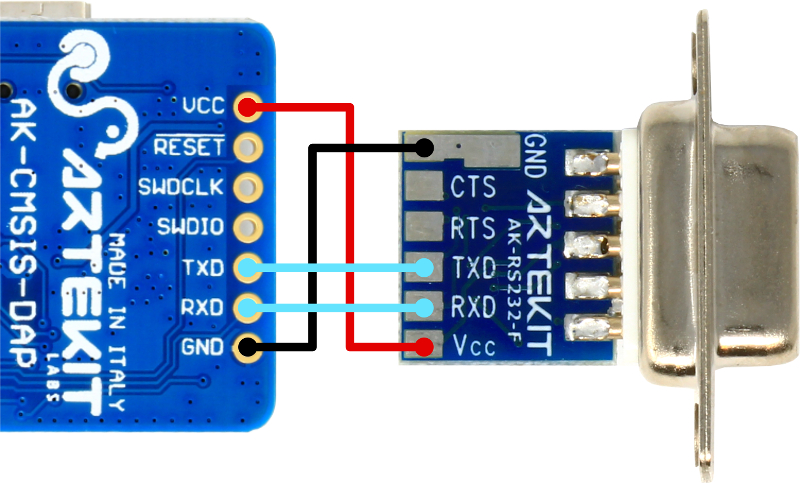
If needed, you can download a new firmware to the AK-CMSIS-DAP board. This is done through the EFM32 serial port signals exposed on the 7-pin connector. The serial port signals have to be translated to RS232 level. For this you can use a female Artekit AK-RS232 and connect it as in the following picture.
Or you can use an AK-FT232RL breakout board to upload the firmware through USB, connected in the following way (remember to set the AK-FT232RL switch to 3.3V):

To upgrade the firmware use a program capable of doing X-MODEM file transfer. In this case, we are going to use TeraTerm.
Follow this steps:
1) Disconnect the USB cable from the AK-CMSIS-DAP.
2) Connect the PC COM cable to the AK-RS232 (or the USB cable to the AK-FT232RL) attached to the AK-CMSIS-DAP.
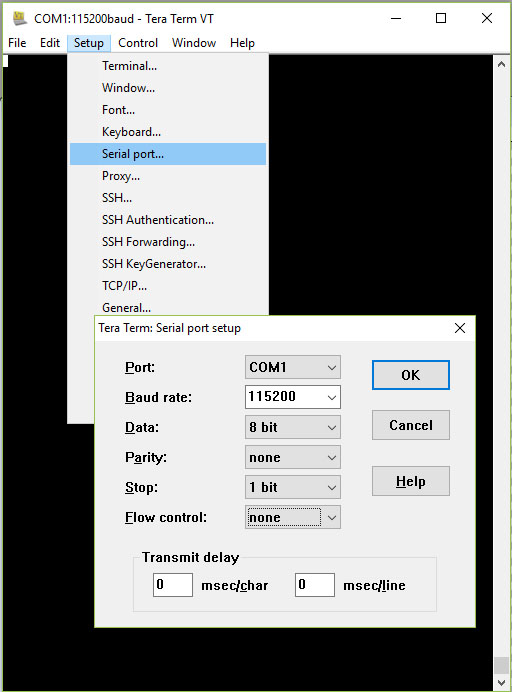
3) Open the COM port at 115200, 8 bits, No parity, 1 stop bit, no flow control.
4) Press the BOOT push button on the AK-CMSIS-BOARD and keep it pressed while connecting the USB cable. Wait a few seconds until the yellow (ACT) LED starts to blink. At this point you can release the BOOT push button.
5) In the terminal program you can see a message like the following:
Artekit Labs - Bootloader for AK-CMSIS-DAP - version x.x
AK-CMSIS-DAP firmware version x.x
Firmware download triggered by BOOT button
Press any key to start firmware download...
5) Press any key in the terminal program.
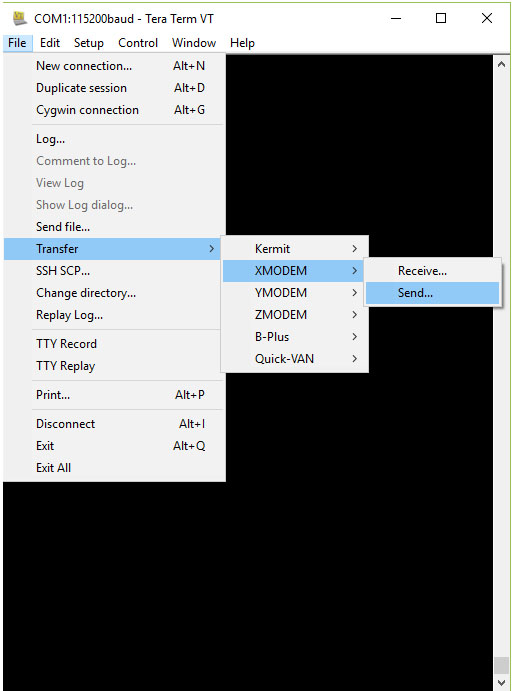
6) Select the file to transfer clicking File/Transfer/XMODEM/Send… as in the next picture:
7) Select the file name to transfer.
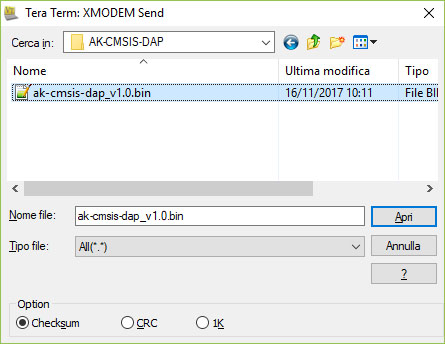
8) Click the Open button. The transmission should start and you will see a progress bar.
9) When the download finishes you will see the message:
Firmware download succeeded
Jumping to main program...
At this point the AK-CMSIS-DAP will start running the new firmware.