Artekit PropBoard: basic lightsaber example
This guide shows you how to create a basic lightsaber with the PropBoard.
Introduction
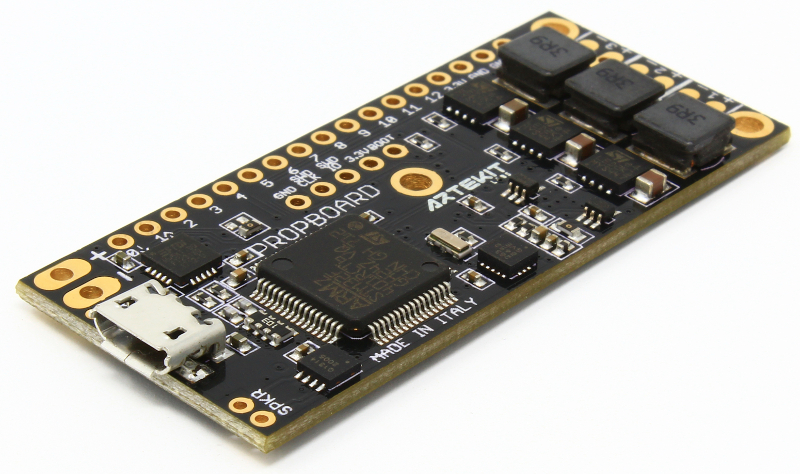
The PropBoard is the perfect board to create interactive props like a lightsaber with lights, sound and motion detection. In this guide we are going to learn how to connect the required components and how to program a lightsaber prop like the one you had the chance to see in the ‘sneak preview’ video we made announcing the PropBoard.
Required materials
- A PropBoard
- One or two 18650 batteries
- A momentary push-button with integrated LED (the LED is optional)
- If you have a push-button with an LED, then you need a 150 Ohm resistor
- An 8 Ohm or 4 Ohm speaker
- A high-brightness RGB LED. We use one with 3 LEDs with a maximum forward current of 700mA. If your LEDs support less current, make sure you see this note before uploading the code to the PropBoard
- A microSD
- Wires, solder and a soldering iron
If you are going to use a single 18650 battery, then follow this guide to learn how to change the input voltage range of the PropBoard.
We are going to program the board using the Arduino IDE. If you don’t have installed it, or you want to add support for the PropBoard, follow this guide. If you are connecting the PropBoard to your PC/MAC for the first time, make sure you have the drivers installed. Read this for more info about USB and drivers.
You can use cables with connectors (like JST) if you want to be able to plug/unplug the batteries or try a different speaker or LEDs later.
A good read of the PropBoard manual could be useful too.
Connections
The following picture shows the basic connections required for this project.
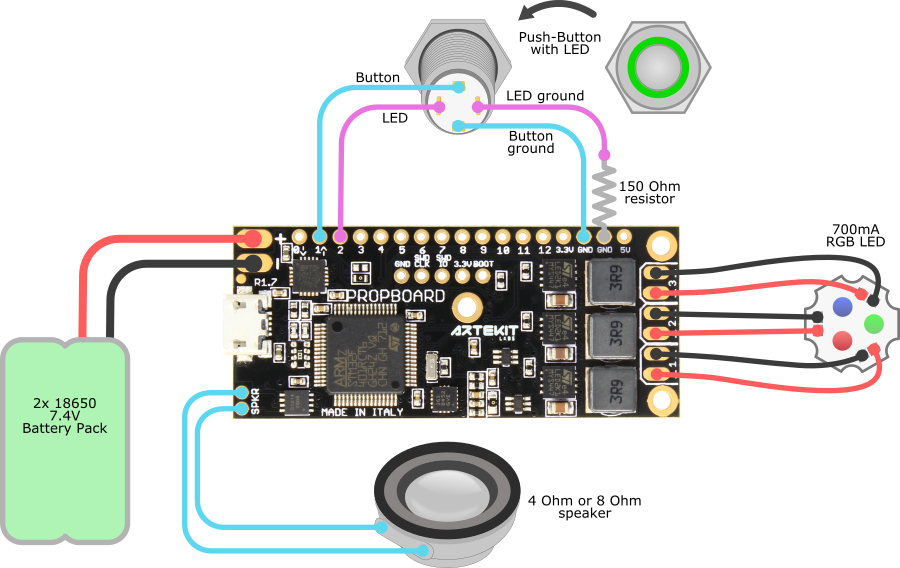
Lightsaber prop connections
We are connecting the red LED to output 1, the green LED to output 2 and the blue LED to output 3. You can use different LEDs colors or 2 LEDs or just 1 LED. It’s not a problem, the code would work the same, but read this section to learn how to adjust the light effects (under LED colors)
Audio files
Like in the 2013 project, we are going to use the same files from the user Barlow of the freesounds.org website. Here is the link: http://freesound.org/people/joe93barlow/packs/5968/
Download the files and uncompress them inside the root folder of your microSD card.
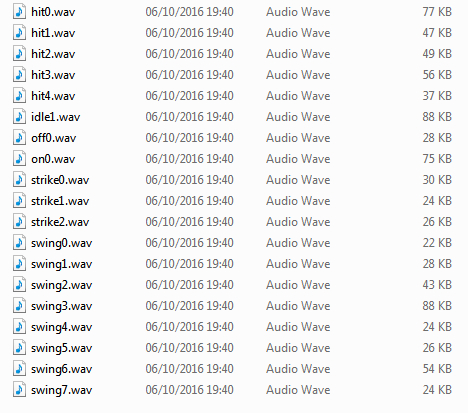
You should have now a series of files with names like “78667__joe93barlow__hit0.wav”. Rename the WAV files by removing the “78667__joe93barlow__” part. The file names the program will use are these:
As you can see/hear in the second part of the video, you can play music in the background. While this is optional we will explain later in this guide how to achieve it.
The code
Open the Arduino IDE and create a new sketch. Clear all the contents of the editor (setup and loop functions). Then copy the code here below and paste it in the Arduino IDE. Connect the PropBoard to the PC/MAC with the USB cable and hit Upload.
#include <PropButton.h>

// Button pins
#define BUTTON_PIN      1
#define BUTTON_LED_PIN  2

// Lightsaber states
#define STATE_OFF       0
#define STATE_POWER_ON  1
#define STATE_IDLE      2
#define STATE_POWER_OFF 3
#define STATE_HIT       4
#define STATE_BLASTER   5

// Five minutes before entering low power
#define TIME_BEFORE_LOW_POWER 300000

// Red LED on output 1
HBLED red(1);
// Green LED on output 2
HBLED green(2);
// Blue LED on output 3
HBLED blue(3);

// One WAV player for the hum sound, one for the sound effects
WavPlayer hum, fx;

// Our push button with LED
PropButton OnOffButton;

// The current state
uint8_t state = STATE_OFF;

// Two booleans to signal motion events
volatile bool on_swing = false;
volatile bool on_hit = false;

// This variable holds the time (millis() ticks)
// since the program in the STATE_OFF state.
uint32_t time_off;

void setup()
{
  // Initialize audio
  Audio.begin();

  // Initialize motion sensor
  Motion.begin();
  Motion.configPulse(AxisAll, 3.78f, 500, 100, MotionInterrupt1 );
  Motion.configTransient(AxisAll, 0.1f, 120, MotionInterrupt2);
  Motion.attachInterrupt(MotionInterrupt1, MotionPulse);
  Motion.attachInterrupt(MotionInterrupt2, MotionTransient);

  // Initialize LEDs
  blue.begin(700);  // Blue LED with 700mA maximum current
  red.begin(700);   // Red LED with 700mA maximum current
  green.begin(700); // Green LED 700mA maximum current

  // Initialize On/Off button
  OnOffButton.begin(BUTTON_PIN, ButtonActiveLow);

  // Configure the OnOffButton to declare a long press after 1000ms
  OnOffButton.setLongPressTime(1000);

  // Initial blinking LED sequence, cycle: 2000ms, time on: 100ms
  OnOffButton.blink(BUTTON_LED_PIN, 2000, 100);

  // We entered in the STATE_OFF state
  time_off = millis();
}

void loop()
{
  ButtonEvent button_event;

  // Check the current state
  switch(state)
  {
    case STATE_OFF:
      // If On/Off button is pressed
      if (OnOffButton.pressed())
      {
        // New blinking sequence, cycle: 500ms, time on: 100ms
        OnOffButton.blink(BUTTON_LED_PIN, 500, 100);

        // Wait for the user to release the OnOffButton
        while (OnOffButton.pressed());

        // Go to STATE_POWER_ON
        state = STATE_POWER_ON;
      } else {
        // Check if we have to go into low-power
        if (millis() - time_off >= TIME_BEFORE_LOW_POWER)
        {
          // Stop blinking the button LED
          OnOffButton.blink(BUTTON_LED_PIN, 0, 0);

          // Enter low power mode. Wait for a FALLING edge
          // on the button pin.
          enterLowPowerMode(BUTTON_PIN, FALLING);
        }
      }
      break;

    case STATE_POWER_ON:

      // Play ignition sound
      fx.play("on0.wav");

      // Ramp LEDs up
      ledRampUp(fx.duration());

      // Wait a little before launching the hum sound
      delay(500);

      // Play hum sound in loop mode
      hum.play("idle1.wav", PlayModeLoop);

      // Wait until ignition sound finishes
      while (fx.playing());

      // Start shimmering LEDs
      ledShimmer();

      // Check if user still pressing the On/Off button. If so, wait.
      while (OnOffButton.pressed());

      // Ignore any motion detected previous to STATE_IDLE
      on_swing = on_hit = false;

      // Clear any OnOffButton queued events
      OnOffButton.resetEvents();

      // Go to STATE_IDLE
      state = STATE_IDLE;
      break;

    case STATE_IDLE:
      // This is the main state. The hum sound is looping in the background
      // while we monitor for motion and buttons events.

      button_event = OnOffButton.getEvent();

      // If On/Off button is long-pressed, go to STATE_POWER_OFF.
      if (button_event == ButtonLongPressed)
      {
        // Go back to initial blinking sequence
        OnOffButton.blink(BUTTON_LED_PIN, 2000, 100);
        state = STATE_POWER_OFF;
        break;
      }

      // If OnOffButton is pressed and released, go to STATE_BLASTER.
      if (button_event == ButtonShortPressAndRelease)
      {
        state = STATE_BLASTER;
        break;
      }

      // Check hits
      if (on_hit)
      {
        on_hit = 0;
        state = STATE_HIT;
        break;
      }

      // Check swings
      if (on_swing)
      {
        on_swing = 0;

        // Play a random swing sound (from swing0.wav to swing7.wav)
        fx.playRandom("swing", 0, 7);
      }
      break;

    case STATE_HIT:
      // Flash the LEDs
      ledFlash();

      // Play a random strike sound (from strike0.wav to strike2.wav)
      fx.playRandom("strike", 0, 2);
      while (fx.playing())
      {
        // Check if another clash happened while we were playing the sound
        if (on_hit)
        {
          on_hit = 0;

          // Play again
          fx.playRandom("strike", 0, 2);
        }
      }

      // Go back to IDLE shimmering and to STATE_IDLE state
      ledShimmer();
      state = STATE_IDLE;
      break;

    case STATE_BLASTER:
      // Blaster hit, start flashing the LEDs
      ledFlash();

      // Play a random blaster sound (from hit0.wav to hit4.wav)
      fx.playRandom("hit", 0, 4);

      while (fx.playing())
      {
        // Check if the OnOffButton was pressed againg while playing the blaster sound
        if (OnOffButton.getEvent() == ButtonShortPressAndRelease)
          // Play again
          fx.playRandom("hit", 0, 4, PlayModeNormal);
      }

      // No more blasters, stop flashing and go back to STATE_IDLE
      ledShimmer();
      state = STATE_IDLE;
      break;

    case STATE_POWER_OFF:
      // Stop the hum sound
      hum.stop();

      // Play the OFF sound
      fx.play("off0.wav");

      // Ramp the LEDs down
      ledRampDown(fx.duration());

      while (fx.playing());

      // Wait until OnOffButton is released
      while (OnOffButton.pressed());

      // Initial blinking LED sequence, cycle: 2000ms, time on: 100ms
      OnOffButton.blink(BUTTON_LED_PIN, 2000, 100);

      // Remember when we entered in the STATE_OFF state
      time_off = millis();

      // Go back to OFF state
      state = STATE_OFF;
      break;
  }
}

// Motion transient interrupt (swing)
void MotionTransient()
{
  on_swing = true;
}

// Motion pulse interrupt (hit)
void MotionPulse()
{
  on_hit = true;
}

void ledShimmer()
{
  // Shimmer from 220 to 255 and back with a 2Hz frequency
  blue.shimmer(220, 255, 2, 0);

  // Shimmer random values from 0 to 75 at 25Hz
  red.shimmer(0, 75, 25, 1);

  // Shimmer random values from 0 to 75 at 15Hz
  green.shimmer(0, 75, 15, 1);
}

static void ledFlash()
{
  // Flash all LEDs from a value of 255 to 100, frequency 20Hz, infinite duration
  blue.flash(255, 100, 20, 0);
  red.flash(255, 100, 20, 0);
  green.flash(255, 100, 20, 0);
}

void ledRampUp(uint32_t duration)
{
  // Blue LED ramp up from 0 to 220
  blue.ramp(0, 220, duration);

  // Red LED ramp up from 0 to 100
  red.ramp(0, 100, duration);

  // Green LED ramp up from 0 to 50
  red.ramp(0, 50, duration);
}

void ledRampDown(uint32_t duration)
{
  // Ramp down the blue LED from 255 to 0
  blue.ramp(255, 0, duration);

  // Ramp down the red and green LEDs from 75 to 0
  red.ramp(75, 0, duration);
  green.ramp(75, 0, duration);
}
After upload press the push-button connected to the PropBoard. You should hear the ignition sound and LEDs should do a ramp and then start dimming. Move the PropBoard around to generate “swings”. If you (gently) hit the board you should hear “strike” sounds. Press and release the push-button to hear “hits” sounds. LEDs will flash at the same time you hear “strike” and “hit” sounds.
Keep pressed the push-button for about 1 second to turn the lightsaber off. After 5 minutes, the PropBoard will enter low-power mode. To wake it up, press and release the push-button.
The code (with music)
The following code does the same as the code up here, but it plays music in the background. The first time you press the push-button the music will start. The second time you press the push-button the PropBoard will do the ignition.
You have to generate 2 WAV files: one for the music and one for the closure. Find a song you like, convert it to 22050Hz sampling rate and 16-bit bit depth and name it “music.wav”. Do the same for the closure (this should be a short audio file played after retraction) and name it “ending.wav”. Copy these files into the microSD.
This is the code for the second part of the video on the top of the page. Note that is very similar to the code of the previous example. It was added a STATE_MUSIC state to handle the music playback.
#include <PropButton.h>

// Button pins
#define BUTTON_PIN      1
#define BUTTON_LED_PIN  2

// Lightsaber states
#define STATE_OFF       0
#define STATE_MUSIC     1
#define STATE_POWER_ON  2
#define STATE_IDLE      3
#define STATE_POWER_OFF 4
#define STATE_HIT       5
#define STATE_BLASTER   6

// Five minutes before entering low power
#define TIME_BEFORE_LOW_POWER 300000

// Red LED on output 1
HBLED red(1);
// Green LED on output 2
HBLED green(2);
// Blue LED on output 3
HBLED blue(3);

// One WAV player for the hum sound, one for the sound effects
// and one for the music
WavPlayer hum, fx, music;

// Our push button with LED
PropButton OnOffButton;

// The current state
uint8_t state = STATE_OFF;

// Two booleans to signal motion events
volatile bool on_swing = false;
volatile bool on_hit = false;

// This variable holds the time (millis() ticks)
// since the program in the STATE_OFF state.
uint32_t time_off;

void setup()
{
  // Initialize audio
  Audio.begin();

  // Initialize motion sensor
  Motion.begin();
  Motion.configPulse(AxisAll, 3.78f, 500, 100, MotionInterrupt1 );
  Motion.configTransient(AxisAll, 0.1f, 120, MotionInterrupt2);
  Motion.attachInterrupt(MotionInterrupt1, MotionPulse);
  Motion.attachInterrupt(MotionInterrupt2, MotionTransient);

  // Initialize LEDs
  blue.begin(700);  // Blue LED with 700mA maximum current
  red.begin(700);   // Red LED with 700mA maximum current
  green.begin(700); // Green LED 700mA maximum current

  // Initialize On/Off button
  OnOffButton.begin(BUTTON_PIN, ButtonActiveLow);

  // Configure the OnOffButton to declare a long press after 1000ms
  OnOffButton.setLongPressTime(1000);

  // Initial blinking LED sequence, cycle: 2000ms, time on: 100ms
  OnOffButton.blink(BUTTON_LED_PIN, 2000, 100);

  // We entered in the STATE_OFF state
  time_off = millis();
}

void loop()
{
  ButtonEvent button_event;

  // Check the current state
  switch(state)
  {
    case STATE_OFF:
      // If On/Off button is pressed
      if (OnOffButton.pressed())
      {
         // Start playing some music and go to STATE_MUSIC
        music.play("music.wav", PlayModeLoop);
        state = STATE_MUSIC;

        // Wait for the user to release the OnOffButton
        while (OnOffButton.pressed());
      } else {
        // Check if we have to go into low-power
        if (millis() - time_off >= TIME_BEFORE_LOW_POWER)
        {
          // Stop blinking the button LED
          OnOffButton.blink(BUTTON_LED_PIN, 0, 0);

          // Enter low power mode. Wait for a FALLING edge
          // on the button pin.
          enterLowPowerMode(BUTTON_PIN, FALLING);
        }
      }
      break;

    case STATE_MUSIC:
      // We are playing music, wait for a second OnOffButton press
      if (OnOffButton.pressed())
      {
        // New blinking sequence, cycle: 500ms, time on: 100ms
        OnOffButton.blink(BUTTON_LED_PIN, 500, 100);

        // Go to STATE_POWER_ON
        state = STATE_POWER_ON;
      }
      break;

    case STATE_POWER_ON:

      // Play ignition sound
      fx.play("on0.wav");

      // Ramp LEDs up
      ledRampUp(fx.duration());

      // Wait a little before launching the hum sound
      delay(500);

      // Play hum sound in loop mode
      hum.play("idle1.wav", PlayModeLoop);

      // Wait until ignition sound finishes
      while (fx.playing());

      // Start shimmering LEDs
      ledShimmer();

      // Check if user still pressing the On/Off button. If so, wait.
      while (OnOffButton.pressed());

      // Ignore any motion detected previous to STATE_IDLE
      on_swing = on_hit = false;

      // Clear any OnOffButton queued events
      OnOffButton.resetEvents();

      // Go to STATE_IDLE
      state = STATE_IDLE;
      break;

    case STATE_IDLE:
      // This is the main state. The hum sound is looping in the background
      // while we monitor for motion and buttons events.

      button_event = OnOffButton.getEvent();

      // If On/Off button is long-pressed, go to STATE_POWER_OFF.
      if (button_event == ButtonLongPressed)
      {
        // Go back to initial blinking sequence
        OnOffButton.blink(BUTTON_LED_PIN, 2000, 100);
        state = STATE_POWER_OFF;
        break;
      }

      // If OnOffButton is pressed and released, go to STATE_BLASTER.
      if (button_event == ButtonShortPressAndRelease)
      {
        state = STATE_BLASTER;
        break;
      }

      // Check hits
      if (on_hit)
      {
        on_hit = 0;
        state = STATE_HIT;
        break;
      }

      // Check swings
      if (on_swing)
      {
        on_swing = 0;

        // Play a random swing sound (from swing0.wav to swing7.wav)
        fx.playRandom("swing", 0, 7);
      }
      break;

    case STATE_HIT:
      // Flash the LEDs
      ledFlash();

      // Play a random strike sound (from strike0.wav to strike2.wav)
      fx.playRandom("strike", 0, 2);
      while (fx.playing())
      {
        // Check if another clash happened while we were playing the sound
        if (on_hit)
        {
          on_hit = 0;

          // Play again
          fx.playRandom("strike", 0, 2);
        }
      }

      // Go back to IDLE shimmering and to STATE_IDLE state
      ledShimmer();
      state = STATE_IDLE;
      break;

    case STATE_BLASTER:
      // Blaster hit, start flashing the LEDs
      ledFlash();

      // Play a random blaster sound (from hit0.wav to hit4.wav)
      fx.playRandom("hit", 0, 4);

      while (fx.playing())
      {
        // Check if the OnOffButton was pressed againg while playing the blaster sound
        if (OnOffButton.getEvent() == ButtonShortPressAndRelease)
          // Play again
          fx.playRandom("hit", 0, 4, PlayModeNormal);
      }

      // No more blasters, stop flashing and go back to STATE_IDLE
      ledShimmer();
      state = STATE_IDLE;
      break;

    case STATE_POWER_OFF:
      // Stop the hum sound
      hum.stop();

       // Play an ending music
      music.play("ending.wav");

      // Play the OFF sound
      fx.play("off0.wav");

      // Ramp the LEDs down
      ledRampDown(fx.duration());

      while (fx.playing());

      // Wait until OnOffButton is released
      while (OnOffButton.pressed());

      // Initial blinking LED sequence, cycle: 2000ms, time on: 100ms
      OnOffButton.blink(BUTTON_LED_PIN, 2000, 100);

      // Remember when we entered in the STATE_OFF state
      time_off = millis();

      // Go back to OFF state
      state = STATE_OFF;
      break;
  }
}

// Motion transient interrupt (swing)
void MotionTransient()
{
  on_swing = true;
}

// Motion pulse interrupt (hit)
void MotionPulse()
{
  on_hit = true;
}

void ledShimmer()
{
  // Shimmer from 220 to 255 and back with a 2Hz frequency
  blue.shimmer(220, 255, 2, 0);

  // Shimmer random values from 0 to 75 at 25Hz
  red.shimmer(0, 75, 25, 1);

  // Shimmer random values from 0 to 75 at 15Hz
  green.shimmer(0, 75, 15, 1);
}

static void ledFlash()
{
  // Flash all LEDs from a value of 255 to 100, frequency 20Hz, infinite duration
  blue.flash(255, 100, 20, 0);
  red.flash(255, 100, 20, 0);
  green.flash(255, 100, 20, 0);
}

void ledRampUp(uint32_t duration)
{
  // Blue LED ramp up from 0 to 220
  blue.ramp(0, 220, duration);

  // Red LED ramp up from 0 to 100
  red.ramp(0, 100, duration);

  // Green LED ramp up from 0 to 50
  red.ramp(0, 50, duration);
}

void ledRampDown(uint32_t duration)
{
  // Ramp down the blue LED from 255 to 0
  blue.ramp(255, 0, duration);

  // Ramp down the red and green LEDs from 75 to 0
  red.ramp(75, 0, duration);
  green.ramp(75, 0, duration);
}
Modifying the code
Chances are that you are using different LEDs or want to place the files in a different folder in the microSD. Here we will show the typical modification you want to do to the code. Also, this section of the lightsaber project sets the starting point for learning how to program the PropBoard.
High-brightness LED maximum current
Change the 700 value between parentheses you can see here below to the maximum forward current for your LEDs.
// Initialize LEDs
blue.begin(700);  // Blue LED with 700mA maximum current
red.begin(700);   // Red LED with 700mA maximum current
green.begin(700); // Green LED 700mA maximum current
The HBLED::begin function initializes the LEDs outputs. Remember to not exceed the maximum forward current of the LEDs.
LED colors and effects
We are connecting the red LED to output 1, the green LED to output 2 and the blue LED to output 3. If you have less LEDs or different colors you can play with the following lines of code to adjust the light effects to your LED configuration.
To change the location of the LEDs on the outputs modify the value between parentheses
// Red LED on output 1
HBLED red(1);
// Green LED on output 2
HBLED green(2);
// Blue LED on output 3
HBLED blue(3);
To modify the “ramp” effect change the parameters of the HBLED::ramp function:
void ledRampUp(uint32_t duration)
{
  // Blue LED ramp up from 0 to 220
  blue.ramp(0, 220, duration);

  // Red LED ramp up from 0 to 100
  red.ramp(0, 100, duration);

  // Green LED ramp up from 0 to 50
  red.ramp(0, 50, duration);
}
Here it how the PropBoard does the shimmering. Change the parameters of the HBLED::shimmer function if required.
void ledShimmer()
{
  // Shimmer from 220 to 255 and back with a 2Hz frequency
  blue.shimmer(220, 255, 2, 0);

  // Shimmer random values from 0 to 75 at 25Hz
  red.shimmer(0, 75, 25, 1);

  // Shimmer random values from 0 to 75 at 15Hz
  green.shimmer(0, 75, 15, 1);
}
The “flash” effect is done using the HBLED::flash function:
static void ledFlash()
{
  // Flash all LEDs from a value of 255 to 100, frequency 20Hz, infinite duration
  blue.flash(255, 100, 20, 0);
  red.flash(255, 100, 20, 0);
  green.flash(255, 100, 20, 0);
}
Change the volume
Depending on the size of your speaker you may need to modify the audio volume. Do it by modifying the parameter of the Audio.setVolume function.
// Initialize audio
Audio.begin();

Audio.setVolume(5); // <- Add this line here and set the volume level in dB
Audio files
If you want to place the WAV files into a different folder, you have to modify the code. Let’s say you have placed all your audio files in the “font1” folder. You have to add “font1/” everywhere the code mentions a sound file. For example:
// Play a random swing sound (from swing0.wav to swing7.wav)
fx.playRandom("swing", 0, 7);
becomes
// Play a random swing sound (from swing0.wav to swing7.wav)
fx.playRandom("font1/swing", 0, 7);
Useful reading
In this project we have put together many functionality present in the PropBoard API. Here follows a list of the APIs we used for this project with links to every document: