In this guide we will workaround the lack of RTC in the Raspberry Pi by adding an external RTC module: the AK-DS1340 board.
Due to the nature of being an ultra-low cost, single board computer, a feature that is missing on the Raspberry Pi is a Real-Time Clock (RTC).
Why is there no real time clock? The Raspberry Pi is supposed to be always connected through WiFi or Ethernet and to get the current date and time from internet using NTP. On systems where an internet connection is not always possible, the workaround is to install a separated hardware module that counts and keep the time.
This module is often connected to a battery to keep the time while the main power is not present. In this guide we will be connecting the AK-DS1340 RTC module board through I2C to the Rapsberry Pi.
For this guide we’ll be using:
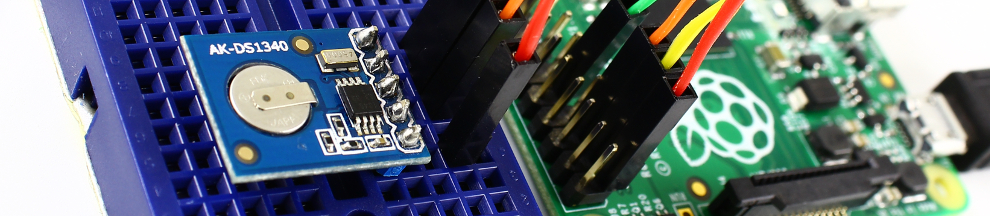
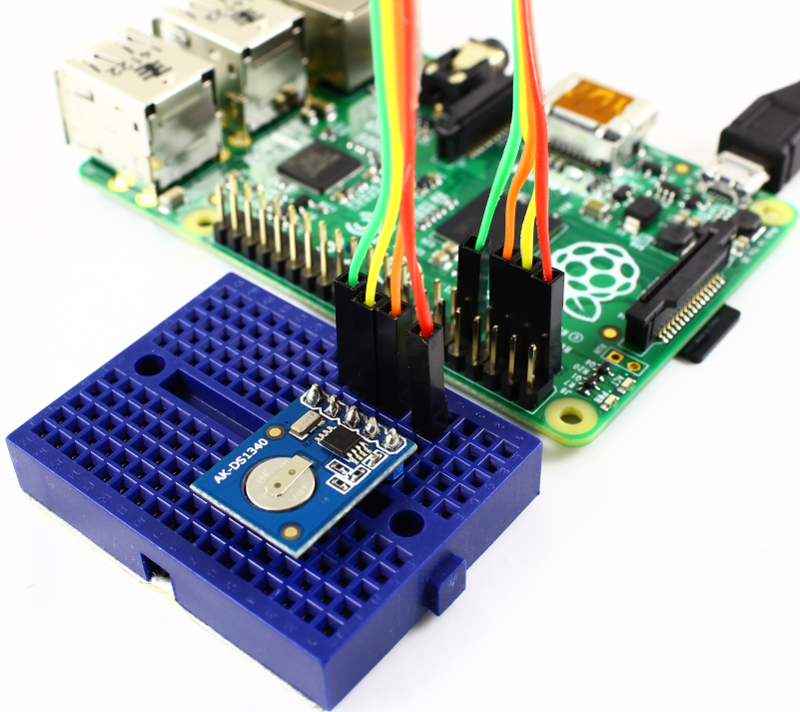
We will be connecting the AK-DS1340 board to the power supply and the I2C of the Raspberry Pi. We use the breadboard, headers and jumper wires for simplicity’s sake, but a direct, wired connection is valid too.
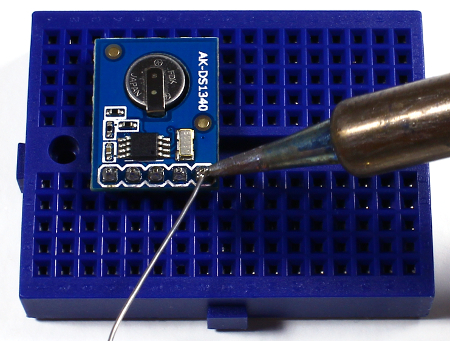
Start by soldering the headers to the AK-DS1340. Cut a 5 pin header strip and place it on the breadboard. On top on the pins place the AK-DS1340 and start soldering!
Now using 4 jumper wires connect everything together as shown here below.
| Raspberry Pi B+ Pin | AK-DS1340 Pin |
| PIN 1 – 3.3V | PIN 1 – VCC |
| PIN 3 – SDA1 | PIN 4 – SDA |
| PIN 4 – SCL1 | PIN 3 – SCL |
| PIN 9 – Ground | PIN 5 – GND |
The AK-DS1340 is 3.3V compatible so there is no need for signal level translation.
First of all, we have to enable the I2C on the Raspberry Pi. If you already have enabled the I2C, this step is not required. Otherwise this guide will explain you how to do it. Also, we will be using i2ctools to test the RTC and enable the trickle charger. If you don’t have the i2ctools package installed, write the following:
sudo apt-get install python-smbus
sudo apt-get install i2c-tools
Now, since the DS1340 is protocol-compatible with the well-known DS1307 RTC, we can use the module that is already included in recent Raspbian distros.
We use the rtc-ds1307 module. Check that is included in your distro by typing in the console:
modinfo rtc-ds1307
Now let’s check if the RTC board is alive and we have connected everything in the right place. We do that by scanning the devices in the I2C bus.
Note that newer V2 Raspberry Pi(s) uses the I2C1 bus. Older V1 Raspberries uses the I2C0 bus. Whenever in this guide you see written “-y 1” or “i2c-1”, and you are using a version V1, replace the “1” with a “0”, for example change “-y 1” to “-y 0”
Type in the console:
sudo i2cdetect -y 1
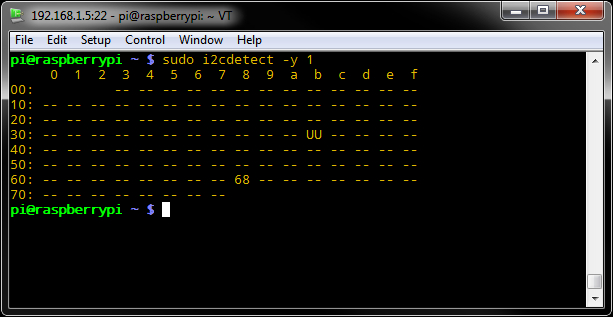
That’s our AK-DS1340 board, with the I2C address = 0x68.
OK, let’s load the rtc-ds1307 module by typing at the console:
sudo modprobe rtc-ds1307
Then type:
sudo bash
echo ds1307 0x68 > /sys/class/i2c-adapter/i2c-1/new_device
exit
Now let’s check the current time in the DS1340 module.
sudo hwclock -r
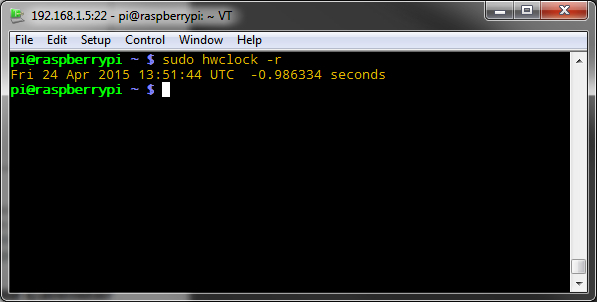
The above command reads the current time from the DS1340 module. Note that if this is the first time you power up the DS1340, the current time may be zero’ed. We set the time by connecting the Raspberry Pi to internet, and wait for the date/time to be updated through NTP (check with the date command). An alternative is to write the current date/time by hand (again with the date command) and then transfer the date/time to the DS1340, like in the image here below:
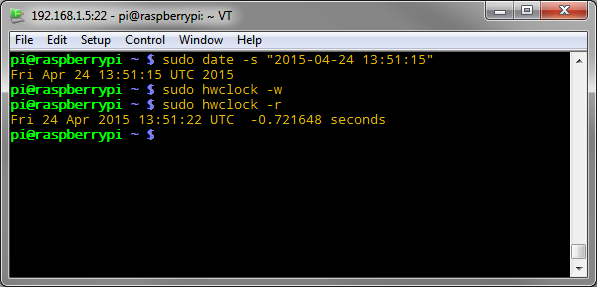
To update the date/time to the DS1340 run the following command:
sudo hwclock -w
The DS1340 includes a trickle charger that charges the little lithium battery when the main power supply is present. The charger is enabled by writing into an internal register through I2C.
Once the above procedure is done and the DS1340 is used for system time, the I2C access to the DS1340 will be locked, so we have to enable the trickle charger before this happens. What we’ll see here is just for reference, but if you want to try it, unload the rtc-ds1307 module by typing sudo modprobe -r rtc-ds1307.
We will use i2ctools to send a command to enable the trickle charger:
i2cset -y 1 0x68 0x08 0xA7
With the above command we write into the register 0x08 the 0xA7 value. 0xA7 means that we enable the trickle charger with no diode and a 4K Ohm resistor, providing ~0.8mA of charging current at 3.3V (check the DS1340 datasheet, page 10, for more details).
While the lithium battery power is good, or the main power supply is present, the value of this register and the date/time will be permanent. If these two conditions are not met, the trickle charger will have to be enabled again with the above command, and the date/time will have to be synchronized again.
Now we’ll put all this info together to enable the DS1340 at startup, so the Raspberry Pi will automatically know the current time even if it’s not connected to internet.
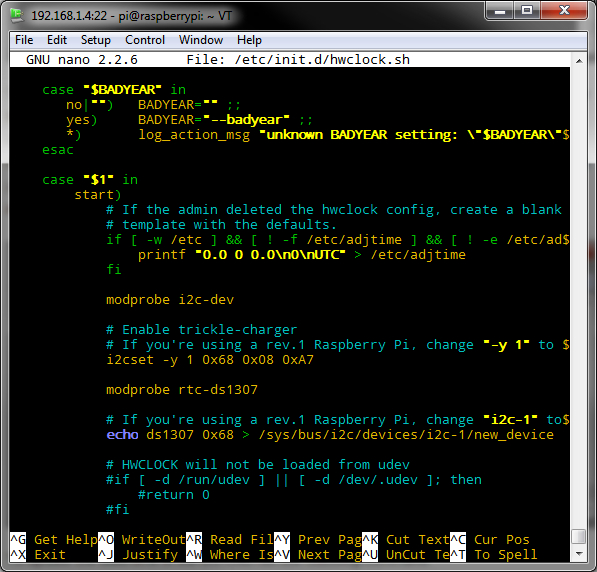
Edit the /etc/init.d/hwclock.sh
sudo nano /etc/init.d/hwclock.sh
Look for the line starting with case “$1” in start) and modify the file as follows:
case "$1" in
start)
# If the admin deleted the hwclock config, create a blank
# template with the defaults.
if [ -w /etc ] && [ ! -f /etc/adjtime ] && [ ! -e /etc/adjtime ]; then
printf "0.0 0 0.0\n0\nUTC" > /etc/adjtime
fi

modprobe i2c-dev

# Enable trickle-charger
# If you're using a rev.1 Raspberry Pi, change "-y 1" to "-y 0" in the following line
i2cset -y 1 0x68 0x08 0xA7

modprobe rtc-ds1307

# If you're using a rev.1 Raspberry Pi, change "i2c-1" to "i2c-0" in the following line
echo ds1307 0x68 > /sys/bus/i2c/devices/i2c-1/new_device

# HWCLOCK will not be loaded from udev
#if [ -d /run/udev ] || [ -d /dev/.udev ]; then
#return 0
#fi
As you can see, we also enable the trickle charger at every start up.
Here there is an screenshot of how the file should look like after the modifications:
Now the following lines will update the hwclock initialization script with update-rc.d and remove the fake hwclock driver so we will use a real one.
sudo update-rc.d hwclock.sh enable
sudo update-rc.d fake-hwclock remove
sudo apt-get remove fake-hwclock
sudo rm /etc/cron.hourly/fake-hwclock
sudo rm /etc/init.d/fake-hwclock
Since we are accessing the console through SSH (Ethernet), we have to be sure we are getting the time from the DS1340 and not from some NTP server somewhere in the network. A good and definitive way to test it is completely removing the NTP. Run:
sudo apt-get remove ntp
If by the next time you reboot the Raspberry Pi the current date/time is still there, congratulations, you have successfully installed a hardware RTC!
That’s all! Here is the RTC datasheet if you want to learn more about the Maxim DS1340.
Enjoy your “time” with the AK-DS1340 board and the Raspberry Pi.
The Artekit Team.